Inspections, control works
Introduction
The document describes, in the form of examples, the management of the periodic inspection process within a given enterprise. Depending on the requirements, the machine park and fixed equipment require periodic inspections and inspections. The system makes it easy to schedule the execution of such activities, keeps track of performance periods and reminds you of deadlines. It also monitors device parameters, e.g. operating hours, and generates inspections based on them. Templates of such performances may contain a series of questions, measurements and tasks to be performed on individual devices. All operations are performed fully digitally on mobile devices, whether by plant employees or external subcontractors
Prepared data
This tutorial requires you to have properly prepared starting data. Inspections are performed on specific resources (devices, machines) or by selecting locations (for virtual inspections). All this data should have been created or imported beforehand. This tutorial does not cover this information and you should refer to the user documentation or other tutorials.
Mechanism for carrying out control/inspection work
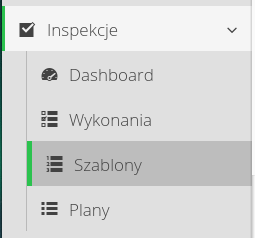
Inspections in the main system are available in a separate section that includes four views related to inspections:
-
Dashboard - a view of the graphic panel for analyzing the progress of ongoing works
-
Executions - a list of inspection executions that we perform. This is actual and commissioned inspection work.
-
Templates - inspection templates that allow you to define a set of activities (checklist) to be performed
-
Plans - inspection plans used to determine the schedule of planned inspection work. This is a list of potential work to be done, resulting from defined rules. Audit executions can be generated from these plans.
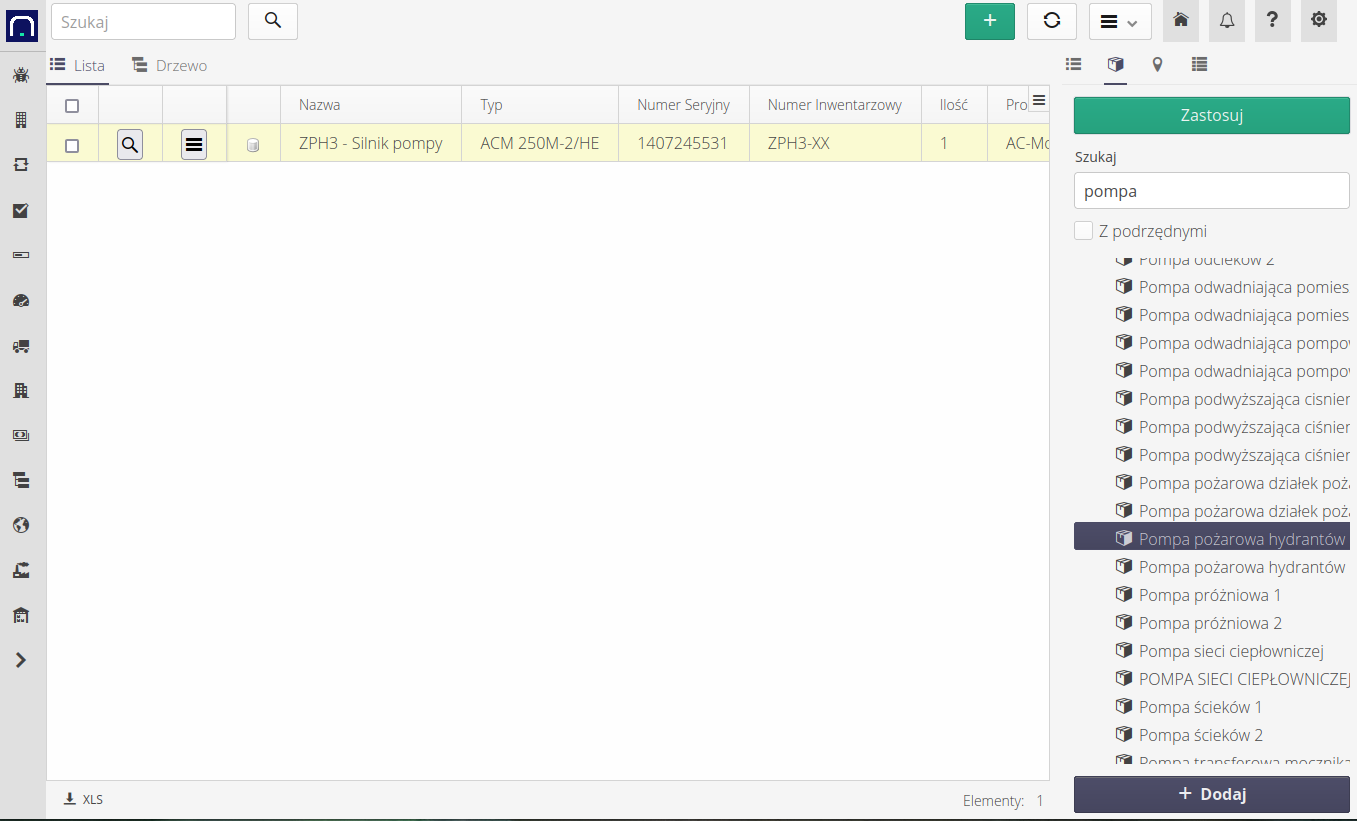
Device structure and parameters
The imported resource structure data contains information about all resources. Here, after selecting the appropriate filters, we get one resource for which we can generate an inspection.
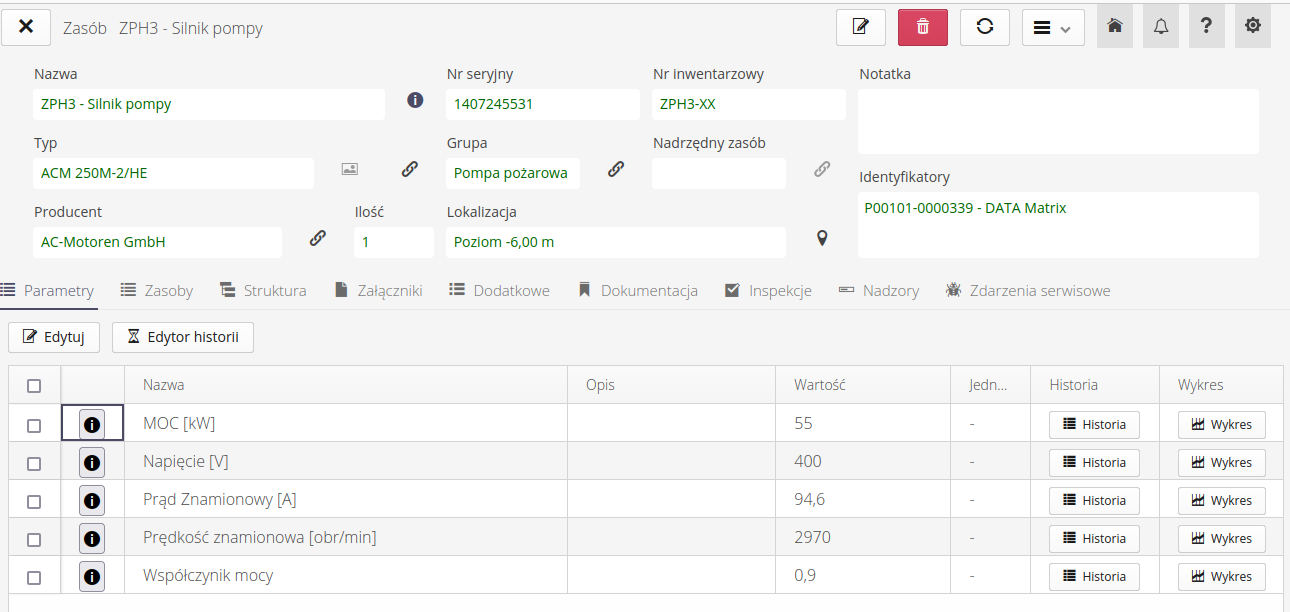
Each resource can have definable parameters. In this case, this resource has several parameters related to the electrical parameters of the device. These parameters can be used during inspections as data to verify the measured measurements. This will be explained with examples in a later step.
| Resource data and their parameters can be created manually or imported from external sources such as XLS/CSV sheets. |
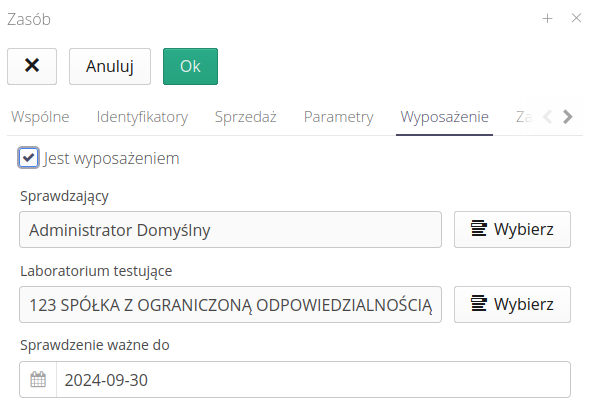
In the case of inspections, the measurement device and calibration information are often required in addition to the measurements. We can achieve this by defining a new resource and in its settings specify that it is a measuring device and indicate the date of calibration and other parameters of such a device.
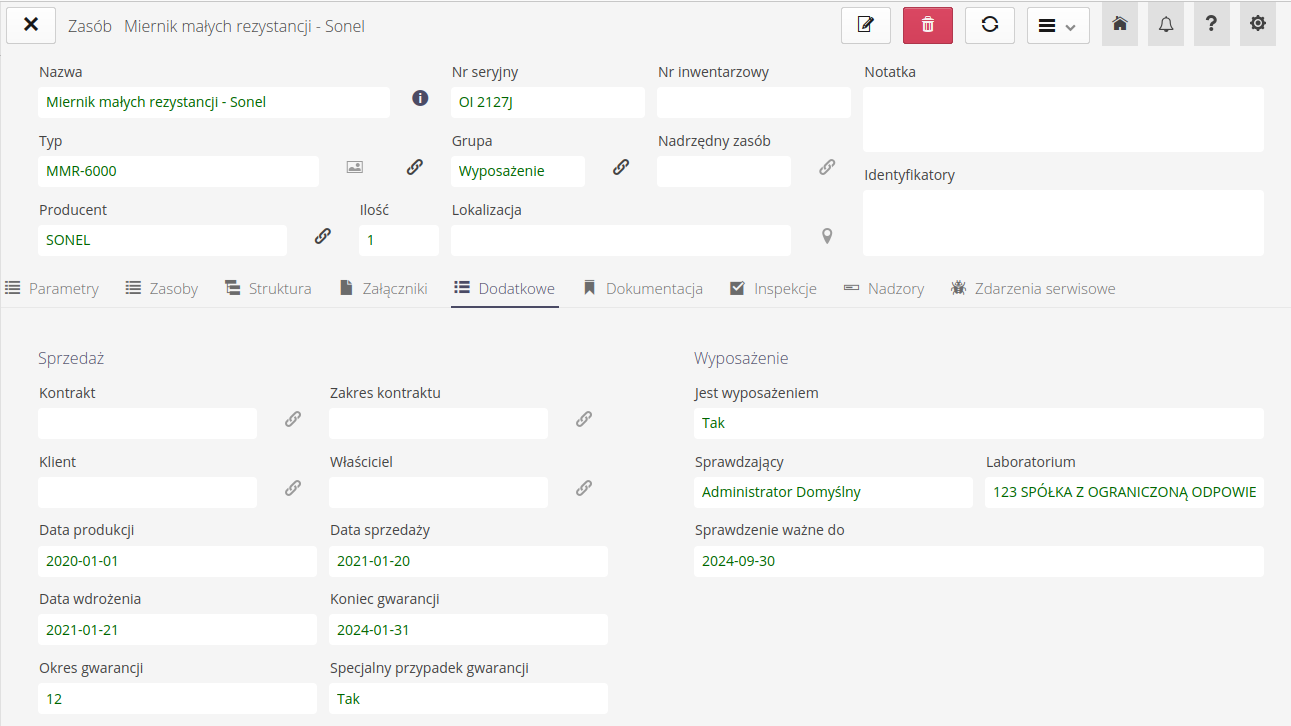
We specify it in the edition of the resource in the "Equipment" tab, indicating that the given resource is equipment and specifying the validation parameters.
After this introduction, we have all the data and facilities available to plan and perform inspections.
Audit template definition
First, we define the inspection template. A template is a set of rules and actions to be performed as one set of operations. These elements may result either from normative requirements (national or international standards) or from internal arrangements.
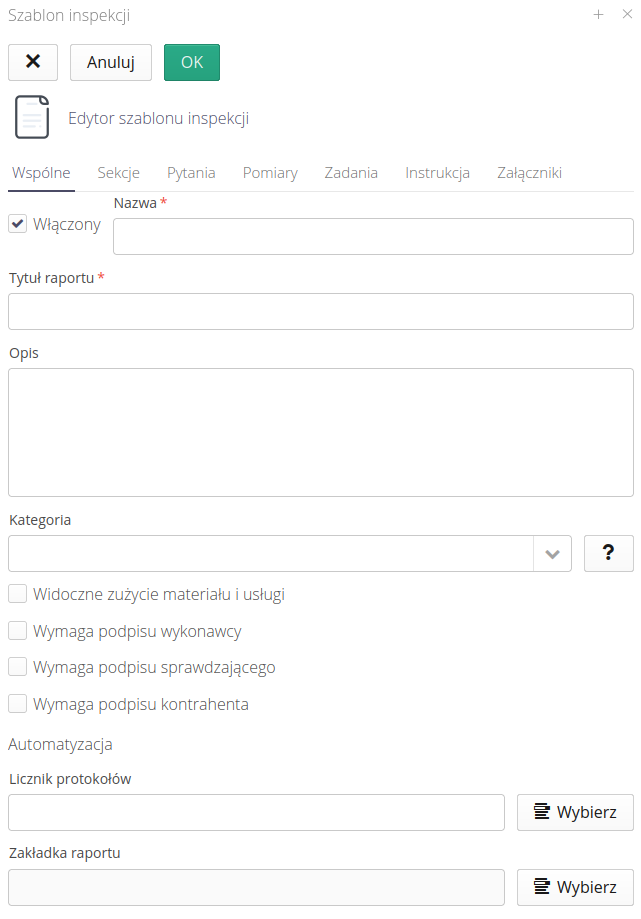
The template is defined in the template view. We create a new template. The template definition window appears. It is divided into several parts separated by tabs.
General information:
-
Enabled - activates the inspection template for use in other inspection items
-
Name/Description - the name of the inspection available to users in the system
-
Report title - the title of the inspection that is available in the report
-
Category - a category that allows you to group inspection templates, e.g.
electric,mechanical -
Visible consumption of material and services - whether tabs should be visible during the inspection allowing for the introduction of materials from the warehouse and additional services, e.g. external costs
-
Requires contractor’s signature - forcing the contractor’s signature
-
Requires a verification signature - enforces a verification signature (during the inspection verification procedure)
-
Requires the contractor’s signature - forcing an additional signature and specifying the name of the contractor’s representative (ordering party/customer)
-
Protocol counter - selected automatic protocol counter for assigning a number during the inspection
-
Report tab - default report tab, to be used when generating reports, e.g. containing client logos or a specific appearance
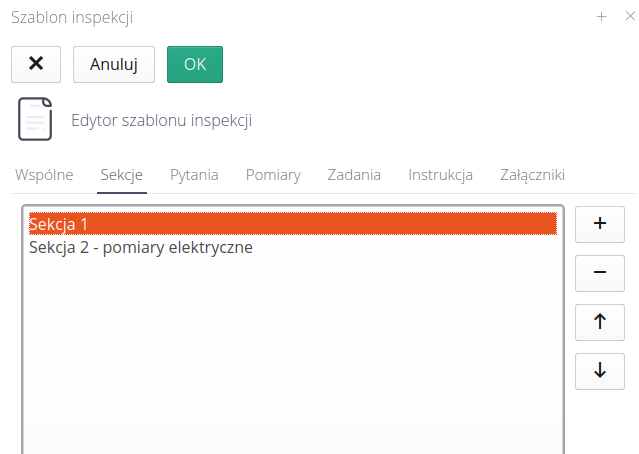
Inspection sections allow you to divide questions/measurements into sections, e.g. question/measurement areas.
Questions
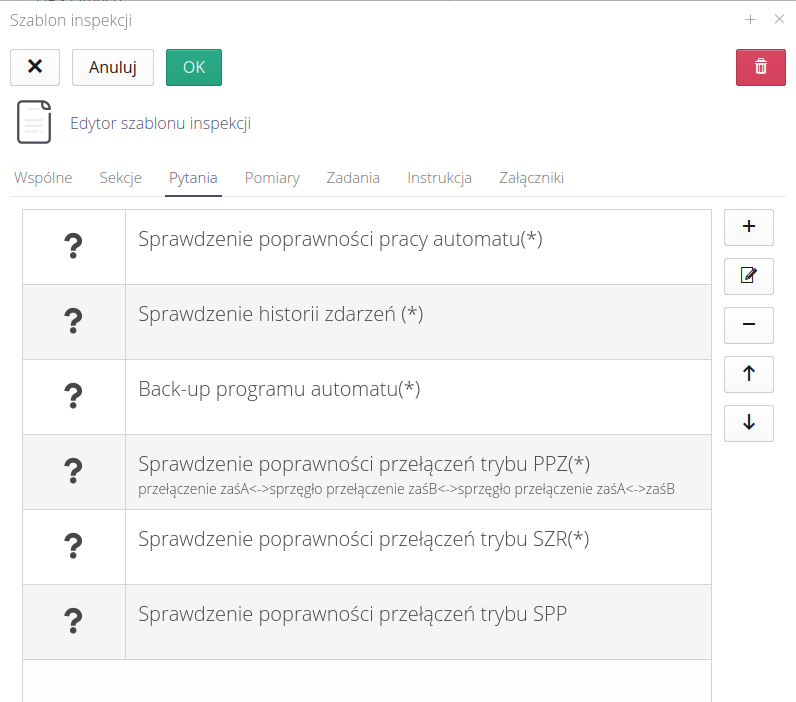
A list of questions is a list that builds a checklist consisting of actions that require an answer to a specific question. As in the given example, these can be questions such as "Checking the history of events" with a yes/no answer, but also questions such as "Is the device working properly?" or "Indicate the operating mode of the device", which will contain more than two "yes/no" answers.
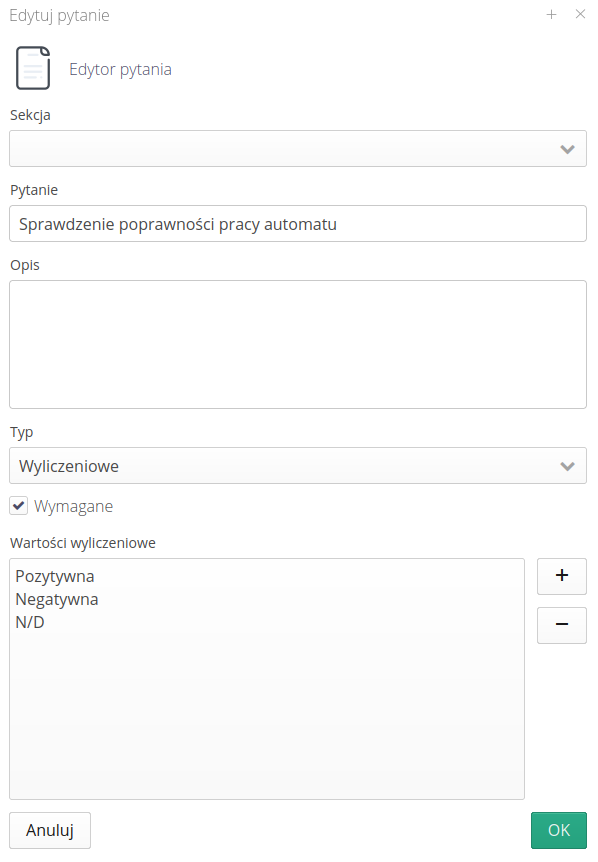
The question editor allows you to specify this element. It contains the following fields:
-
Section - The section to which the question belongs, if we want to group them
-
Question - Content of the question
-
Description - An additional description of the question that will help you understand the intention
-
Type - is the question a simple question to which we will answer
Yes/Noor do we need a definable list of answers -
Required - whether the answer to this question is required to close this inspection
-
Enumerated values - list of answers for the
Enumeratedquestion type. These can be `Correct\Incorrect\To be explained' answers or any other list of answers.
Measurement
The second list of action items in an inspection is a set of measurements. Measurements are clearly elements that must have a numerical answer, i.e. a specific information value. The system allows you to define any number of measurements and then helps in their acquisition during the inspection. We can add/edit/remove measurements from the list and change their display order.
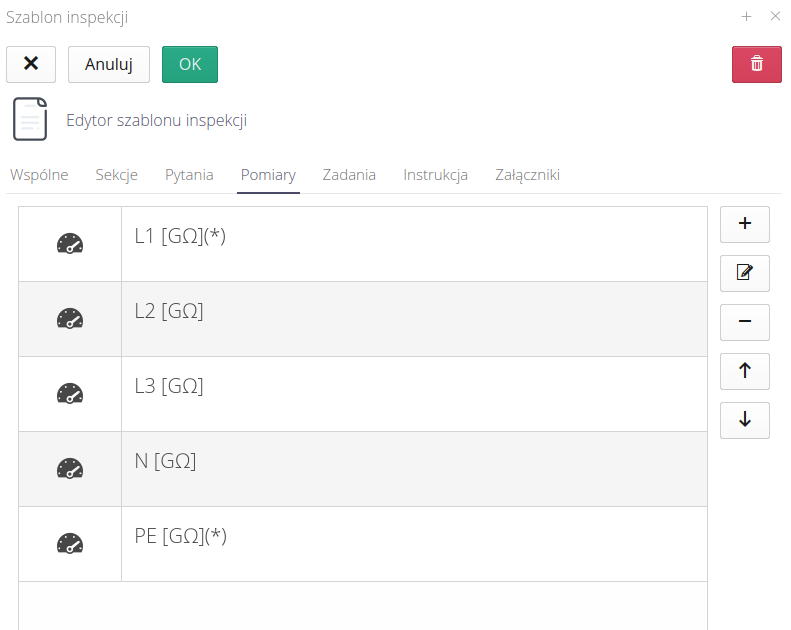
The editor of a particular measurement consists of two sections. General measurement information such as:
-
Section - The section to which the question belongs
-
Name/Description - Name and detailed description of the measurement
-
Unit - unit of measurement
-
Required - Flag whether the given measurement is required to complete the inspection.
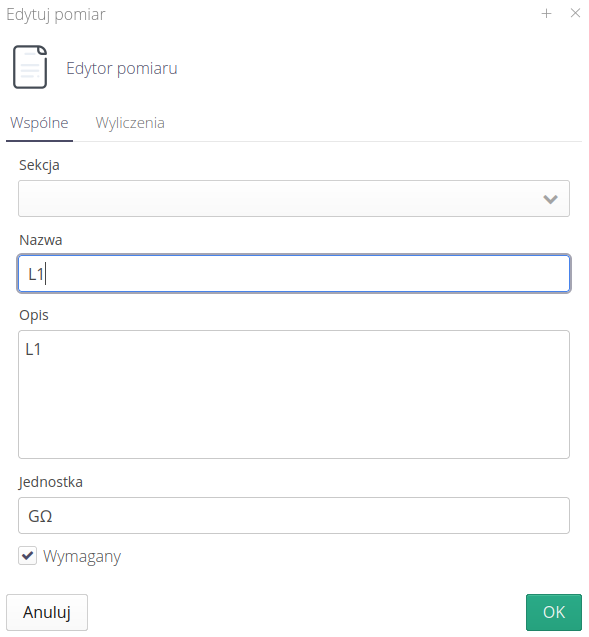
The second section contains information that allows you to verify the correctness of the measurement. While entering the measurement during the inspection, the system can verify the correctness of this measurement, additionally facilitating the work of the persons performing the inspection. This allows you to avoid simple errors and mistakes, but it can also indicate a potential problem with the device being inspected.
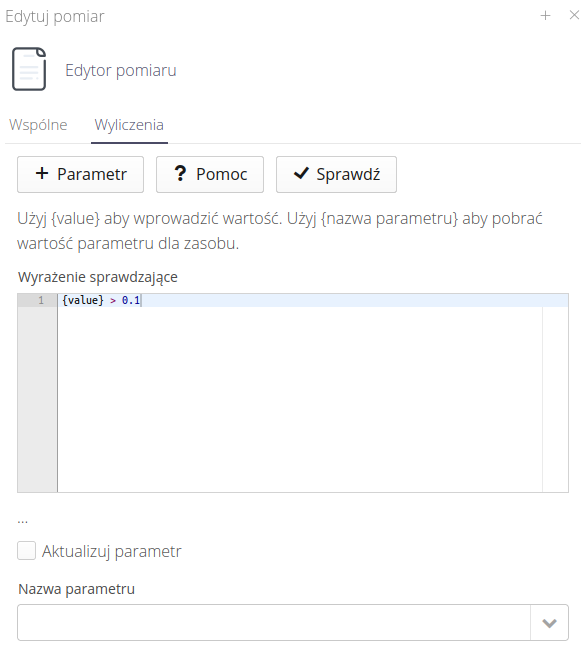
This section allows you to define and verify check equations.
-
Add parameter - allows you to add a parameter from the parameter list of any device. Once selected, the given parameter will be entered into the edit field at the current cursor position.
-
Help - the documentation page of the math engine that is used to validate equations will be displayed. There you can learn about the possibilities, functions and operators of the equation.
-
Check - checks the equation by assigning the number 1 to the template value. Allows you to check the correctness of the equation.
-
Checking expression - an expression in which the value entered by the user will be the
{value}template and the remaining elements will be verified according to mathematical equations. The result of the equation is to be YES/NO. For example, the equation{value} > 0.1will have the value YES when the value entered by the user is greater (sharp inequality) than 0.1. -
Update parameter - additional flag that will update the parameter in the device subject to inspection after the inspection
-
Parameter name - name of the parameter that will be updated. ATTENTION. this parameter must exist on the device before the inspection can be performed. The inspection itself will NOT create any additional parameter.
Tasks
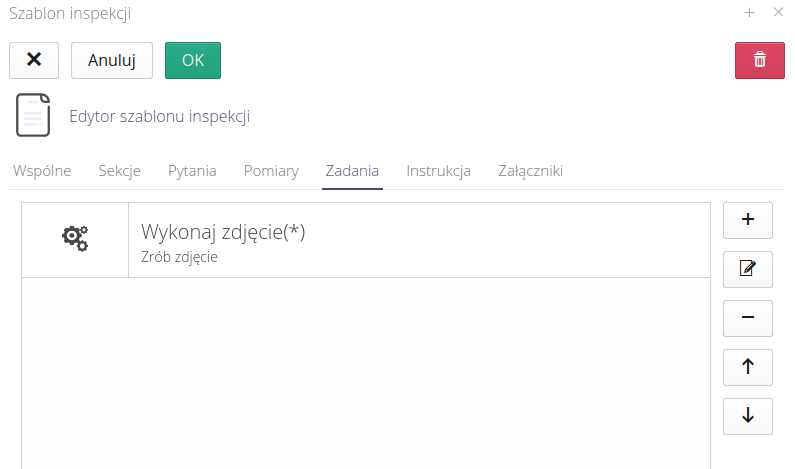
Tasks allow you to define additional activities to be performed during the inspection. Sometimes the employee is expected to perform additional activities during the inspection. These additional steps will be part of the inspection. These can be:
-
Taking a photo/photos - if we want to have additional photographic documentation and not forget about it. For example, a photo of the device before and after the inspection, which also includes cleaning the device. This greatly facilitates the remote verification of works during the verification procedure
-
Scan ID - allows you to force the ID to be scanned, e.g. an RFID tag mounted on the device. This task will clearly indicate that the inspection was performed in the vicinity of this device and not in the privacy of the office.
-
Upload file - if we need to read, for example, configuration files of the controller, inverter or other data during the inspection, which would be good to have saved in electronic form in the central system
Editing the task template allows you to specify these types of tasks. We can add/edit/delete tasks or change their order.
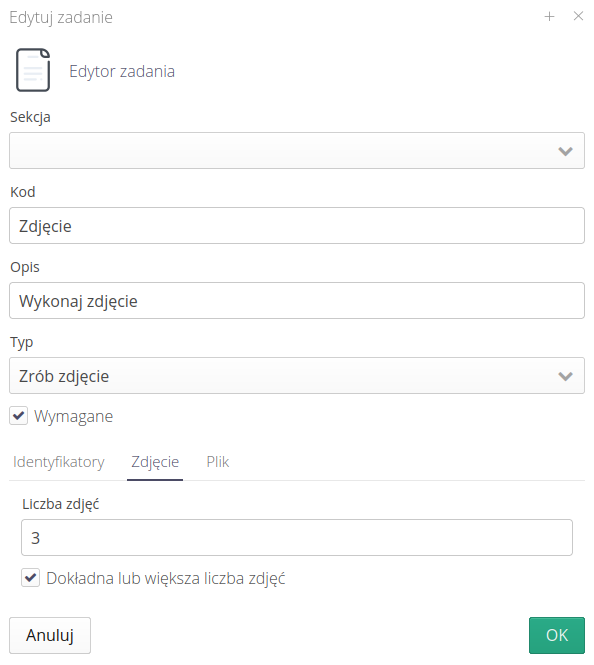
The task editor allows you to specify the fields and values of a given task. Available properties:
-
Code - task code. To be used, for example, in reports. This is an internal task designation, e.g.
device_pictures -
Description - description of the task visible to the user, e.g.
Take two photos of the device before and after the inspection -
Type - Job Type: Take Photo, Scan ID, Save File
-
Required - whether the task must be performed for the inspection to complete correctly
In the case of code scanning, we can additionally specify the type of required identifier. This allows you to force a specific type of identifier even if the device has two types of identifiers - RFID and a printed QR code.

-
Identifier type - QR code, RFID or other.
In the case of a photo task, we specify the number of photos and we can mark the flag that at least the given number of photos must be taken. Otherwise, the number will only be a suggestion.

-
Number of photos - number of photos to be taken
-
Exactly or more photos - Explicitly force at least this number of photos
For the Upload files task, we define the same parameters as for photos.

-
Number of files - number of files to be uploaded
-
Exactly or more files - explicitly forcing at least this number of files to be uploaded
Other
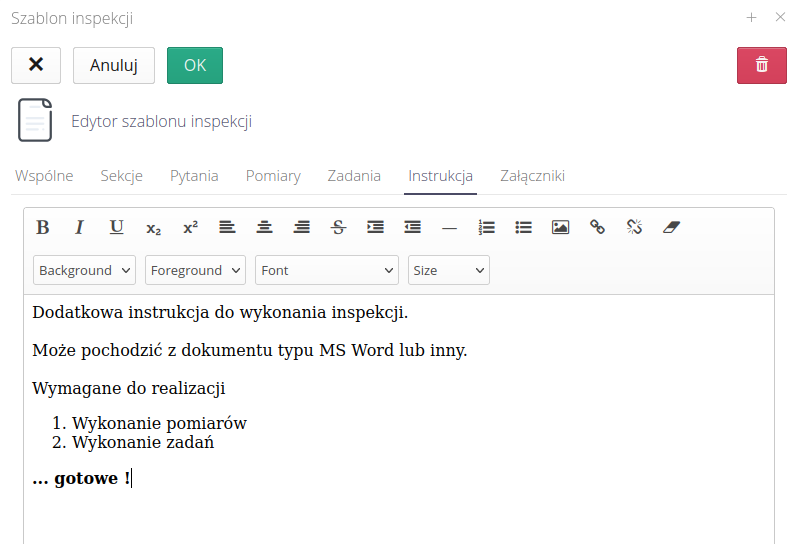
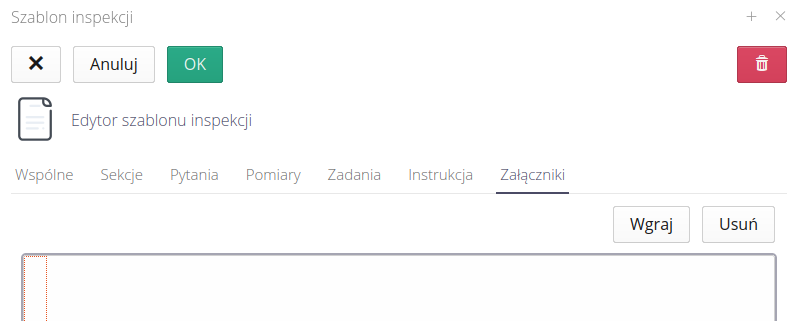
In addition to the inspection template, we can add documentation of the inspection in the form of an editor or a list of attachments, e.g. device manuals with a section on performing this type of inspection.
Summary
After saving the inspection template, we can proceed to the stage of their use. We can do this in two ways. To explicitly and explicitly trigger the execution of a given inspection for specific resources/locations or to specify the rules according to which these inspections should be performed.
Inspection schedule/plan
The schedule/inspection plan allows you to define rules that will allow you to periodically perform and remind you to perform such activities. Using inspection templates, we defined what should be done. We will use inspection plans to determine when this should be done.
Schedules are defined in the section called Schedules in the main menu. After displaying it, we get a view with several tabs and main actions to be performed.
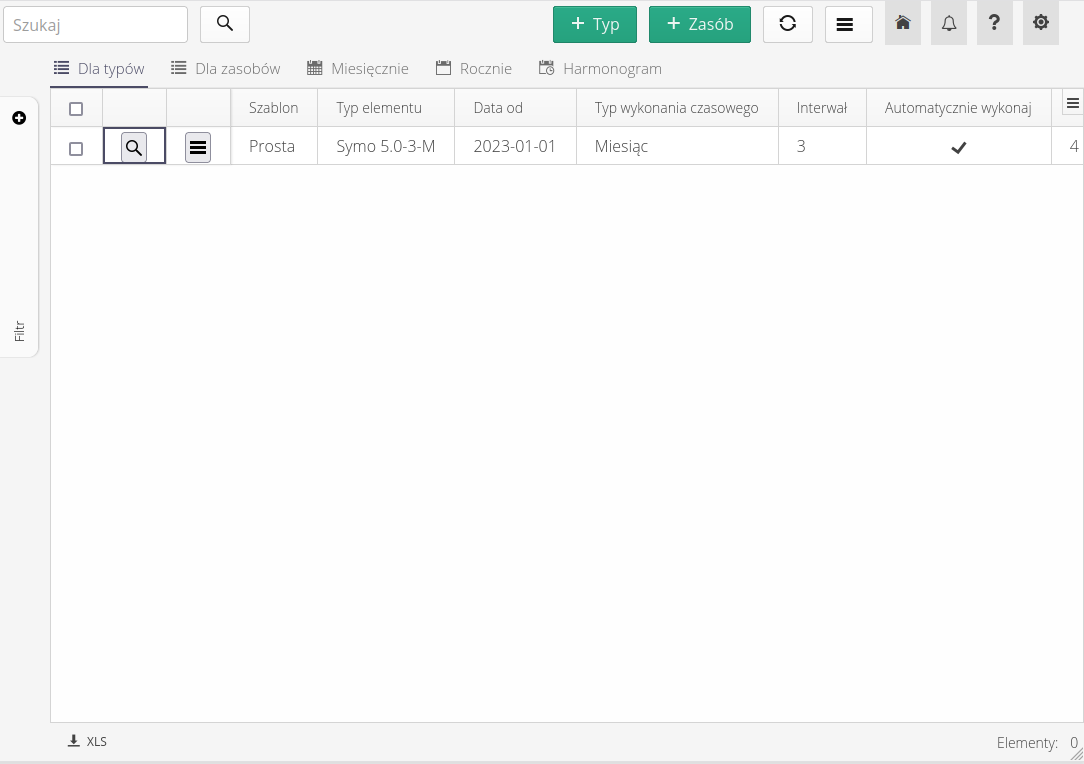
Importantly, AMAGE/AMAGE24 distinguishes between two types of schedules. Depending on the scope of the review, we use one of them. However, in the end, we perform inspections for a specific device.
Schedule types:
-
For types - if we want to define an inspection plan for all devices of a given type, e.g. all
Sivacon S8switchboards or all X-type motors. Then we use this mechanism. Once specified, the schedule will be applied to all resources in the structure of a given type. -
For resources - if we need to specify an inspection schedule for a specific resource, e.g. a given engine, due to the place of installation and the way it is used, must be checked against a different schedule than other engines of this type. Then we use this type of inspection plan definition.
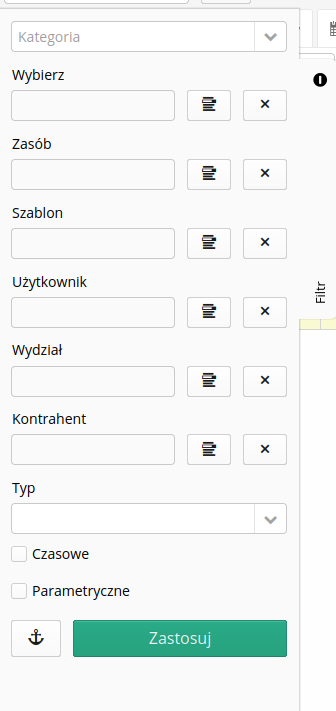
To enable filtering, of course, an additional, detailed filter is available, with which we can additionally filter plans.
For each schedule (after its creation) we also have a context menu available that allows you to perform basic operations.
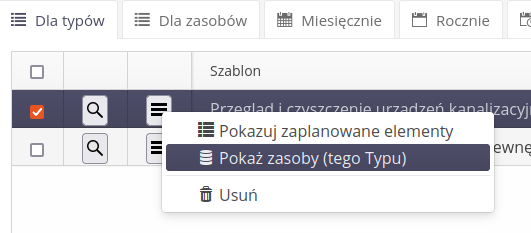
-
Show scheduled items - shows a list of scheduled items with the option of specifying the date range to be displayed
-
Show resources (of this type) - shows resources of a given type for visual verification which devices will be subject to this inspection
-
Delete - delete the plan
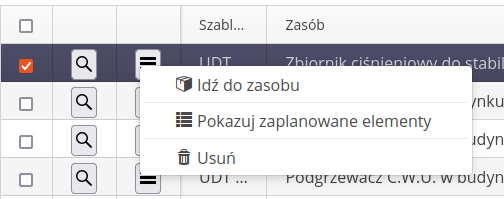
-
Go to resource - goes to the resource details view
-
Show scheduled items - shows a list of scheduled items with the option of specifying the date range to be displayed
-
Delete - delete data
The inspection plan view is additionally divided into several tabs.

-
Definition for resource type - here we define the inspection plan for types (groups of devices)
-
Definition for a specific resource (device) - here we define a plan for a specific resource
-
Monthly/Yearly - view the generated inspection plans in the context of months or years. They indicate the days when inspections should be scheduled
-
Schedule - a schedule of inspection plans in the form of a tree indicating plans for date ranges - this week, next, etc.
Inspection plan definition
After invoking the action to create an inspection plan, in the first step we indicate which resource or type will be covered by this inspection plan. Next, the plan definition window is displayed, divided into three parts.
The first part is basic data about the plan
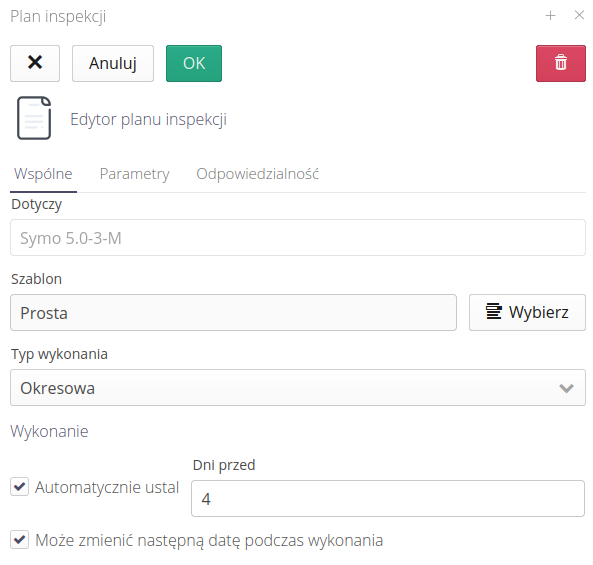
-
Applies to - informative data specifying what type of data (resource, type) we have chosen to create the plan.
-
Template - selected inspection template that will be applied during the inspection
-
Execution type - periodic/commissioning/event/round - depending on the source in the system, the inspection will have a given type. It allows you to generate an inspection from machines or manually. Normally, during the plan, we select a periodic inspection and specify how to trigger it according to the time interval.
-
Execution - the inspection plan does not automatically generate the inspection execution. In the case of periodic inspections, it would even be inadvisable, because assuming a weekly period, we would display at least 52 inspections per year to the responsible user. In this case, we may determine that X days before the scheduled audit is actually performed, it will be created and assigned to you. This allows you to limit the visible inspections in the to-do list to only those that are to be performed soon. Depending on the time necessary to prepare the inspection (gathering materials, subcontractors), you can change this number of days.
-
Can change the next date during execution - an option that allows you to change the date of the next inspection during its execution. This is important in the case of inspections of, for example, external inspection bodies (in Poland, UDT), which during the inspection determines the date of the next inspection, and it may be accelerated or delayed. Enabling this option will allow you to change the date directly during the inspection.
If the option may change the next date during execution is set, the system will not automatically generate the first inspection and will not show it in the schedule. Order the first inspection manually and set the next due date during execution.
|
The next tab is the definition of the schedule for calling this plan based either on the calendar or on the selected parameter of the resource, e.g. motor hours.
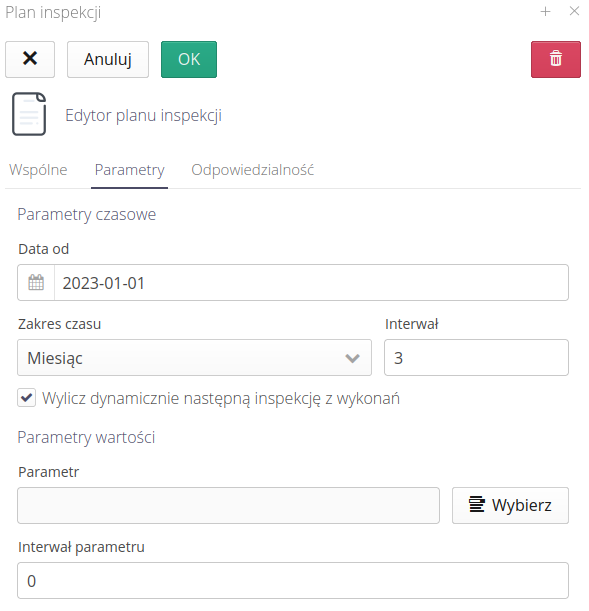
-
Time schedule - define a schedule based on time. We specify the date (daily, monthly, yearly), start and end dates (may be inactive) and the interval of how many elements the inspection is to occur, e.g. every 3 weeks.
-
Parametric schedule - the parametric schedule requires indicating the parameter against which the data difference and the interval will be calculated. For example, select the
Motor hoursparameter and set the value to 100. This means that the inspection will be generated if the value of theMotor hoursparameter changes by more than 100 values (here hours of operation) since the previous inspection.
| In the case of a parametric schedule, the first such inspection should be ordered manually so that the parameter value is saved and the necessary inspection interval is calculated from it. |
Format parameters:
-
Date from - start date of calculation
-
Time range - interval type (day, week, month, year)
-
Interval - every how many elements of the time range, e.g. every 3 weeks, every 15 days
-
Dynamically calculate the next inspection from executions - Enabling this option allows dynamic calculation of the time of the next inspection in relation to the last execution. For example, if this option is not enabled and the time is set every 1 month, the inspections will be scheduled exactly every 1 month. If we enable this option, then the next inspection will be scheduled exactly 1 month from the last inspection, i.e. if it is performed by an employee 5 days earlier, then another month will be calculated from this date instead of the date of the theoretical plan.
-
Value parameter - the parameter against which we calculate the interval
-
Parameter interval - the interval for which we will set the next inspection date
The last section of the plan definition is identifying those responsible for its implementation.
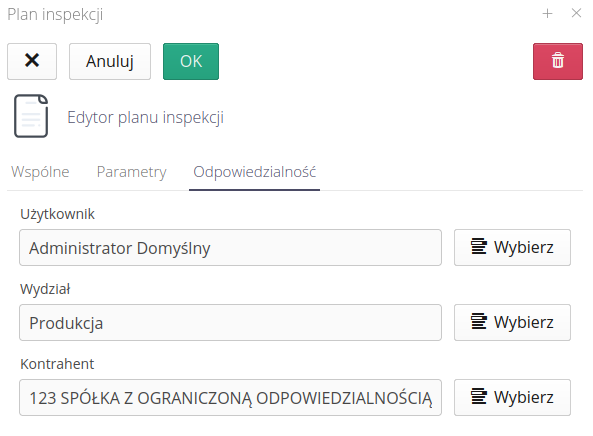
-
User - A specific user who is responsible for execution. Only in this case we can generate specific messages about inspection dates/assignments.
-
Department - indication of the responsible department. In this case, we cannot immediately establish an execution plan for a specific person, but we can view the data.
-
Contractor - indication of an external contractor who will perform such an inspection
Determining the execution of inspections on the basis of a schedule
After defining the template and the plan, we can visualize the deadlines and manage the inspection. We can do this in two ways:
-
Automatically according to time - prepare inspections automatically according to planned dates or parameters (motor hours)
-
Manually - determine the performance manually and assign it to the appropriate people.
After preparing the plans, we can see the scheduled inspections on the calendars. In the form of a monthly or yearly view.


When you select any day or range of days, a window appears that displays all scheduled inspections for that day. We can perform specific operations on each inspection.
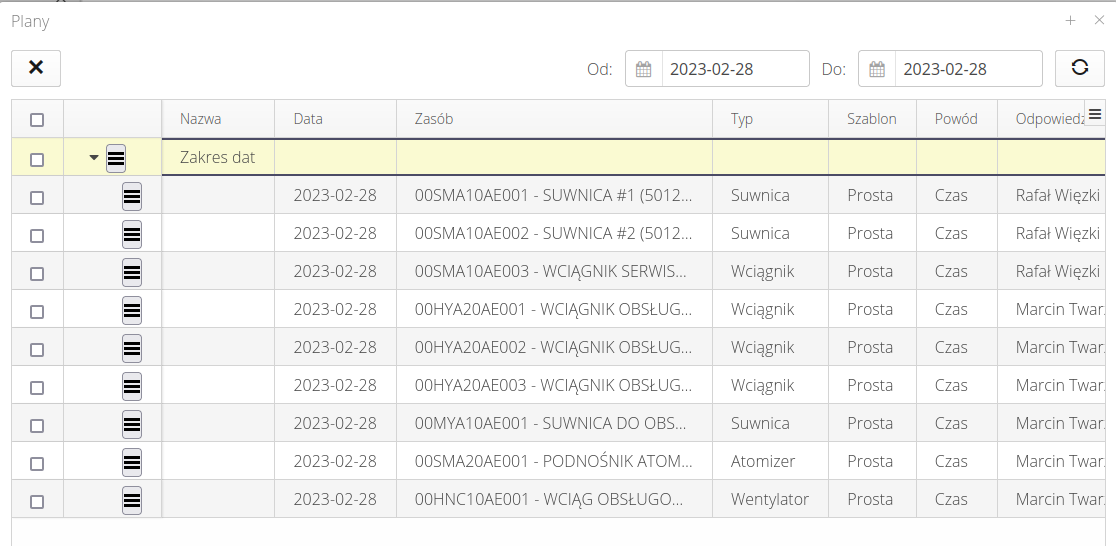
The Execution Schedule shows the audit plan divided into date ranges. Dates are shown - this week, next week, end of month, next month. Inspections according to parameters are grouped separately, e.g. after exceeding the defined operating hours. We can also manually change the date range and display planned (and historical) inspection plans according to the selected range.
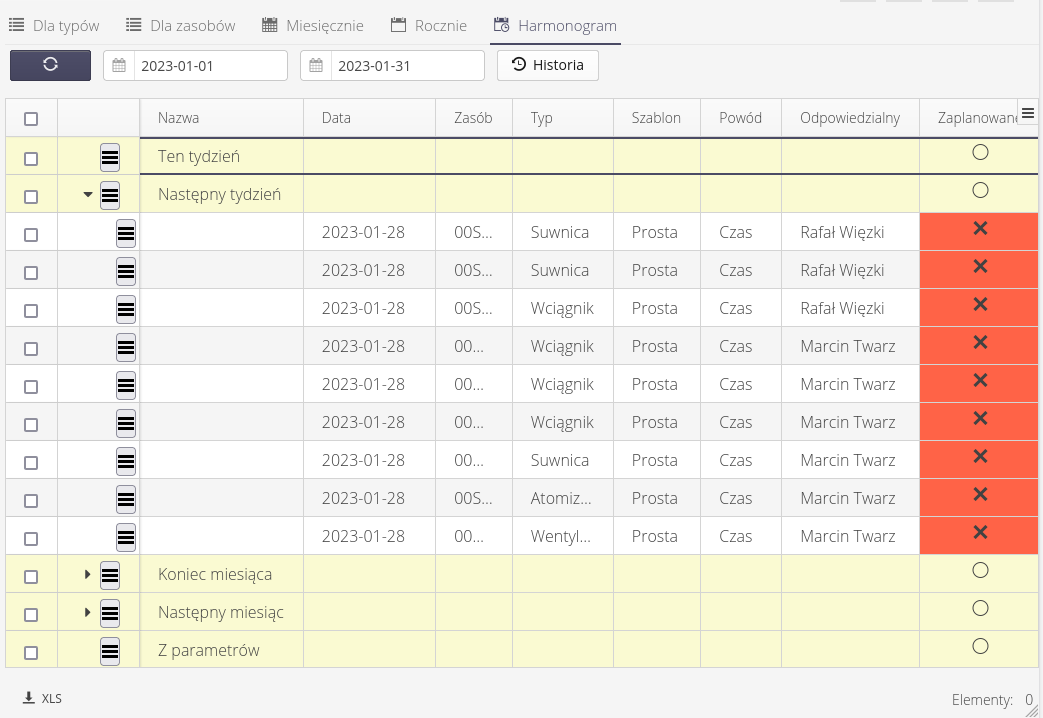
We can perform specific operations for each entry.
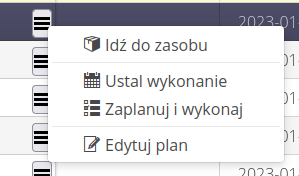
-
Go to resource - goes to the view of the resource to which the inspection plan applies
-
Set execution - schedule execution - assign people and verify execution
-
Plan and execute - plan and immediately go to execution. Marks the active person as performing. This action is useful when a plan is assigned to you and you want to perform it immediately and enter information directly from the desktop view.
-
Edit plan - edit inspection plan - displays an edit field that can change the schedule.
manual order
We can do it directly from the plan view. We can also trigger the inspection manually. Each of these operations will bring up the inspection execution definition window.
To invoke (add) an inspection execution manually, we can go to the execution view and select one of the inspection invocation actions:
-
(+)- creates an inspection assigned to a resource -
(+) Bulk- creates an inspection assigned to multiple resources and a specific location

If we choose a virtual type, we must additionally select locations (many) for which inspection plans will be created.
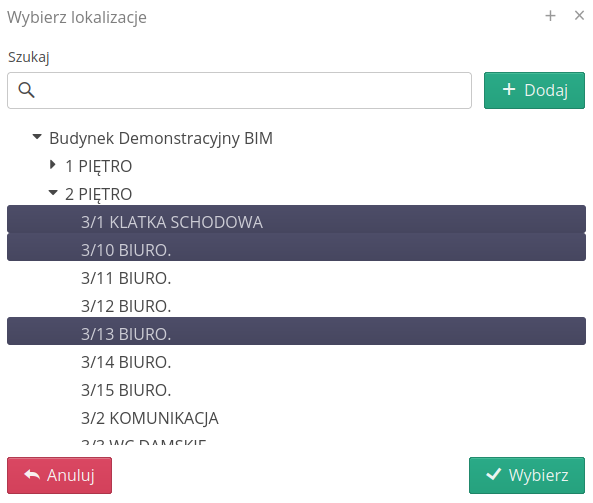
Determination of execution
Whether we call the inspection determination directly from the plans view or manually in the execution view, a window appears in which we can determine who will be responsible.
Here we add:
-
Inspection template - if we invoke manual addition. If from the plan, the template is already set
-
Assigned - the person responsible for the inspection
-
Checked by - the person responsible for verification of performance
-
Work order - optionally assigning an inspection to a work order (if the work order module is active)
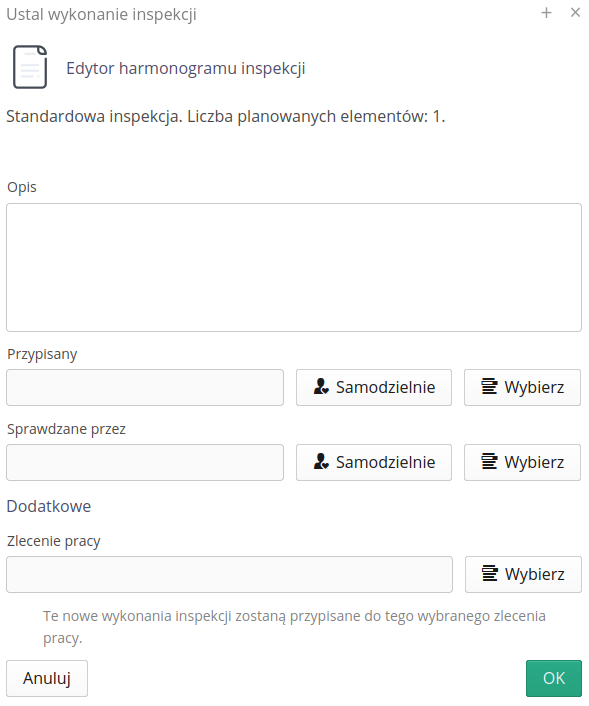
After determining the execution, the system generates a task in the inspection list assigned to a specific person to perform it. In the plans view, we can view whether a given inspection has been planned and whether it has been performed in accordance with the order.
Executing inspections
To perform the inspection, the employee launches the mobile version via the AMAGE Shell application. The app can be configured to use a launchpad with quick action buttons. An example view is shown below.
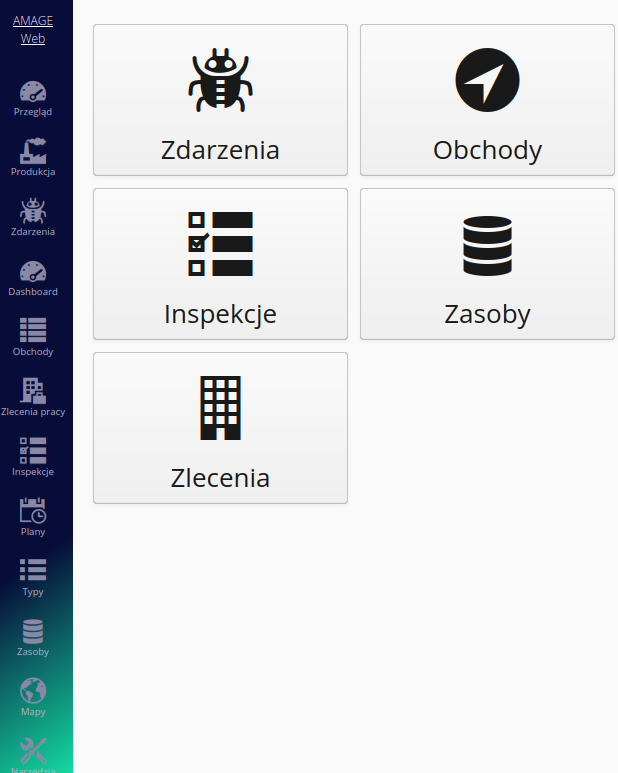
| You can configure the start panel yourself in the configuration section. Refer to the user manual on how to do this. |
We go to the inspection list. The view is divided into tabs showing inspections assigned to the logged in person.
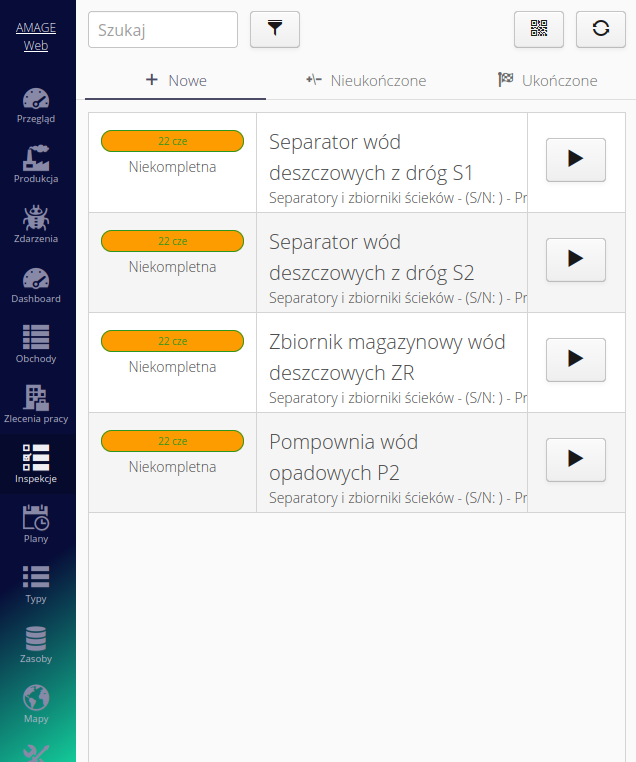
-
New - new inspections that have not yet been started
-
Not Completed - Inspections in progress but not completed
-
Completed - inspections completed
Pressing the Filter button displays additional filtering options.

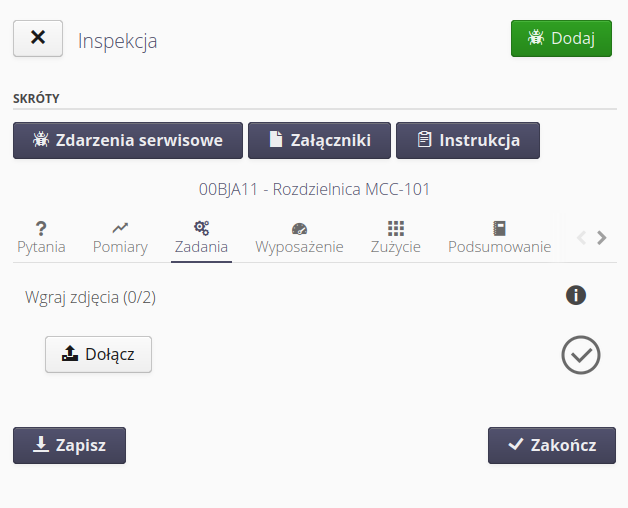
Selecting any inspection will take us to the execution view. In it, we have tabs for questions, measurements, tasks to be performed. Shortcuts allow us to go to attachments, manuals or related service requests (if the module is active).
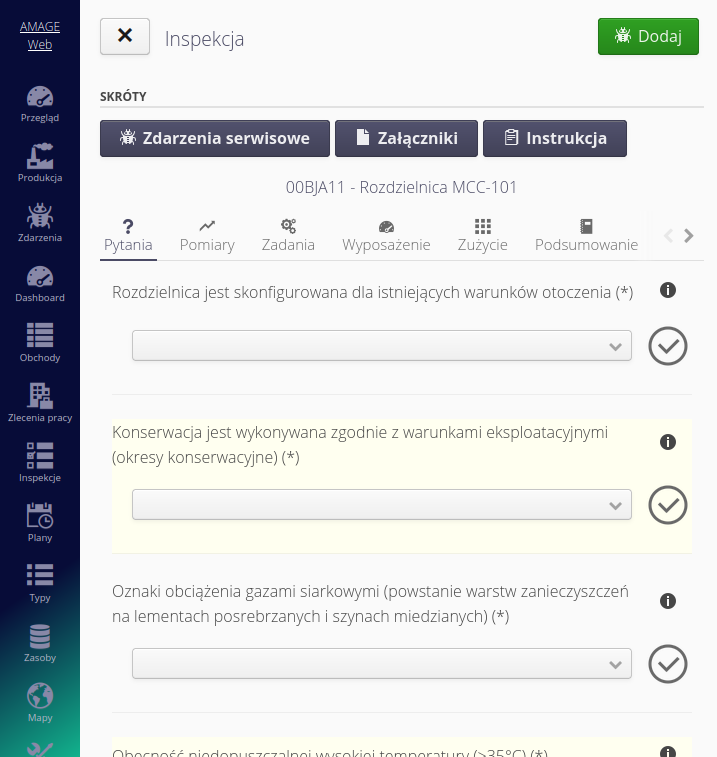
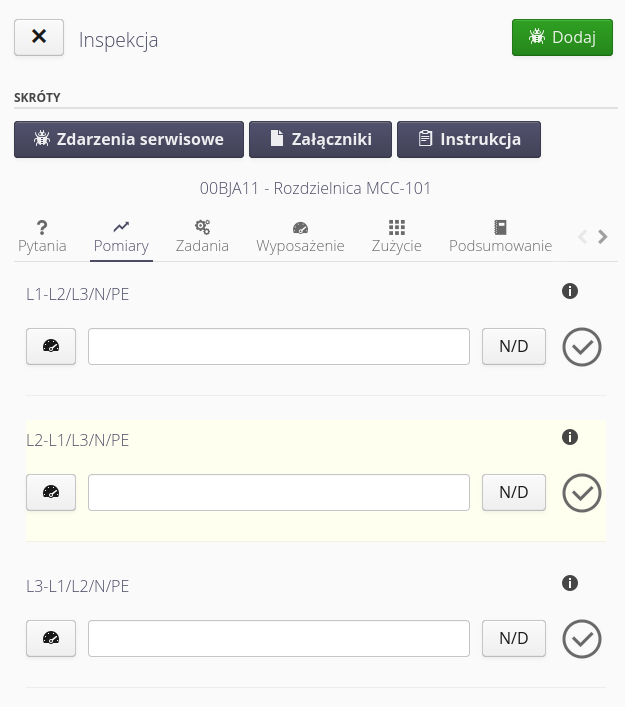
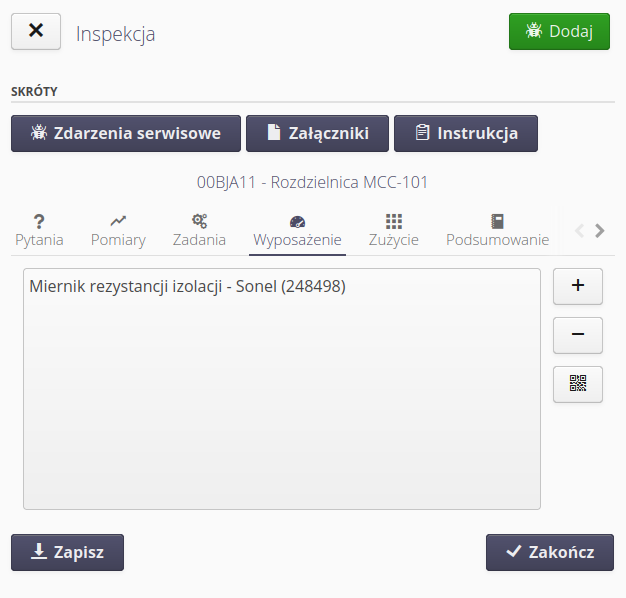
The view of measuring devices allows you to select equipment defined in the system that will be used for measurements (multimeters, etc.). It will then be displayed in detailed reports.
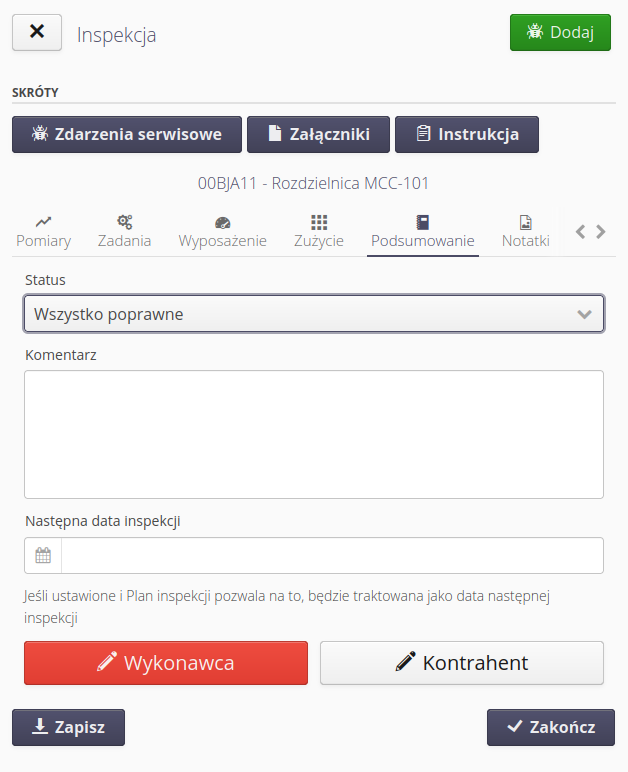
The summary view allows you to determine the execution status - after that, you can quickly filter out inspections in the main system, which, despite the fact that they are done correctly, have some remarks about devices. Then we add a comment and we can set the next inspection date.
Contractor/contractor signatures allow you to save signatures and include them in reports.
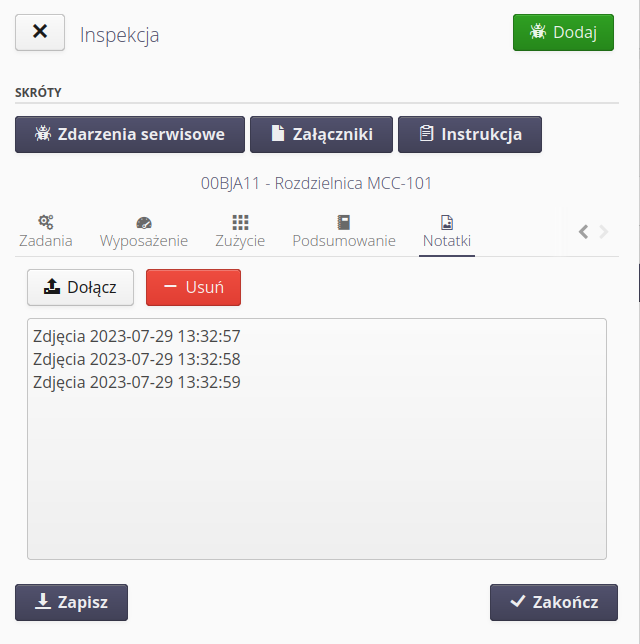
The attachment view allows you to add photos or other files during the inspection.
After inspection, we can view them in the desktop view. Each inspection shows its status, description and execution information. Filters allow you to additionally filter the view.
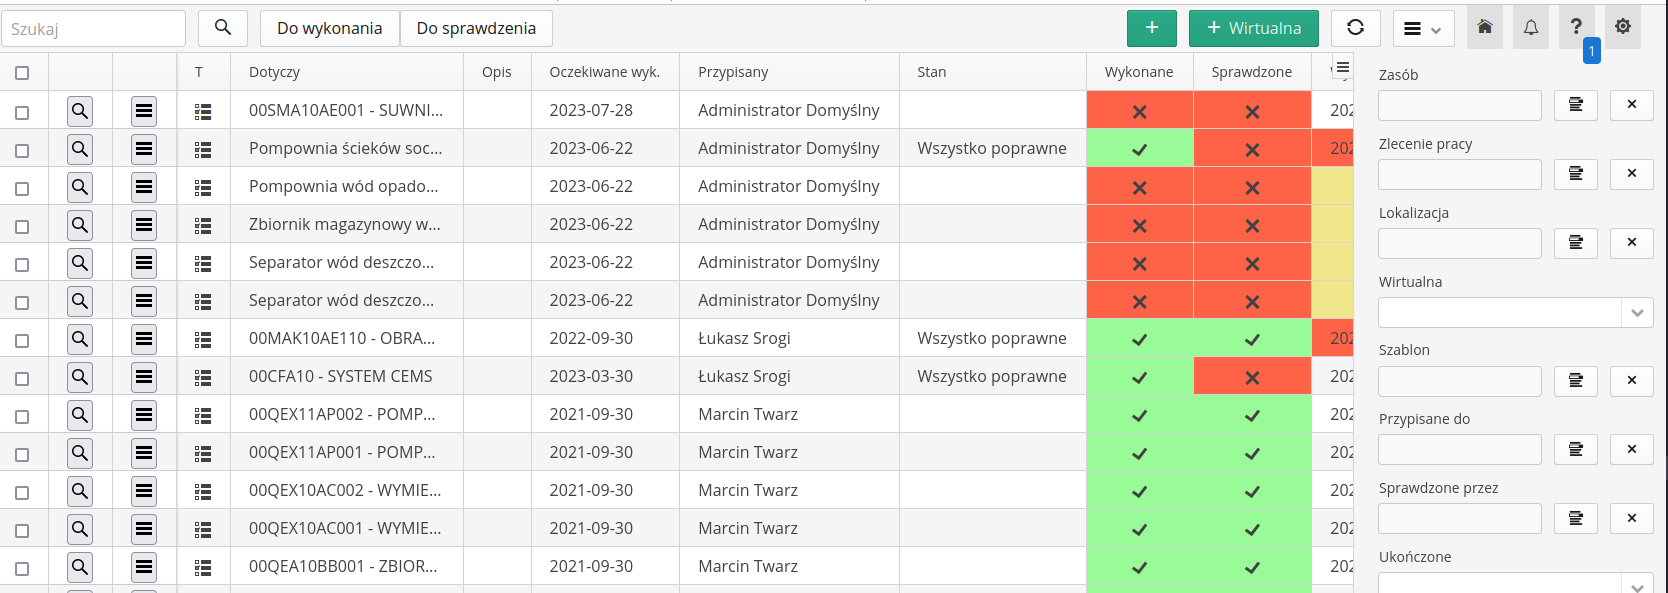
We can also perform inspections directly from this view. By invoking the Execute action from the pop-up menu, we display a window with the inspection execution, as if we were performing it on a mobile device.
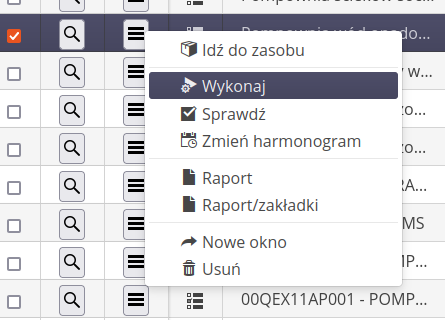
Inspections are carried out completely electronically.
Inspection acceptance
If we have appointed a person responsible for checking the inspection, then that person can perform the check. A window is displayed in which you can accept or reject the execution, modify the comment, enter your signature and protocol number.
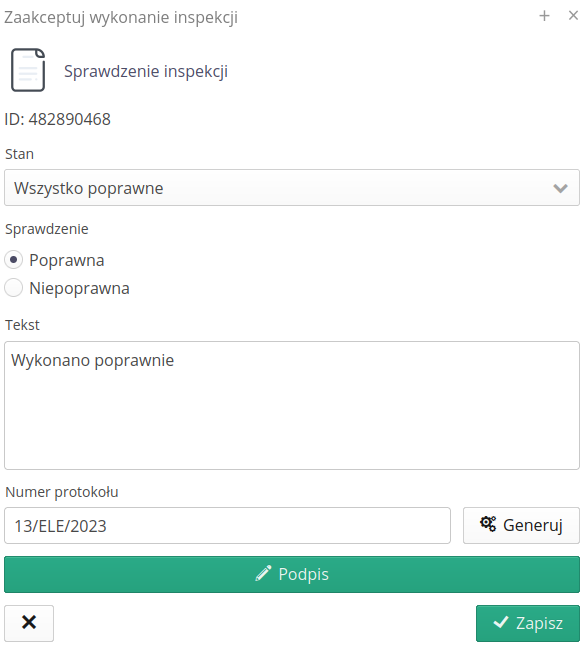
| Automatic generation of an inspection report (automation) allows you to generate an inspection document in PDF form after proper execution and checking, and save the finished document in the resource and work order. See the instructions of the machines on how to do it. |
View of inspection executions
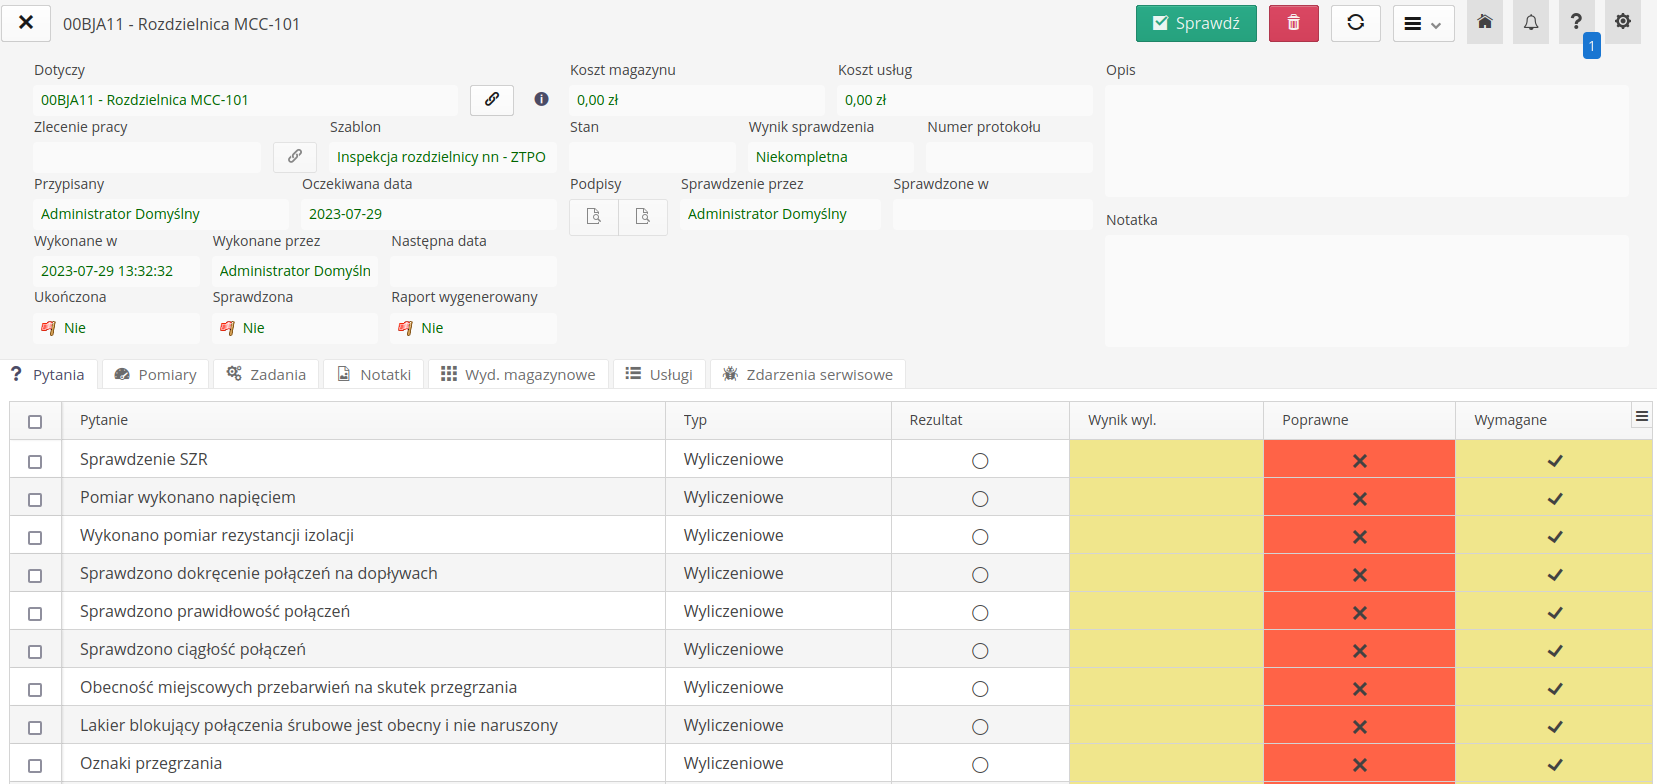
Inspection Execution Views allows you to view all inspections with statuses and background information.
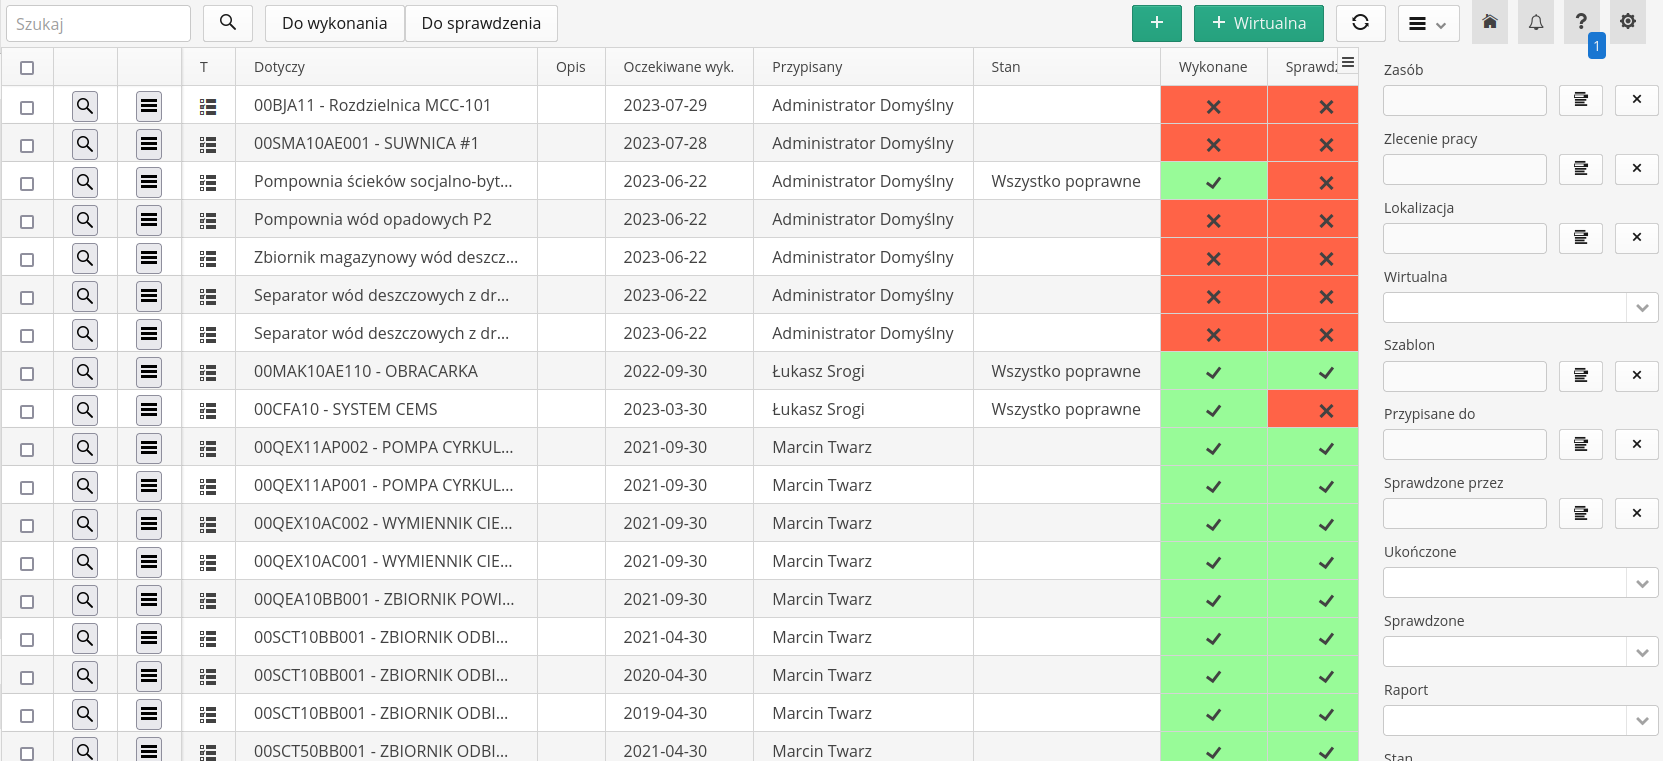
By selecting details, we go to the view of detailed data and answers to all checklists and attachments.
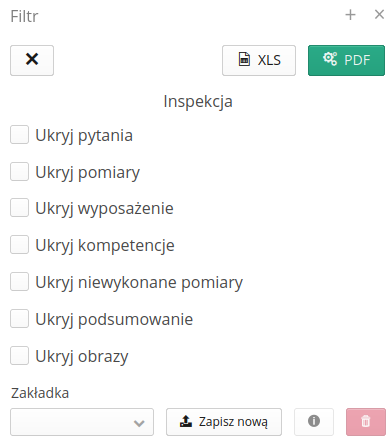
To generate a report, we can use a general template and specify which sections should be hidden because, for example, they are not used.
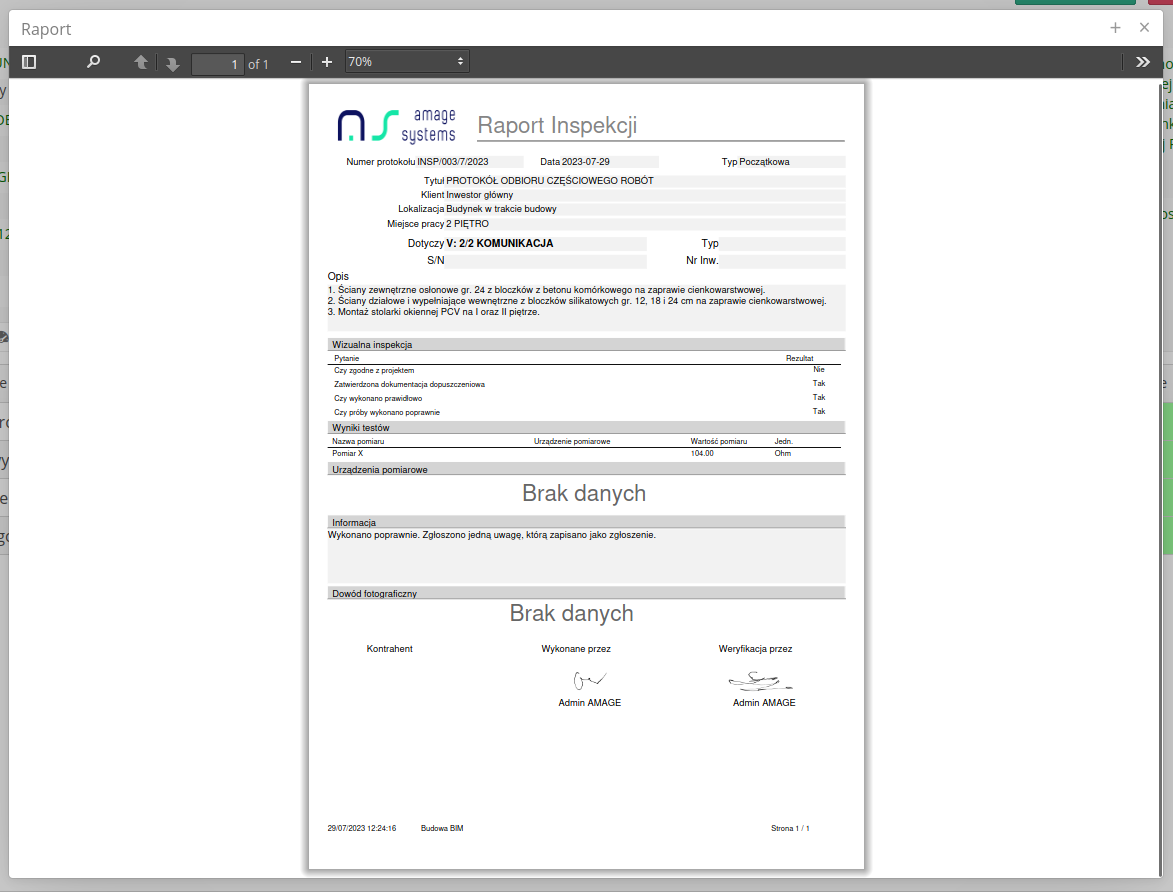
You can customize the report to suit your needs in terms of data and appearance. Refer to other tutorials to do this.
The generated report contains all information as well as captions and photo documentation.
Subcontractor Portal
Inspections can be outsourced to third parties. They gain access through a unique token and can perform a given inspection without the need for an account in the system. Refer to the portals user guide for more information.
Summary
In this tutorial, we have shown most of the features of the inspection system and how to use them. We obtain fully electronic information flows.
| This Howto is based on system version 1.22.0.1 (07.2023) and presents features that may not be available on your system. Ask AMAGE to provide this functionality. |
| Due to ongoing development of the system, some screens or configuration files may look slightly different, but will still retain the full functionality described here. This does not affect the core functionality described in this document. |