Inspections
Inspections
The inspection module contains information on the functions of definition, visualization, execution and verification of inspections performed on mobile devices and in the desktop application.
The inspection area includes the following sections:
-
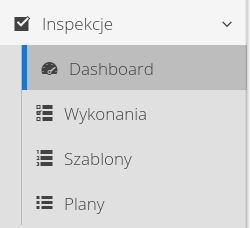
Inspection dashboard - a dashboard for visualizing the progress and completion of individual inspections.
-
Inspection performance list - list of inspections performed with mobile devices.
-
Inspection templates - the area of inspection definitions and execution rules.
-
Inspection plans - scheduling inspections and their execution.
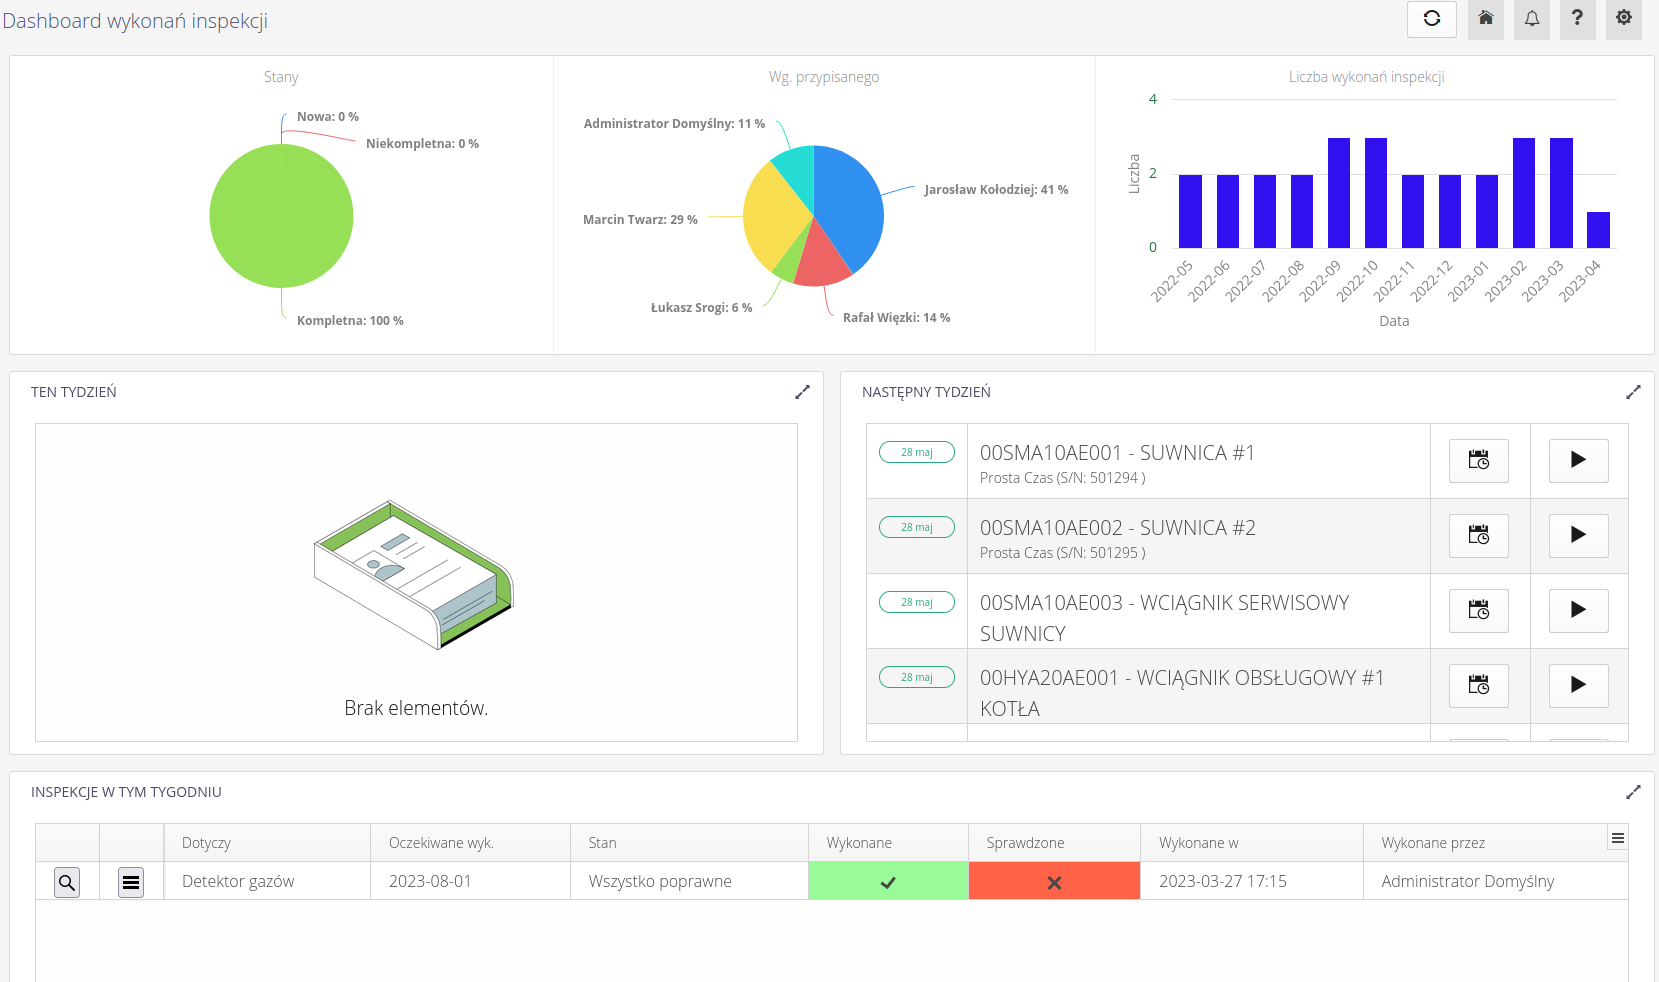
Inspection Dashboard
The inspection dashboard presents summary information about the inspections performed, the breakdown of inspections, their status and additional information about entities performing or for whom inspections are performed. The list also shows inspections scheduled for this week and next. At the very bottom there is a list of inspections performed in a given week.
Executing inspections
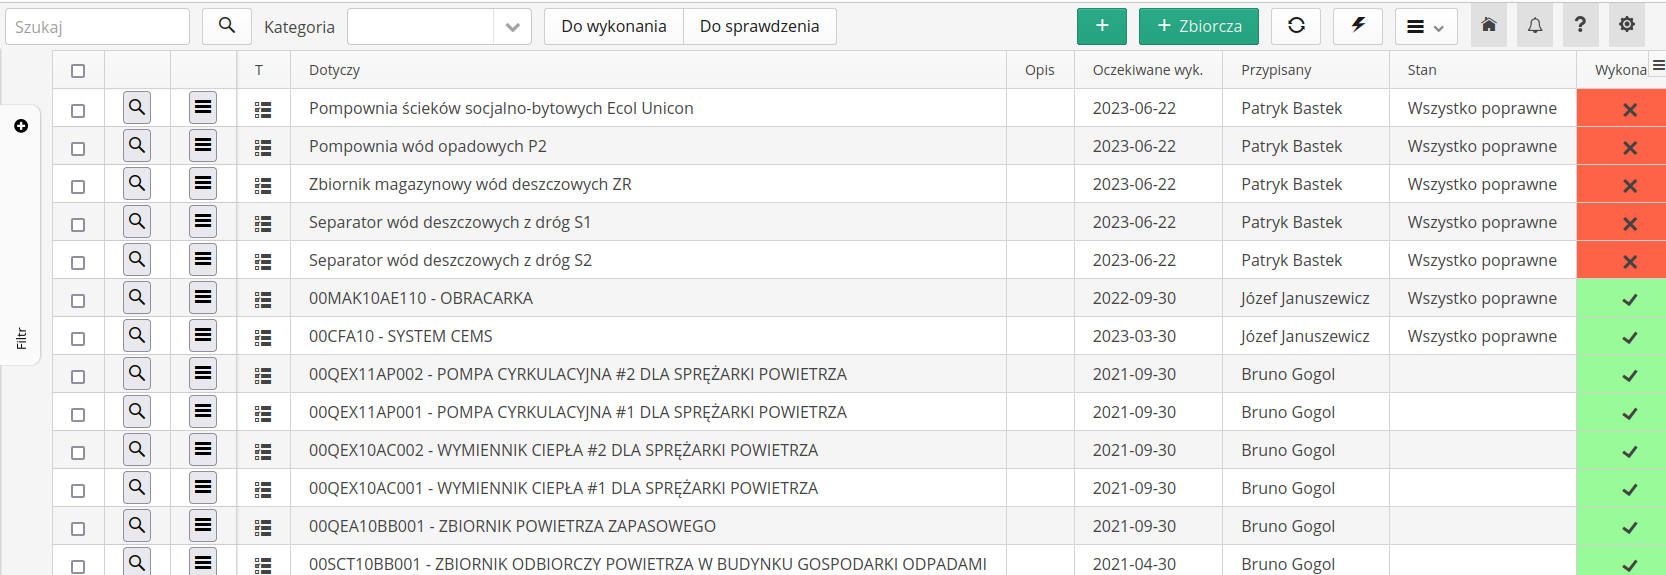
Inspection executions present a list of inspections scheduled for actual execution (as opposed to the data that the inspection planner presents). The list shows all the information about inspection executions. What they relate to, who is responsible for the execution and the status of execution/verification and report generation.
Upon entering the module, the user is presented with a list of inspection executions.
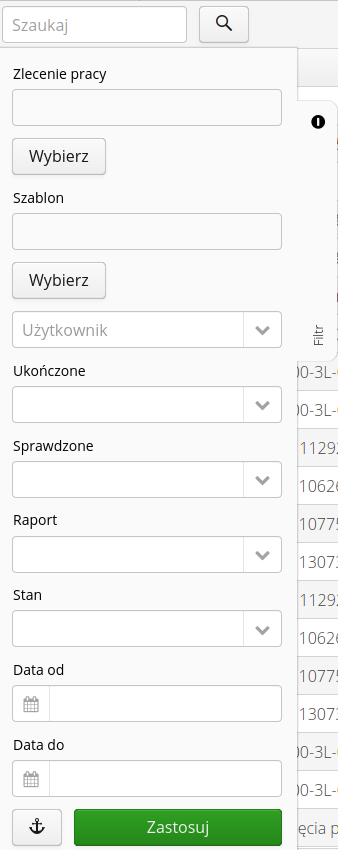
Additional search filters allow you to appropriately limit the inspection data displayed and allow you to focus on the actual inspection work being performed.
Using the main actions we can create:
-
Standard inspection - using the
(+)button - assigned to a specific resource -
Bulk inspection - a location-based inspection that allows you to group multiple assets into one inspection using the
(+ Bulk)button.

In addition, the context menu provides actions that can be executed on the inspections selected with the selectors.
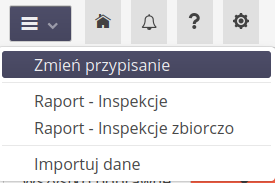
Available actions:
-
Change Inspection Assignment - allows you to change the assignment of the inspection execution to another employee and to change the work deadline. You can also change the work order to which the inspection belongs.
-
Report - inspections - inspection list report.
-
Report - inspections in aggregate - generation of an aggregate report for multiple inspections. This allows you to generate summary reports, i.e. on one report to include details of all selected inspections.
-
Import data - invokes a simplified interface for importing inspection execution data based on templates prepared in the system configuration section.
Details of performing an inspection
After selecting any inspection, the system takes the user to the inspection execution details view. The view is divided into two parts. The upper one presents basic information about the inspection being performed. Its status and time and personal information.
At the bottom we have information on each question/measurement/task and the photos/notes collected during the inspection.
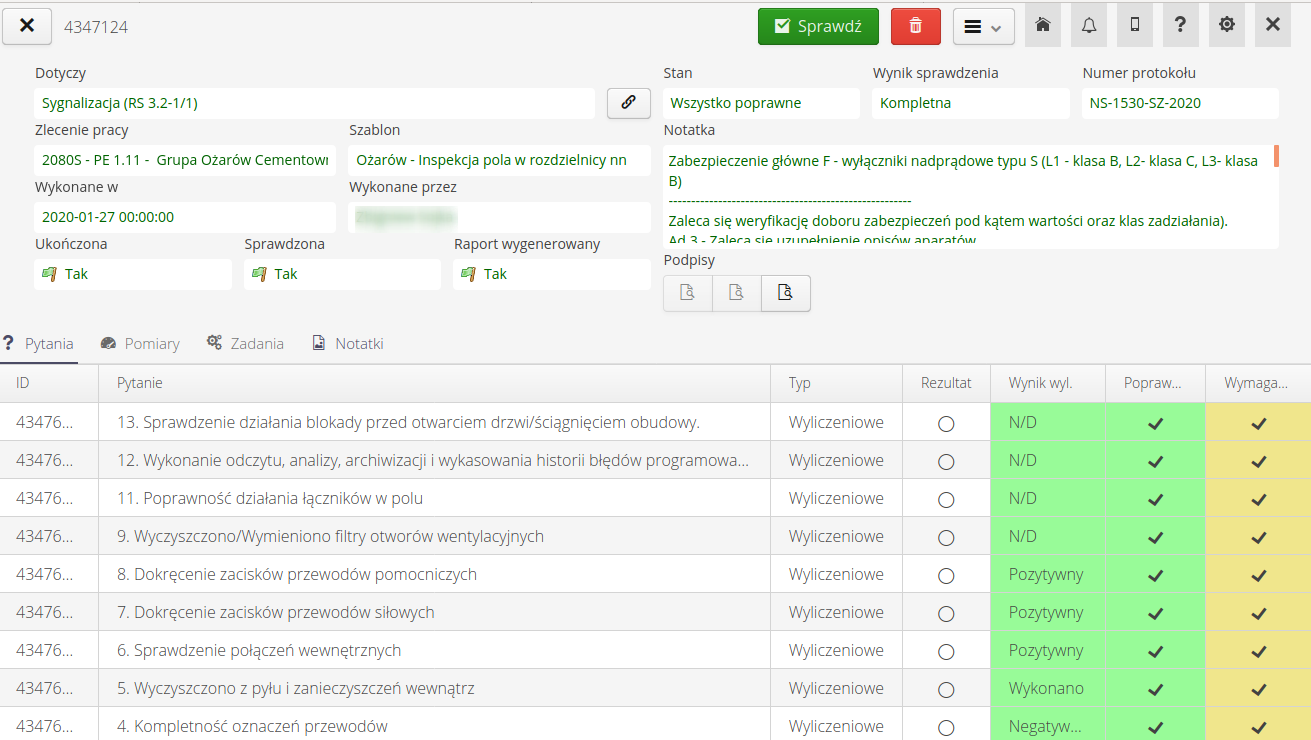
Available data in the details view include:
-
What is involved in a given inspection execution - resource and dates of execution
-
Assigned person, the person verifying the correctness (results from the related work order)
-
Verification status - the status of verification of the correctness of the inspection. The analysis takes into account all activities in this regard, i.e. verification of the execution of mandatory elements, correctness of data ranges, correctness of read identifiers, etc.
-
A note of the execution of the inspection and its general status recorded by users.
-
Description of the scope of the inspection performed
-
Warehouse/service cost information if the warehouse module is enabled
The lower part of the inspection performance contains information in tabular form about the measurements, questions and tasks performed.
The questions view contains information on the execution of the answers to each question, their completeness and due statuses.
The measurement view shows the data of the measurements taken, their correctness, values and details of the measurement description.

For measurements that have a defined measurement validation (check) condition, the application displays this condition when you hover the mouse over the validation field. This is followed by a bubble where the measurement and all other values are entered into the equation.
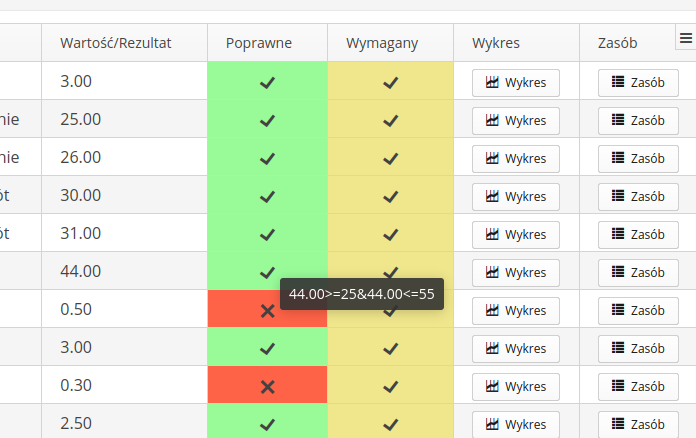
The task view contains information about the status of task execution (photo, ID scan). All information shows additional data such as the number of photos taken, the value of the scanned code, etc.

| Note that the task/measurement/question can be marked as correct and the entire inspection also, in case the item is not mandatory. Only mandatory entries are checked for correctness and affect task completion. Non-mandatory entries are checked (e.g., for correctness of measurements) only if they are entered. |
The notes tab contains information about the photo documentation collected during the inspection and the attached files/photos resulting from the assigned tasks.

If the inspection is of the bulk type, we can attach resources that were checked during this inspection. We can do this using the Select and Unpin buttons, which add/remove selected resources from this inspection, respectively.
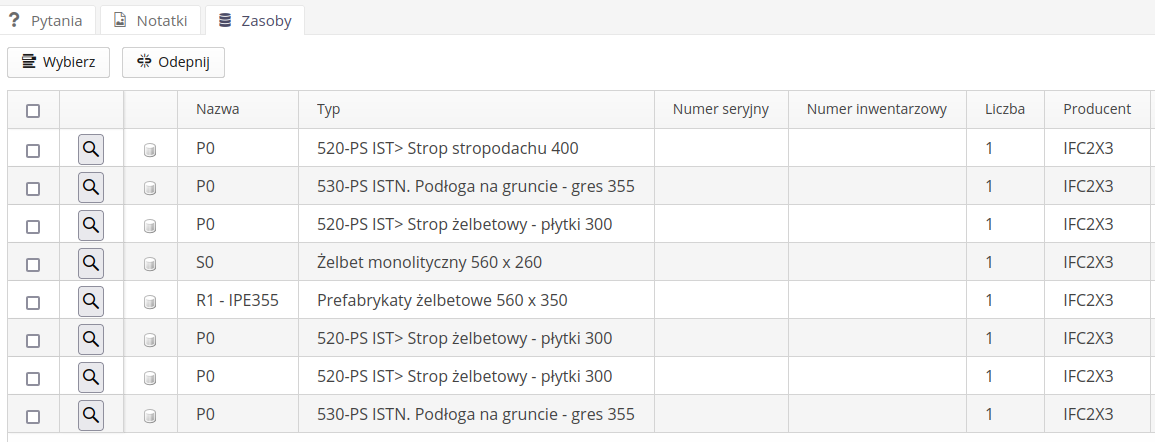
| The application for bulk inspections requires the location of performing such an operation. This information is required in this case. The wizard for creating an inspection will require selecting a location for this type of inspection. In the next step, you will be able to select the resources that participate in this inspection or add them later, as shown in the above figure. |
Verification of inspection performance
| Verification of the inspection is only possible if we enable this option in the inspection template. If this is not enabled, performing an inspection immediately marks the inspection as verified and these elements are marked in yellow on the summary inspection list. |
Inspections in the AMAGE system can be verified by persons designated by assigned work orders. If the execution of an inspection is assigned to a work order AND a verifying person is specified in the work order, that person has the authority to perform verification of the execution of the inspection.
| Typically, the execution of inspections is carried out by multiple people/teams/subcontractors/service companies. It is good practice to verify the correctness of the inspection execution and its results by those who coordinate the technical area. The system makes such a process possible. |
After selecting the Check action available in the inspection execution detail view menu, the user who has such rights and is assigned as verifier is presented with the inspection acceptance format.
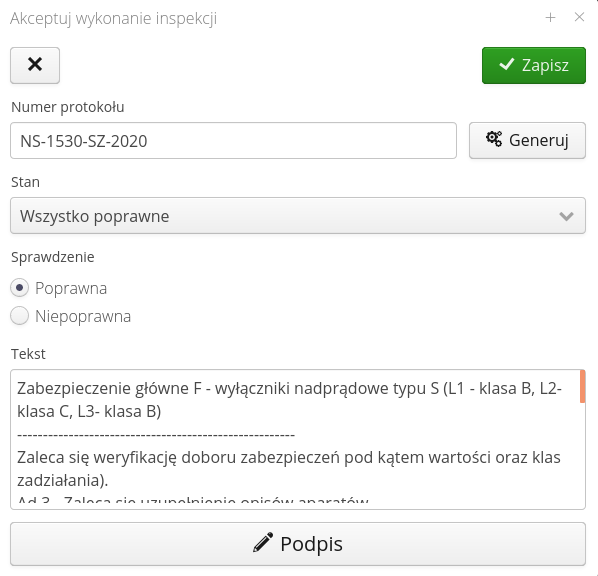
The window presents textual information from the execution of the inspection. The ability to set the status of the inspection - this later allows you to quickly filter inspections that require additional work/creation of reports, etc. And the inspection acceptance status. If accepted, the inspection status changes to accepted and automated systems can generate additional data. If the inspection is rejected, the execution status is deleted and the signatures of the contractors are deleted. The inspection will again be displayed to the user who is assigned to it.
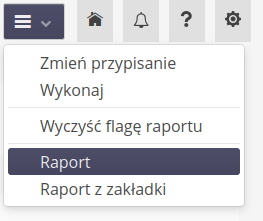
Additional operations possible in the inspection details allow you to perform additional activities:
-
Change Assigned - allows you to change the inspection assignment to another person/change the date of the inspection.
-
Execute inspection - a window with a mobile view of the inspection execution is opened. This allows you to perform the inspection directly from the desktop view. NOTES. A detailed description of how to perform an inspection can be found in the documentation of the mobile version of the system
-
Clear report flag - if you enable automations that generate PDF reports from inspections after they have been performed and accepted, you can use this action to reset the flag of the report and generate it again. Useful when, for example, you change the report appearance template and want to re-generate PDF reports.
-
Report - generation of a default report view.
-
Tab Report - report generation with selection of report tab. This allows you to generate an inspection report with a dedicated look/formatting
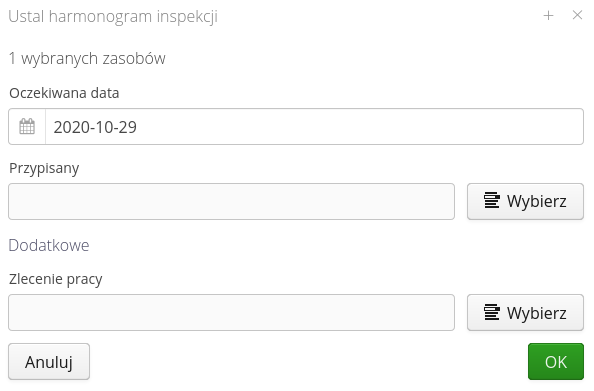
Determining the inspection execution assignment displays a dialog with the ability to specify the assigned person, the execution date and the assignment to the scope of the work order.
The default inspection execution report is generated in PDF form, with all inspection information in tabular form.
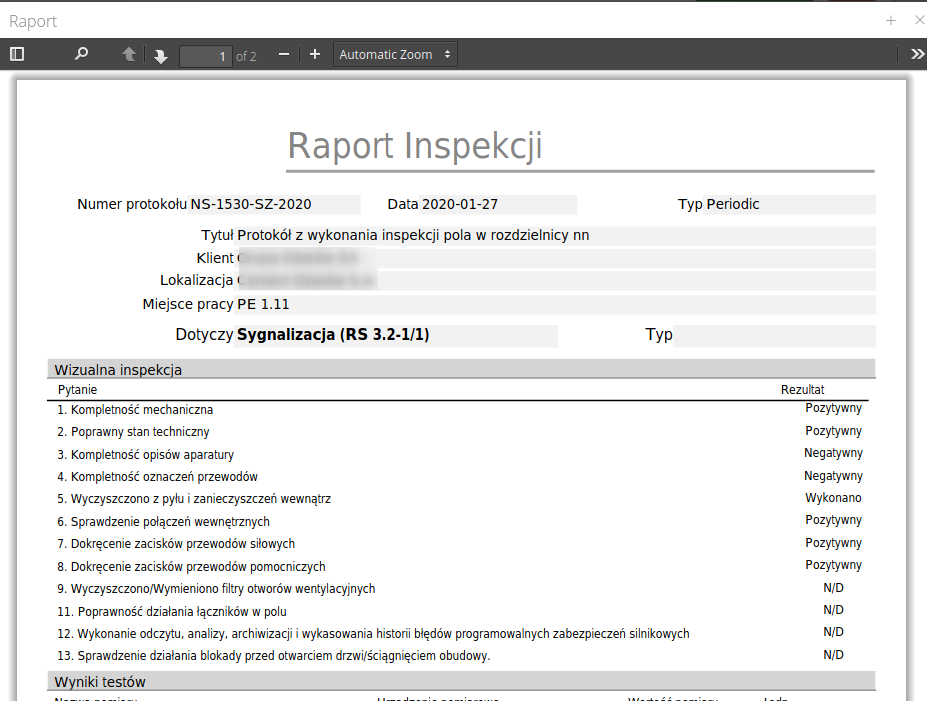
| The appearance of the report, as well as the appearance of all reports, can be changed using the free report designer. The appearance configuration is described in the system configuration section and report design in the Documentation Portal. |
During the generation of the inspection report, the user can choose which inspection sections to display if he/she uses the default appearance of the report template.
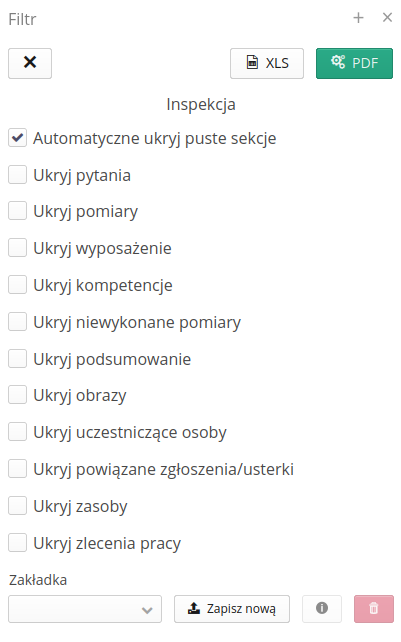
With the Automatically hide empty sections option, the system hides sections in the report that have no data.
Scheduling the execution of the inspection
The inspection can be scheduled manually for selected resources or automatically using the inspection planner. The inspection planner is described in a separate section of the documentation. However, if the user wants to manually schedule/order a specific inspection for a resource/resources, they can do so directly from the resource view. The context menu provides the Set inspection execution action for the general and bulk inspection type.
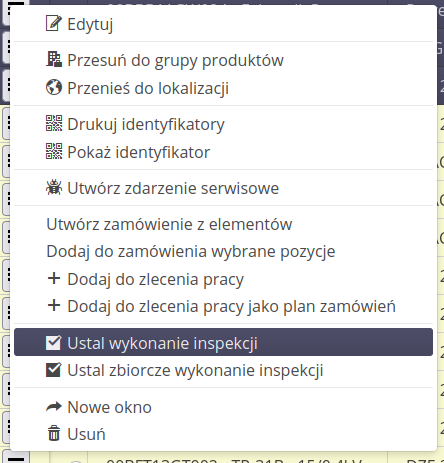
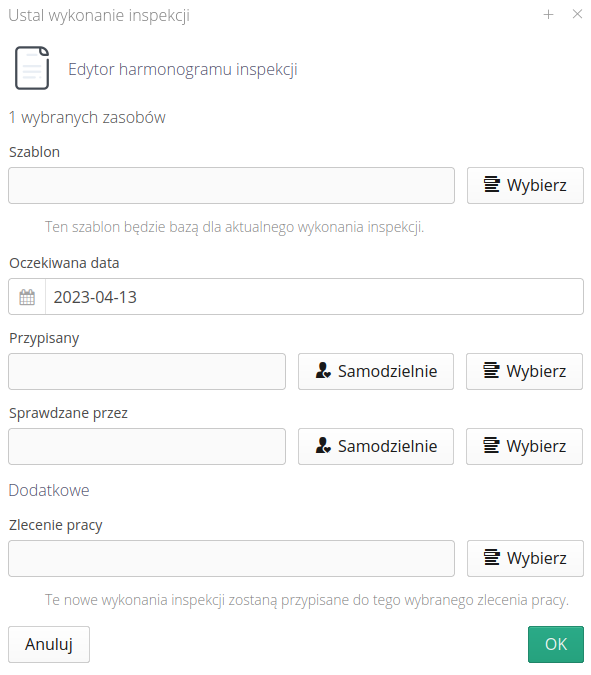
After selecting any number of resources and calling this action, the definition window for performing an inspection is displayed.
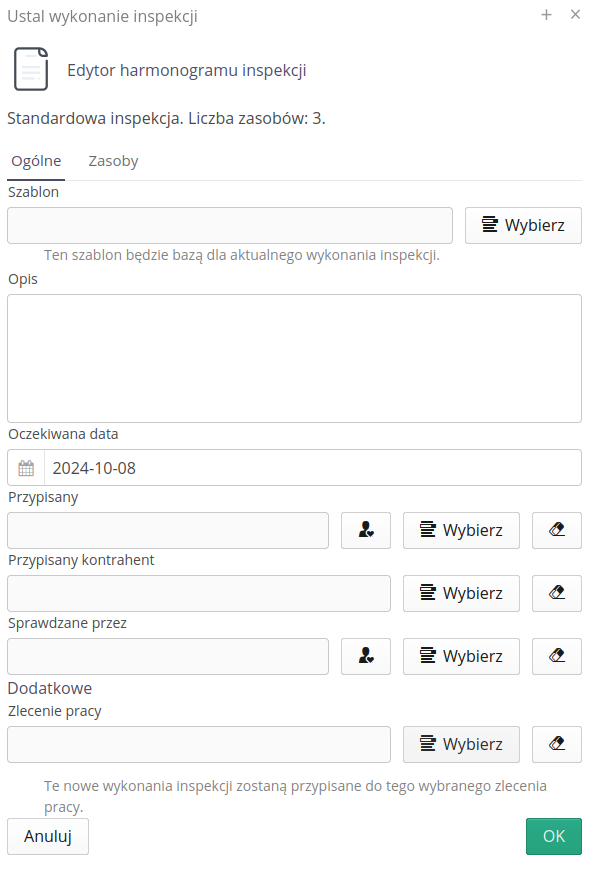
In the window, we select the due date, the person responsible, the work order, and the inspection template according to which it will be planned and performed (a list of questions/measurements/tasks). We can also add a description of the inspection. This is useful for inspections whose template is so general that it does not specify the exact scope. In this field, you can describe its scope, work, etc. in detail. In the case of a bulk inspection, an additional tab appears that allows you to select resources/remove them from the list.
Bulk inspection
The system allows for the definition of two types of inspection executions:
-
Standard - assigned to each resource separately, i.e. one inspection applies to one resource
-
Bulk - sometimes it is required to perform a collective inspection, e.g. construction inspections, in which we perform the inspection and check all elements of a given type, e.g. grounding, electrical installations, etc. This type of inspection allows for linking the inspection to a location, e.g. first floor, and linking many resources to this inspection.
Performing such an inspection is no different from performing a single inspection. We have access to the list of resources that a given inspection covers, we have the ability to report faults to a given resource directly from the mobile interface. In the final report, information about the list of resources associated with this inspection will be additionally included in the form of a table.
Inspection templates
Inspection templates allow you to define rules for performing inspections. Once defined, the templates will be used to schedule and execute inspections on selected resources in the system. They will also form the basis for executing a workaround list. All the data defined in the templates allow the execution of the activities that the designer expects.
Upon entering the inspection templates view, a list of all templates defined in the system is presented. The user has the option to search for a specific template or select template categories, which are defined when creating new templates.
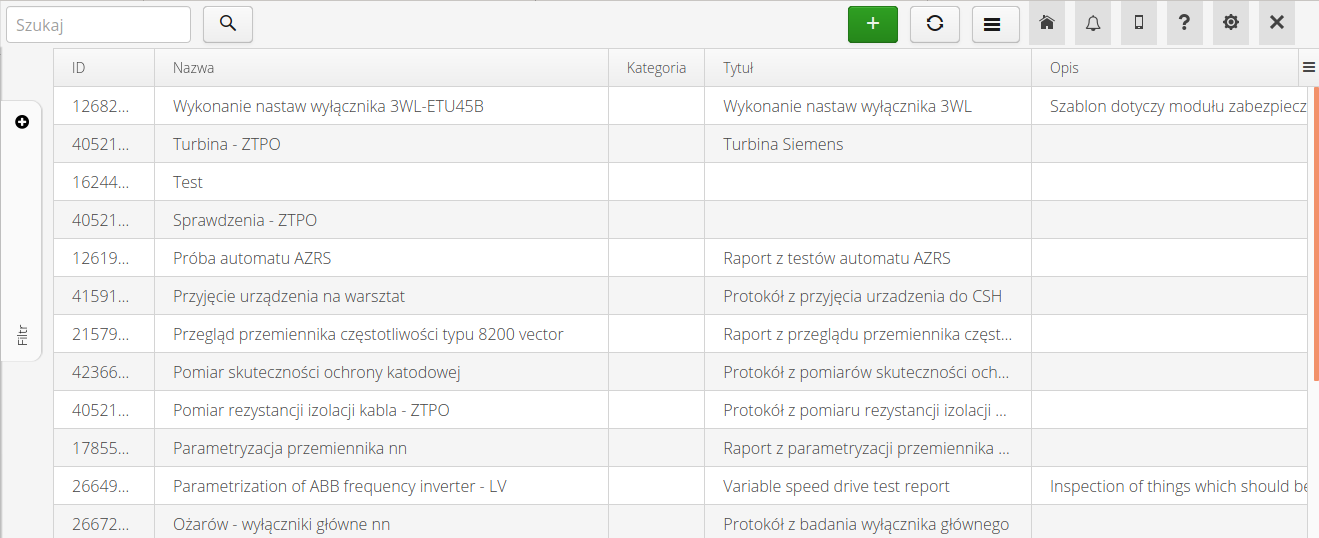
Selecting the definition of a new template via the (+) button in the top menu of the view or selecting any inspection template opens the template preview/editing window. The window is divided into tabs for: general definitions, question/measurement section definitions, question definitions, measurement definitions and definitions of tasks expected to be performed during the execution of a given inspection.
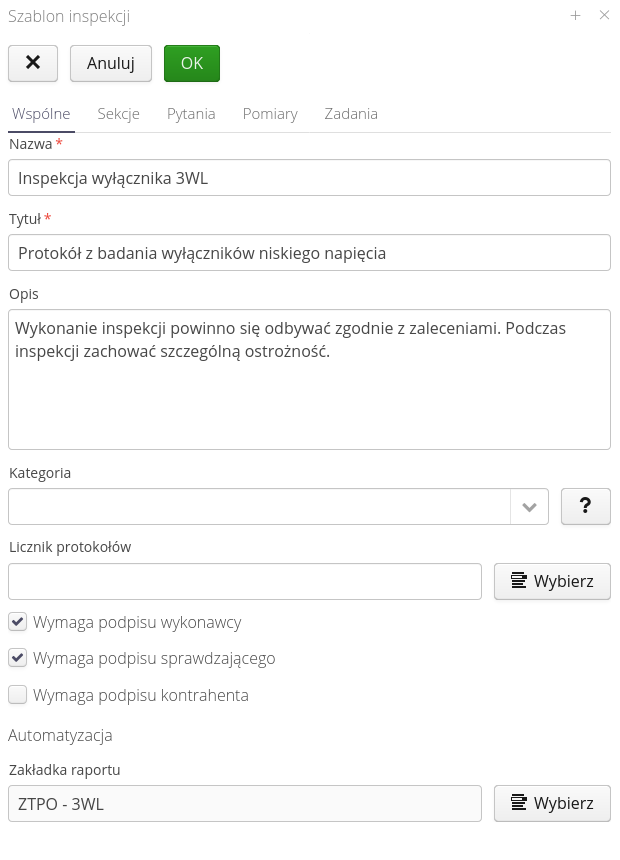
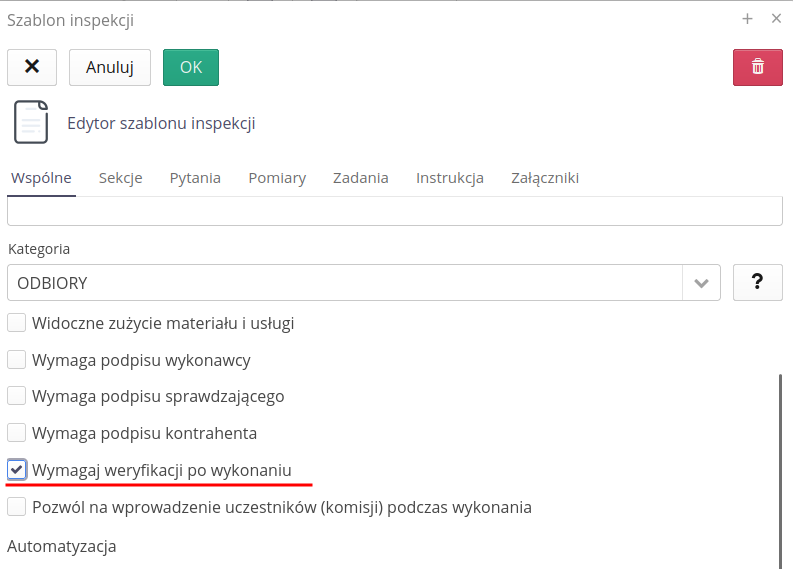
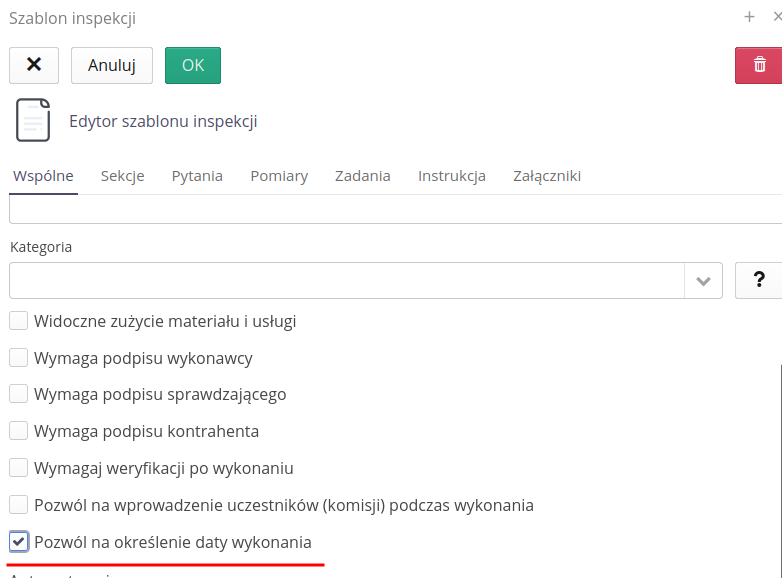
In the general view, we define:
-
Name - the name of the inspection template.
-
Title - the title used in reports. The name of the inspection can then be abbreviated, and the full title of the inspection will be found correctly in the reports.
-
Description - a description of the implementation of the template. Additional data describing the template.
-
Category - template category, allowing to group inspection templates into groups.
-
Protocol counter - counter that will be used during the generation of protocol numbers during the final inspection check and used in the generated reports.
-
Requires contractor signatures - enforcing an "electronic" signature by the inspection contractor. Will be used during report generation
-
Requires checker’s signature - enforcing an "electronic" signature by the checker. Will be used during report generation
-
Requires the signature of the contractor - requires the signature of the principal. In the case of performing inspections on behalf of external companies, the signature of the principal (and its data) allow for additional verification of the feasibility of the inspection
-
Require verification after completion - the option to verify the inspection after completion by a designated person will be enabled
-
Allow participants (committees) to be entered during execution - during the inspection, an additional list will appear with the option of selecting participants who will appear in the inspection details and in the report.
-
Allow specifying the completion date - allows you to enter the actual completion date during the inspection. This allows you to transfer already performed inspections to the system.
-
Report tab - the report tab according to which the report will be generated when automatically generating reports for performing inspections. Allows you to change the appearance of the report according to the type of inspection.
Tasks allow for additional operations.

-
Update asset calibration date after inspection - after enabling this option and performing the inspection, the system will automatically fill in the
Calibration dateparameter in the asset. It will do this based on either the dates entered in the inspection execution (next inspection date) or based on the calculated plan if one is created for the resource.
Sections allow the user to divide questions/measurements and tasks into additional sections. If the user defines sections, they are available when defining the individual components of the inspection template and then the user can filter the data set against the section when performing the inspection.
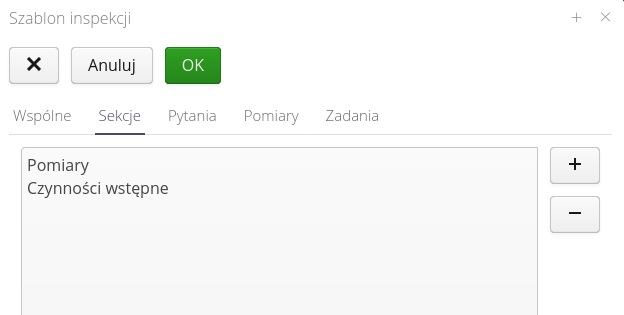
| All question/measurement lists allow you to set and change the order of them in the list. This is done by buttons available in the view of each editing window. |

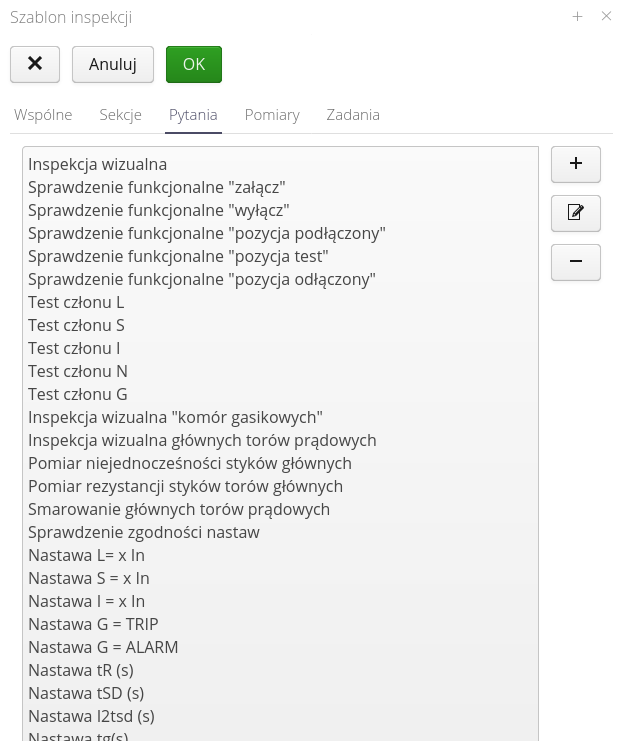
Questions
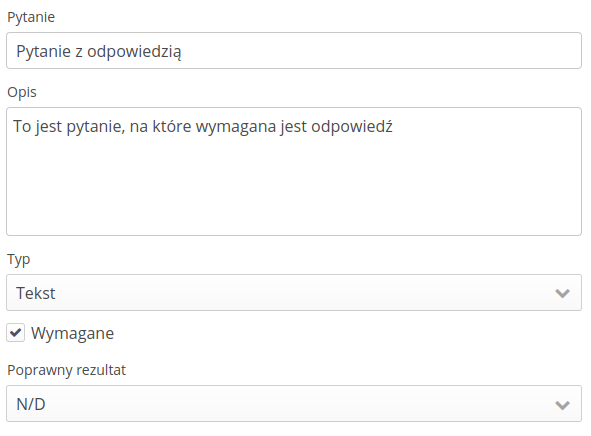
The question list allows you to define a set of items that do not have a measurement but require an answer from the performer. The questions can be of simple type, i.e. the answer to them is from the YES/NO option, but there can also be an answer available from a selectable list - defined for each task separately.
The question definition allows you to specify these parameters.
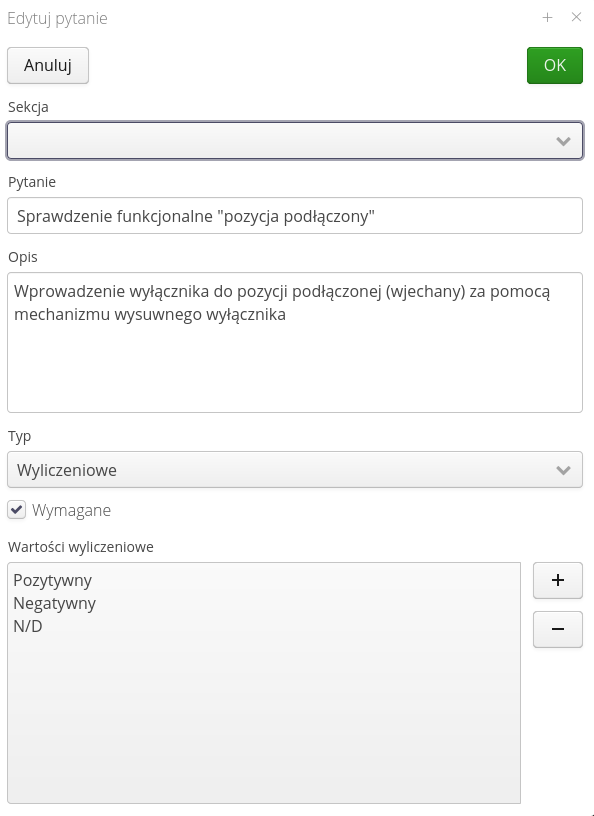
Available question options:
-
Section - the section to which the question belongs.
-
Question - content of the question
-
Description - additional description of the question, explanation, normative information, etc.
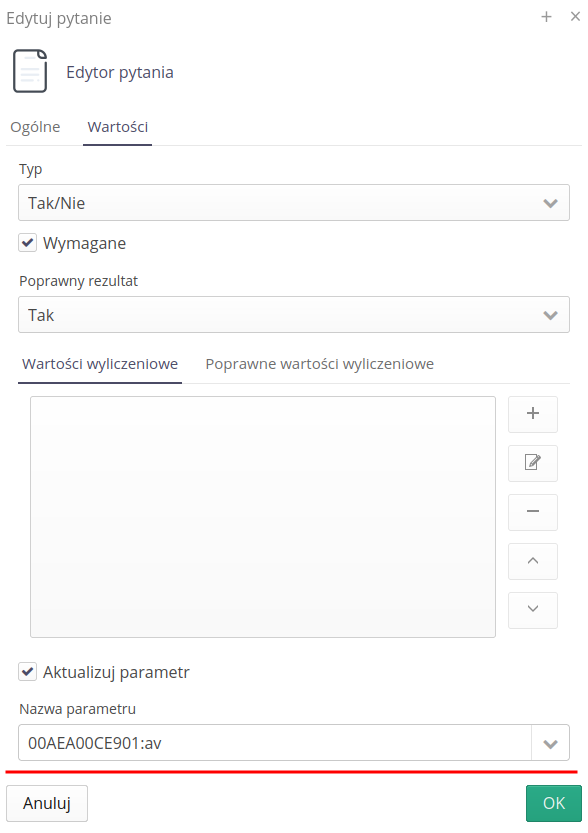
In the additional Values tab we define the question type and the calculated values for the question.
-
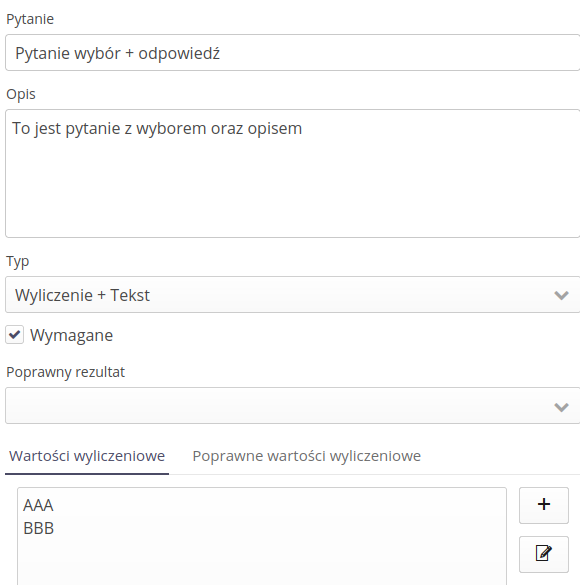
Type - question type - is it a YES/NO question, enumeration question, text or a combination of enumeration and text (answer)
-
Required - whether the question is required to correctly complete the inspection.
-
Enumeration values - a list of enumeration values for a question of this type. A list of arbitrary texts that are selected by the user.
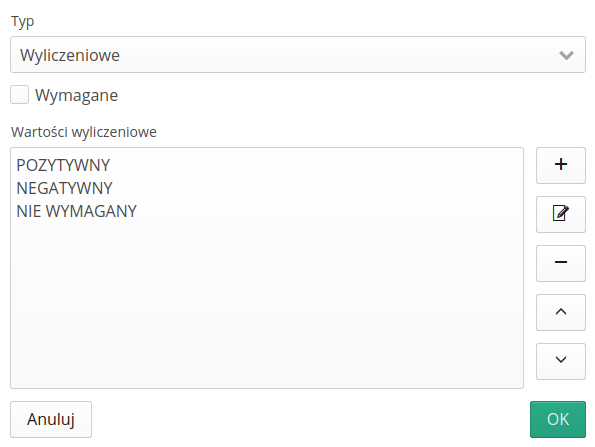
Using the add/remove/edit/up/down buttons we can change and edit the list of calculated parameters.
The text question definition allows you to enter additional information when completing the question. By using the options and setting the text question, we can save any information during the inspection.
Using the enumeration question + text option, we can select an answer from a predefined list and additionally allow the user to enter a text description, if a given enumeration element requires one.
Using the Update parameter operation we can save the result of a question to a parameter in the associated resource. In the case where the question is associated with a resource, then after saving the question, the value of the question will be saved in the resource. We can use this to save information about the resource status, inspection results, etc.
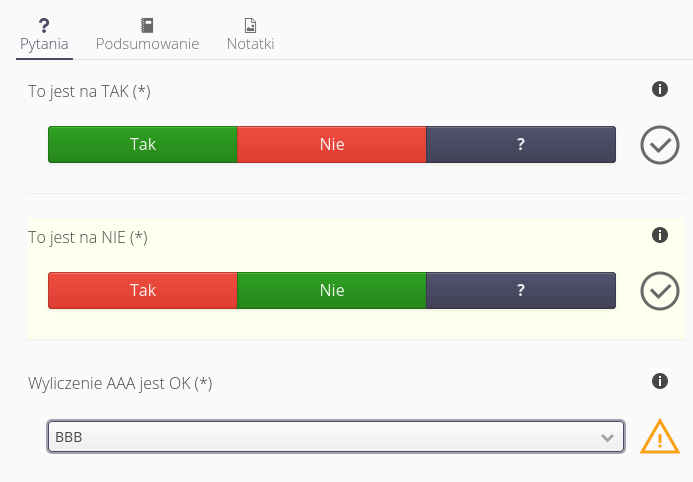
Correct question validation
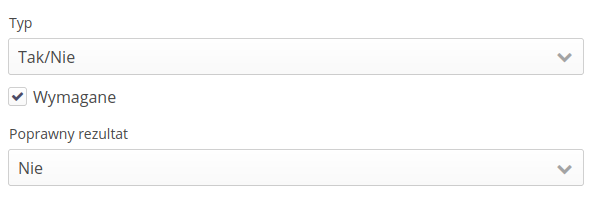
In the case of question definitions, the system allows you to determine which of the answers is the correct answer. In the case of YES/NO questions, YES is not always the correct answer. For example, the question "Is the device damaged?" with a YES answer should be treated as a problem when performing an inspection/walkthrough based on such a question. Therefore, the system allows you to define and determine which answers are correct (acceptable).
For enumerated questions, we can define any list of answers as correct answers.
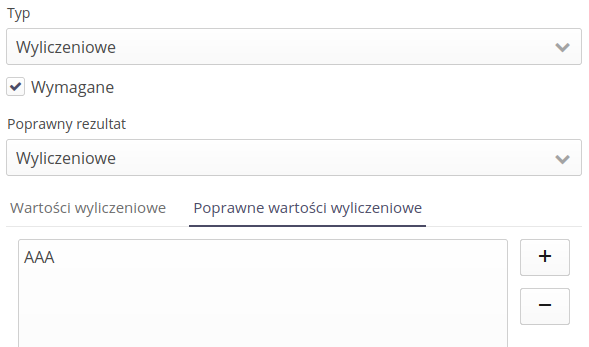
After defining such settings, the system displays and colors the correct answers appropriately during the inspection. For enumerated responses, responses with invalid validation will display a warning sign.
Measurements
Measurements allow you to define an inspection item that requires a measured value. The system facilitates such work and allows additional definitions of validating parameters.
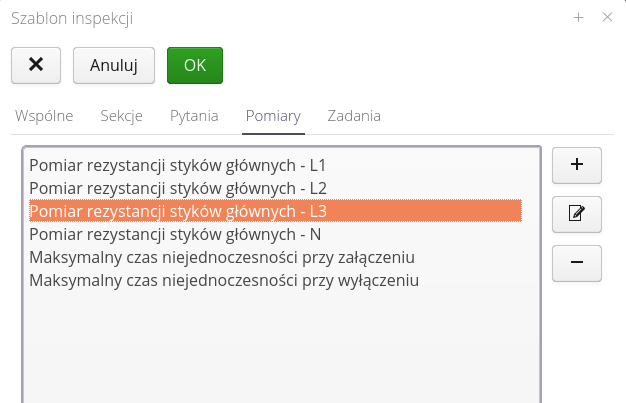
The measurement editor allows you to specify parameters divided into two sections. Basic measurement data and calculation and update of data.
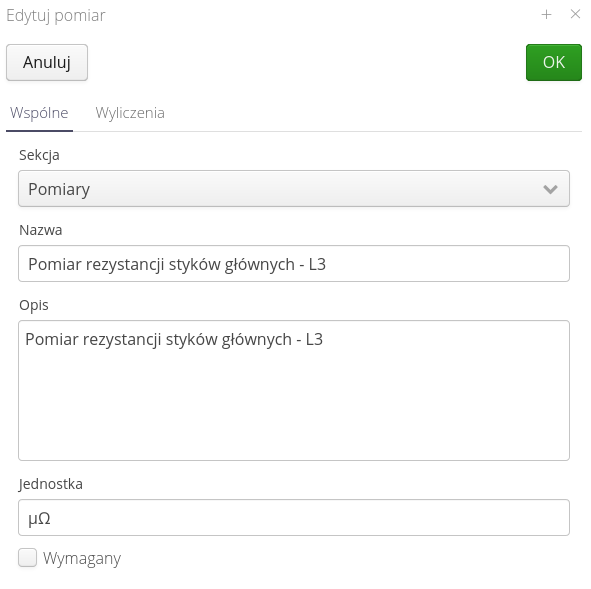
General measurement options available:
-
Section - the section to which the measurement belongs.
-
Name - the title of the measurement presented to the user.
-
Description - additional measurement information
-
Unit - unit of measurement (for display to the user and reporting).
-
Required - whether the measurement is required to properly complete the inspection.
The Calculation tab contains information on how to check the measurement and update the data in the system.
-
Parameter - the button allows you to enter the name of a parameter from a resource into the inspection expression. This allows you to make the expression dependent on the data/parameters of the specific resource being inspected
-
Help - display a dialog box with help on formatting and possible mathematical operations.
-
Check - to force check the expression. Values of "1" are entered into the parameters and the current measurement value and then the equation is calculated. Allows you to check whether the expression is correct.
-
Check expression - check expression editor.
-
Update Parameter + Parameter Name - after the inspection and measurement, if this option is selected, the resource will automatically update the parameter value.
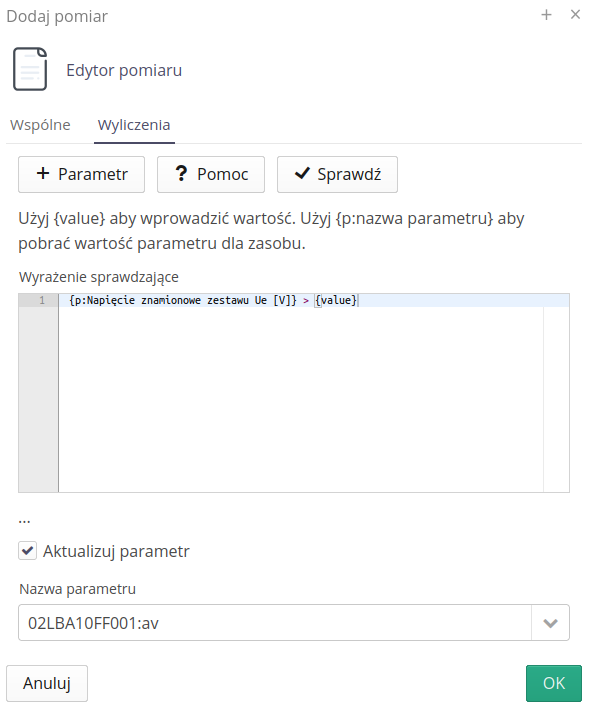
| The check expression allows for very effective verification of the entered data already at the data entry stage. This provides much-needed information to those currently performing the inspection in question and serves to verify/detect incorrect inspections at the plant/construction site. |
Calculations act as a mechanism to check the correctness of the measurement. During the inspection, the mechanism constantly checks the value entered by the user and immediately shows the correctness or incorrectness of a given measurement.
Once the measurement is completed, the verification equation determines whether the measurement is correct and whether the entire inspection (or inspection round) is performed correctly and complete.
The equation is used to verify the correctness of the measurement. Using the {value} template, we enter the value currently provided by the user (or the saved measurement value) into the equation. We can use mathematical equations, functions and the use of parameter values to verify the correctness of the data.
For example, {value} > 100 will check whether the given measurement is greater than the value of 100. If we want to limit the values, we use the AND operator, i.e. the equation can have the value {value} > 50 & {value} < 100. We can also use parameters of the type {p:Parameter name} * {value} < 100, which will download a parameter called Parameter name for a given resource and enter it into the equation. This allows the result to depend on the parameters of each device separately.
| The application uses the MxParser version 4.4 library as the math engine. Refer to the manual available at https://mathparser.org/ to learn all the functions and operators available to users. The library is very extensive and complete. |
Tasks
Tasks are used to specify additional activities to be performed by the person performing the inspection. This allows you to build additional knowledge (e.g., photographic) or enforce the certainty of performing a given inspection on a given resource (by scanning, for example, the RFID code embedded in a given device).
Task definition allows you to add any number of tasks.
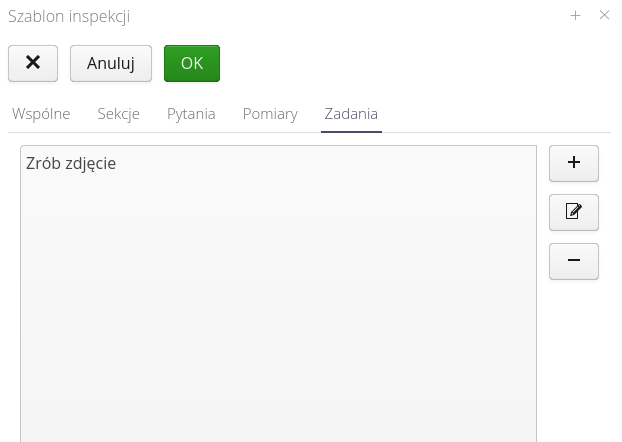
The basic parameters of the task are common to each type of task. Additional parameters depend on the selected type.
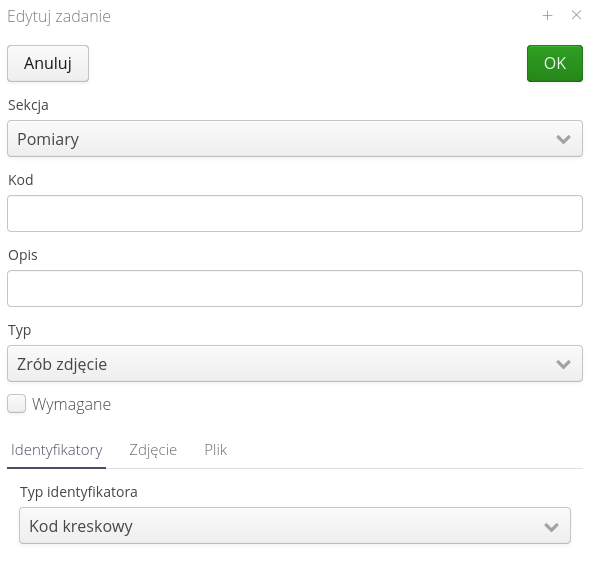
Task parameters:
-
Section - the section to which the task belongs.
-
Code - task code. It can be used during report generation and visualization. It can be used to download, for example, a photo/file of a specific task and display it in a report accordingly, e.g. as a thermal image, photo of measurements and graphs, etc.
-
Description - job description - visible to the user.
-
Task type - type of task.
-
Required - whether completion of the task will be mandatory to complete the inspection.
Task type:
-
Take a photo - requires taking/attaching a certain number of photos for inspection (e.g., a photo of the device before/after the work is done).
-
Scan ID - requires you to scan the appropriate ID assigned to the resource on which you are doing work, such as an RFID tag.
-
Save file - requires attaching a certain number of files, e.g., reading and attaching the device/ PLC configuration.
ID scanning job options:
-
Type of identifier - we specify the type of identifier that is necessary for scanning (a resource may have several such identifiers).

Photo task options
-
Number of photos- specifies the number of photos to be taken
-
Required number of photos - if NOT enabled then the user will be required to take an EXACT number of photos. If enabled then the user must take at least as many photos as specified (but maybe more)

File options
-
Number of files - specifies the number of files to include.
-
Required number of files - if NOT enabled then you will be required to include an EXACT number of files. If enabled then the user must include at least as many files as specified (but maybe more)
Inspection plans and schedules
Inspection plans allow you to specify expected inspection schedules for resources defined in the system. Then it is the system that automatically proposes to perform inspections based on the defined rules. To make such automation possible, the inspection planner view is divided into several sub-views:
-
List of inspection plans for types - possibility to define an inspection plan for a group of devices of the same type
-
List of inspection plans for resources - ability to select specific resources and specify detailed inspection plans for them.
-
List of bulk inspection plans - list of schedules for bulk inspections, grouping several resources.
-
Monthly/Annual Calendar Views with visualization of necessary inspection work.
-
Inspection schedule view - schedule in date ranges to allow efficient scheduling of inspections performed
Each view can be further filtered with the ability to display tasks related to a particular template, resource type, specific resource or person responsible for execution.

The list of inspection plans for types, resources and bulk is presented when entering this module. The lists contain information resulting from the definition of inspection plans. To add a new inspection plan for a type or resource, select the appropriate action from the top menu of the view Type or Resource and Bulk.
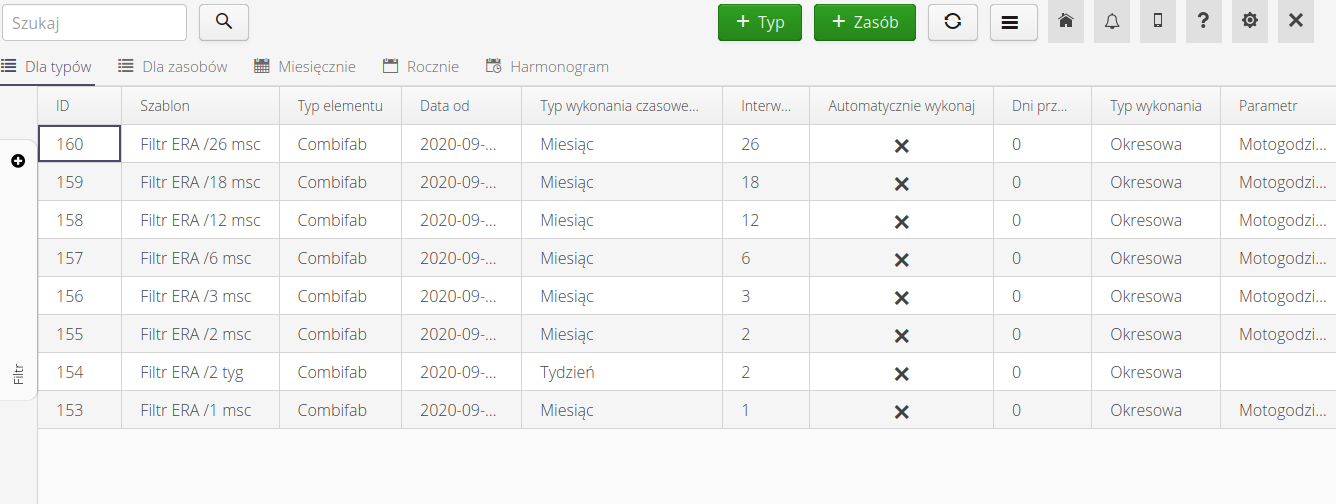
After selecting these actions, or after selecting any existing item, we proceed to the definition of the inspection plan. The available options allow you to define the parameters that will determine whether to propose an inspection of this type. The view is divided into three sections.
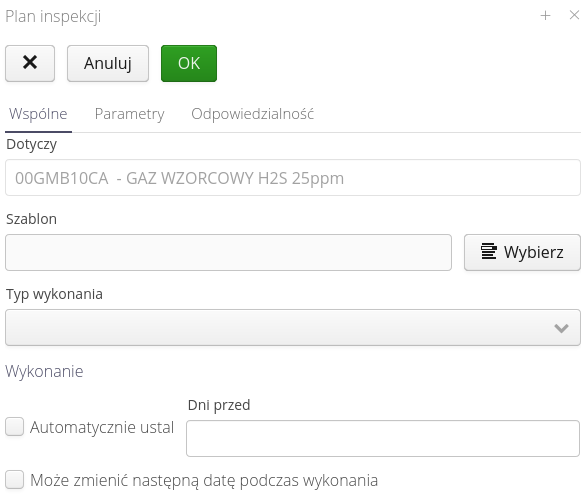
Available data:
-
Applies - what the template applies to. Maybe it applies to a type or a specific resource.
-
Template - the selected inspection template that will apply to the execution of these activities.
-
Performance type - type of inspection performance. For periodic we select periodic. Only this option will allow to perform periodically such
-
Automatically set + days before - If the flag is enabled, the system will automatically for the number of days described in the parameter Days before order this inspection (prepare the execution of the inspection).
-
Can change the next execution date - enabling this flag will take into account the date given during the execution of the inspection in the form summarizing its execution. This date will be treated as the date of the next inspection execution, ignoring the other settings.
If the option may change the next date during execution is set, the system will not automatically generate the first inspection and will not show it in the schedule. Order the first inspection manually and set the next due date during execution.
|
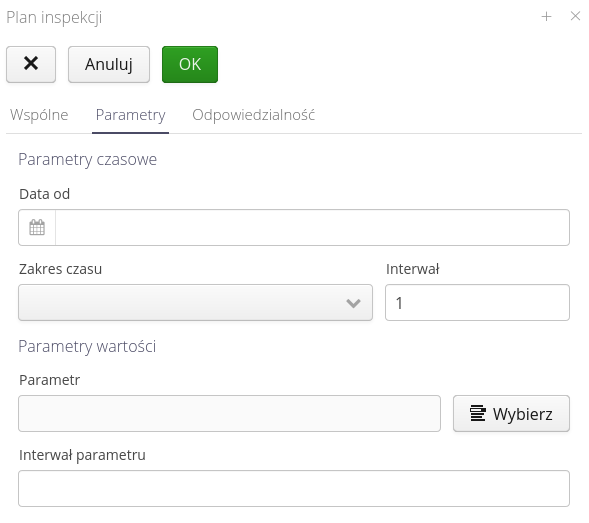
Available data:
-
Date from - the date from which we start scheduling inspections of this type.
-
Time range + interval - time range and interval every how much inspection should be performed by default. Selecting a monthly range and an interval of 2, will mean that such an inspection should be performed every two months.
-
Parameter + parameter interval - the possibility of specifying the parameter of a given device, against which the need for inspection will be calculated. This can be, for example, a parameter of the mot-hour type. Selecting such a parameter and an interval of 200 will cause the inspection planner to recommend performing an inspection of this type every 200 motor-hours.
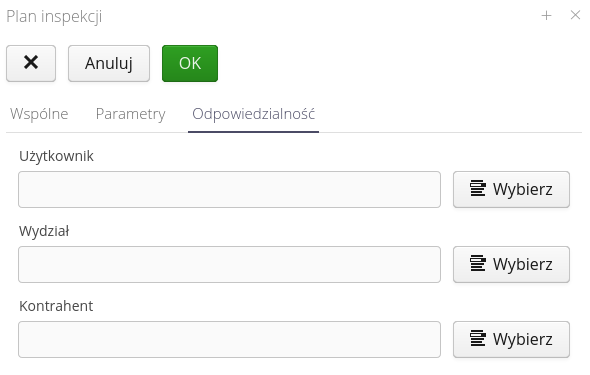
Available data:
-
User - the specific user responsible for performing this type of inspection.
-
Department - the department that is responsible for execution. Assignment to a department depends on the operation of the scheduling planner and may result from a separate implementation configuration.
-
Contractor - a third-party company that performs inspection work.
| The execution of an inspection is calculated both from the basic information in this definition and is also dependent on the time when the last inspection of a given device was performed. I.e., if a device has a set inspection execution every 2 months, then the system will monitor the execution of an inspection of this type for that device, and if such an inspection is performed around the 2-month period (with a range of +/- 5 days) then the next execution date is calculated from that date. |
| Performing an inspection resulting from the parameter rule (e.g., every 200 mot-hours) affects the timing of the next inspection. In the same way, performing a timed inspection automatically updates the mot-hour counter so that these inspection plans (timed/counter) complement each other. |
The inspection plan view is presented using monthly and yearly calendar views. Colors are used to represent different types of inspections. Red is for resource inspections, orange is for bulk inspections, and green is for resource type inspections.
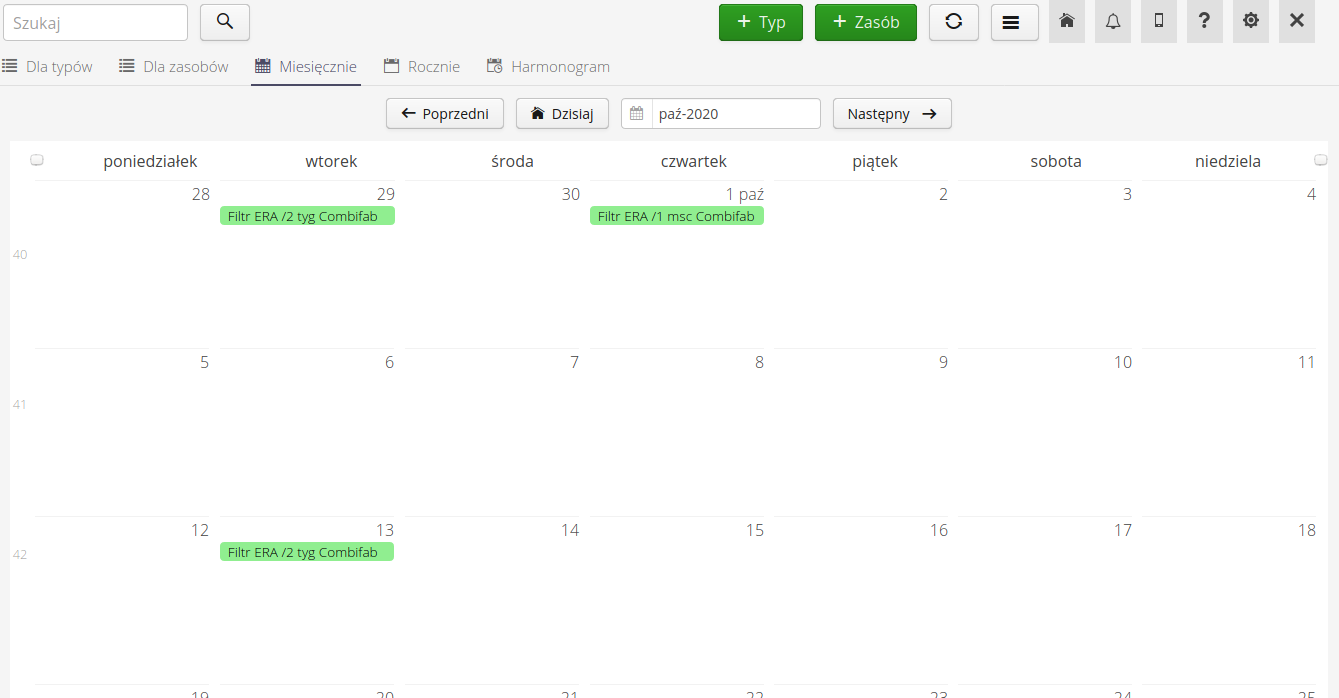
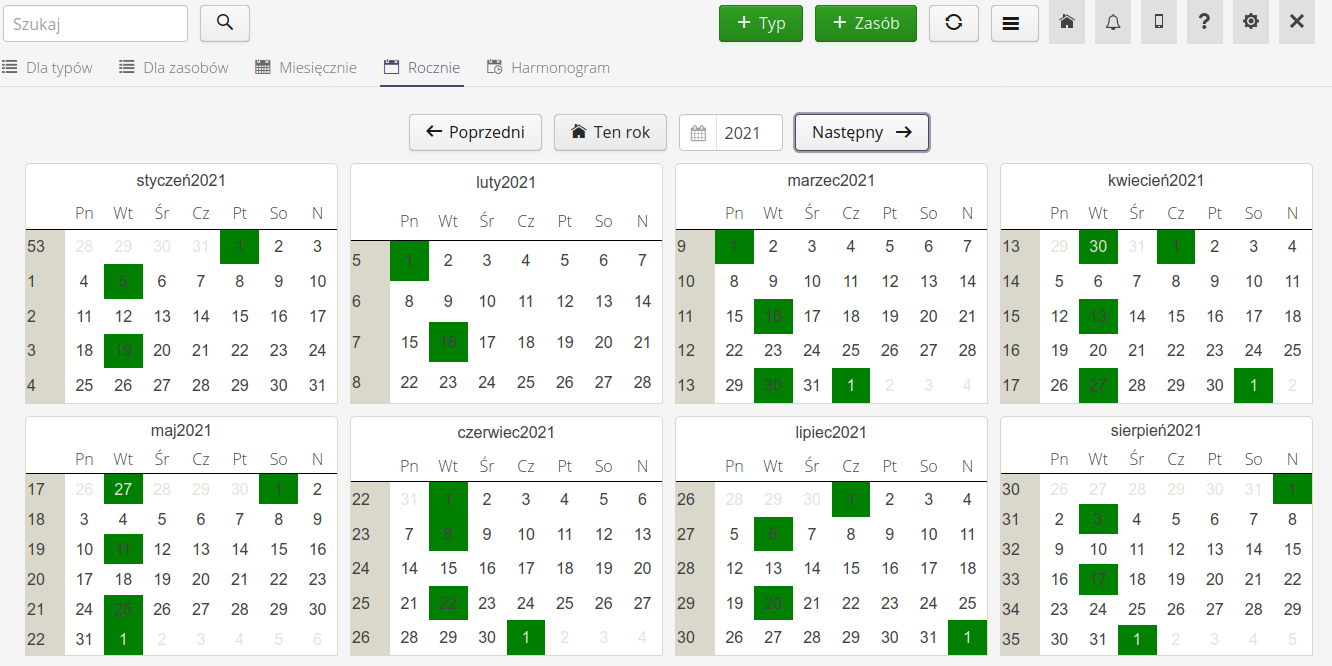
The inspection schedule view allows the data to be displayed in an analytical form, useful for a user planning such inspections.
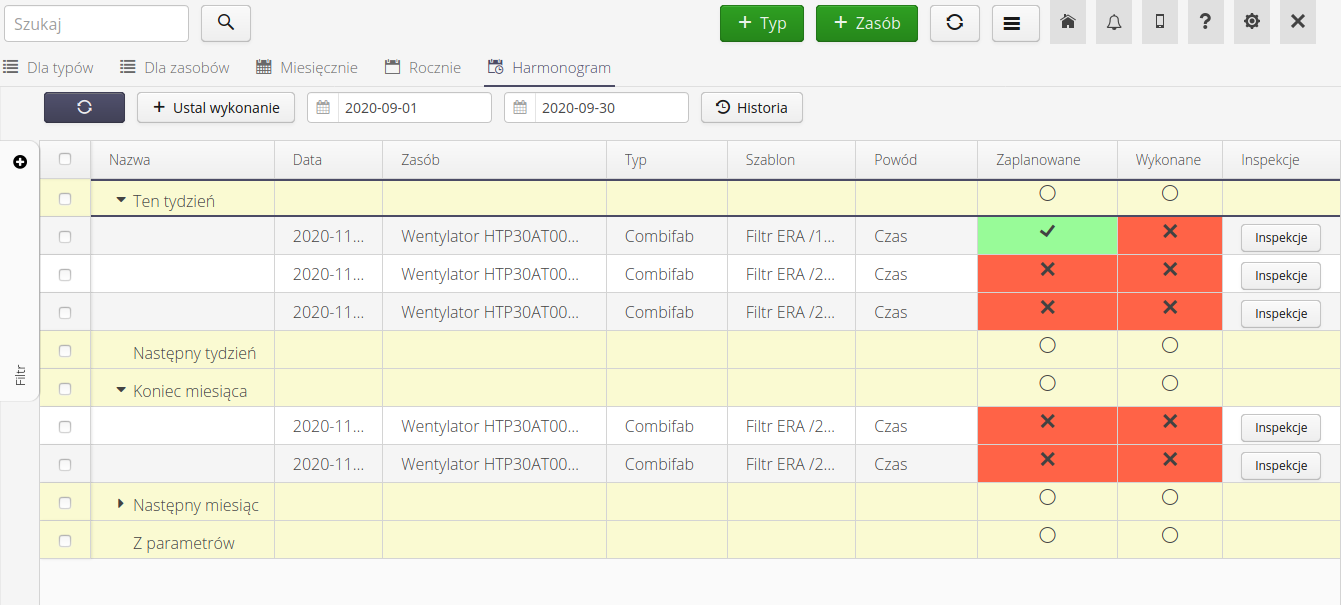
By default, the system displays in the inspection schedule a list of inspections divided into time ranges: this week, next week, by the end of the month, next month, and scheduled inspections resulting from parameters.
| The system in the inspection planner and calendars shows SUGGESTED inspections, i.e. inspections that result from the established inspection plan. It is only up to the user whether he ORDERS the inspections in question to be performed. Then they are monitored using the Inspection Executions view. |
The view of individual inspection plans shows information about:
-
device that should have an inspection performed
-
condition and template that generated such a need
-
information about the status of scheduling the execution of inspections
-
information on the status of the execution of the inspection (the actual completion of the execution of such inspection)
There is an option in the view:
-
schedule the execution of such inspections by selecting suggested inspections and choosing the Set Execution action
-
Display historical data - by selecting a date range and confirming it with the History button
-
Refresh data
When you select the Inspections button in the individual inspection plan view, the system displays all scheduled inspection executions that pertain to that period, along with information on the status and persons assigned

Selecting the Setup action displays the window for assigning users and work orders to selected inspections. The type of template and the devices result from the selected plan elements.
Work orders - scope of inspection
Work orders in the inspection execution section are the same as the main view of the work order list (module Work Structure). By default, the view is limited to the view of work orders of the Inspections type only. Other operations are the same as the main view.
In the details of the work order, lists of inspection performances that are associated with the work order appear.

In addition, the user can use the View in List button to view all inspections for a given work order in a dedicated inspection execution view.