Offline mode - inspection rounds
The offline inspection rounds functionality allows you to perform all inspection rounds functions in the field without the need for internet access.
| The general offline mode interface is described in a separate chapter. Refer to it for details Offline Mode. |
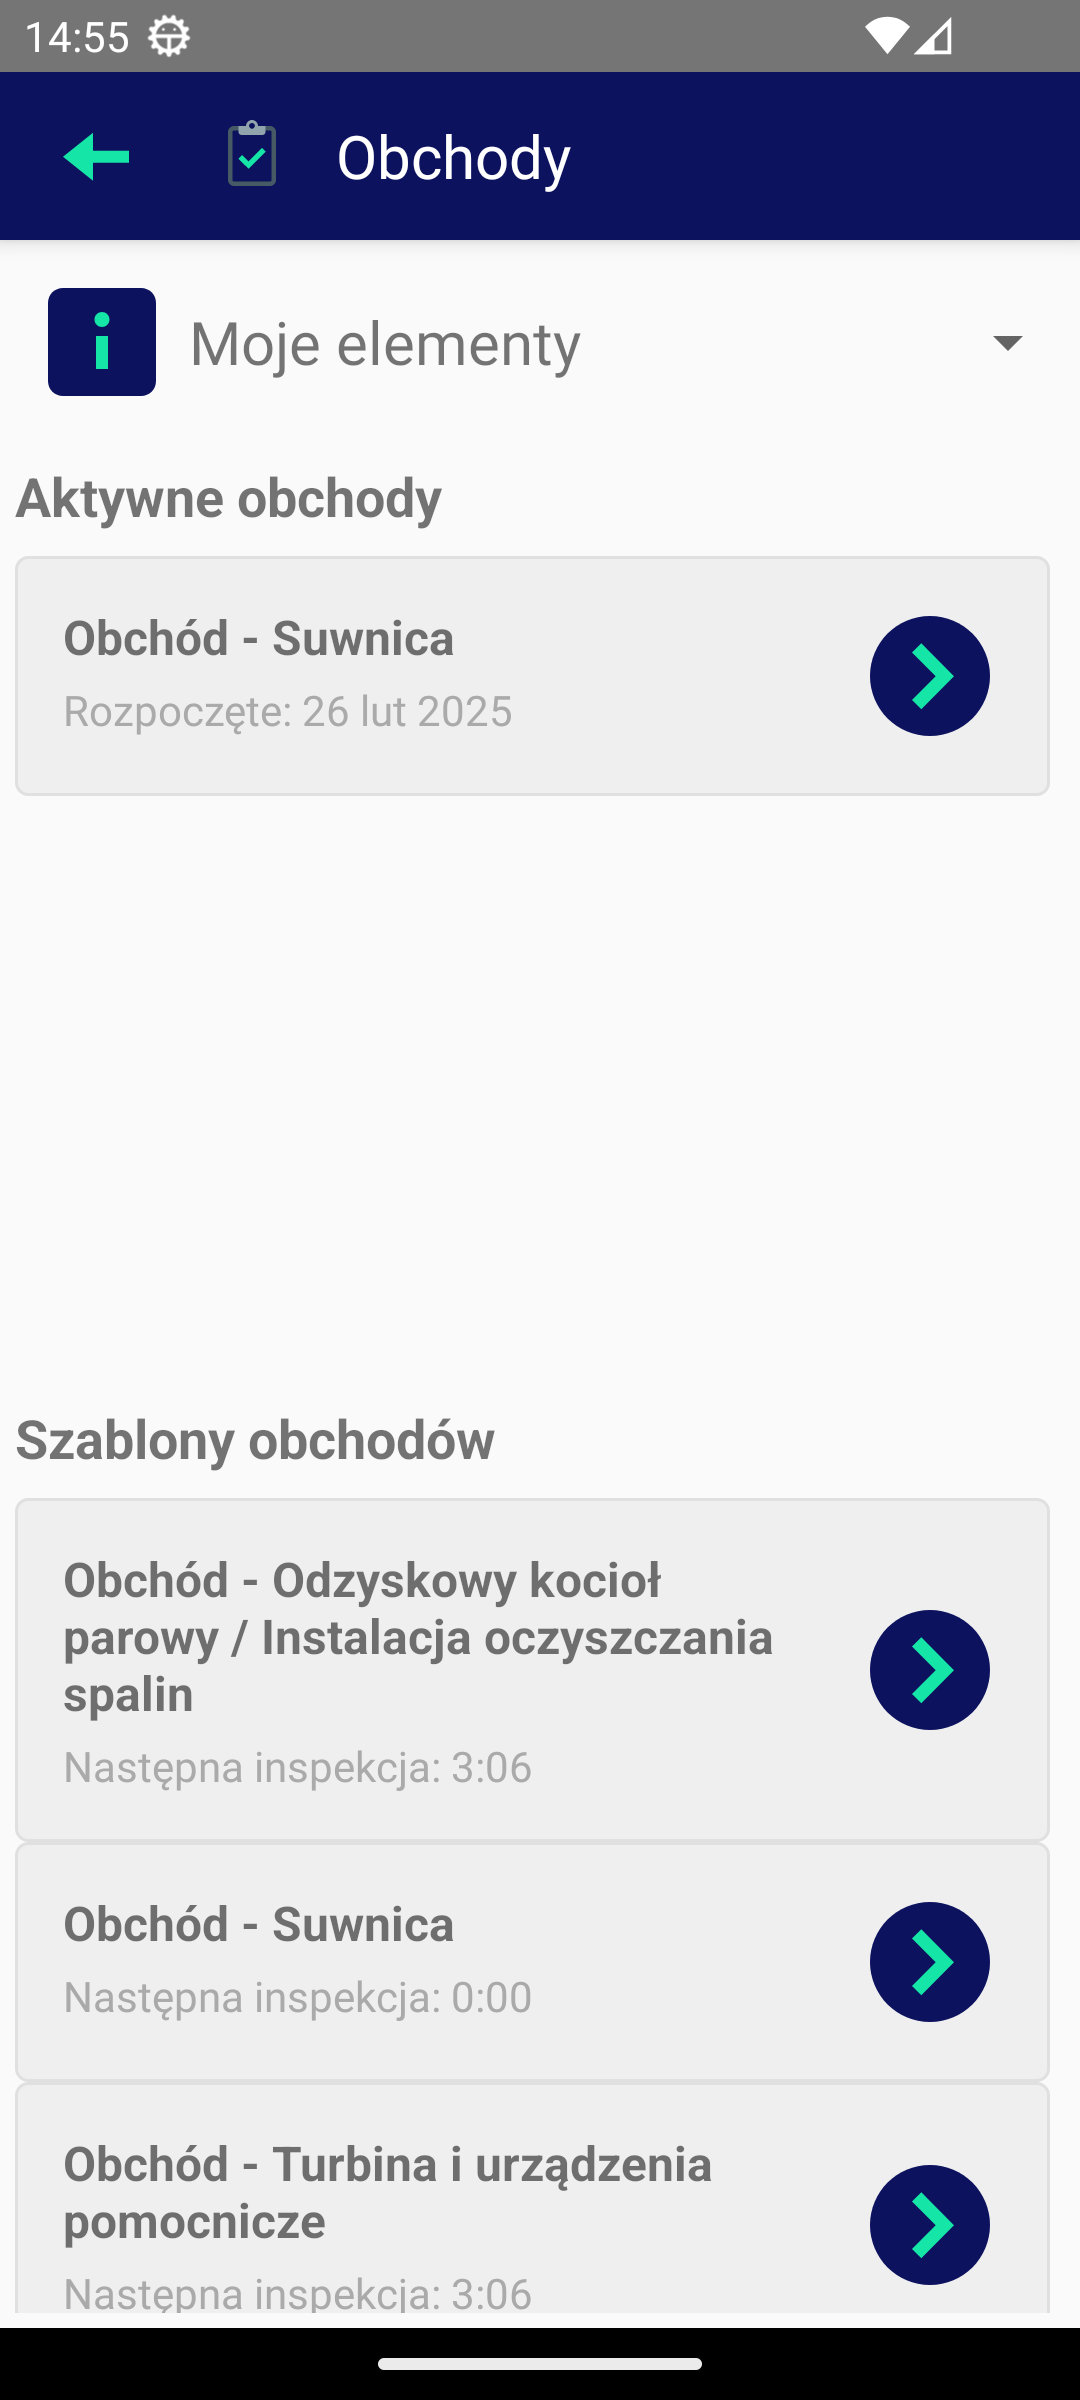
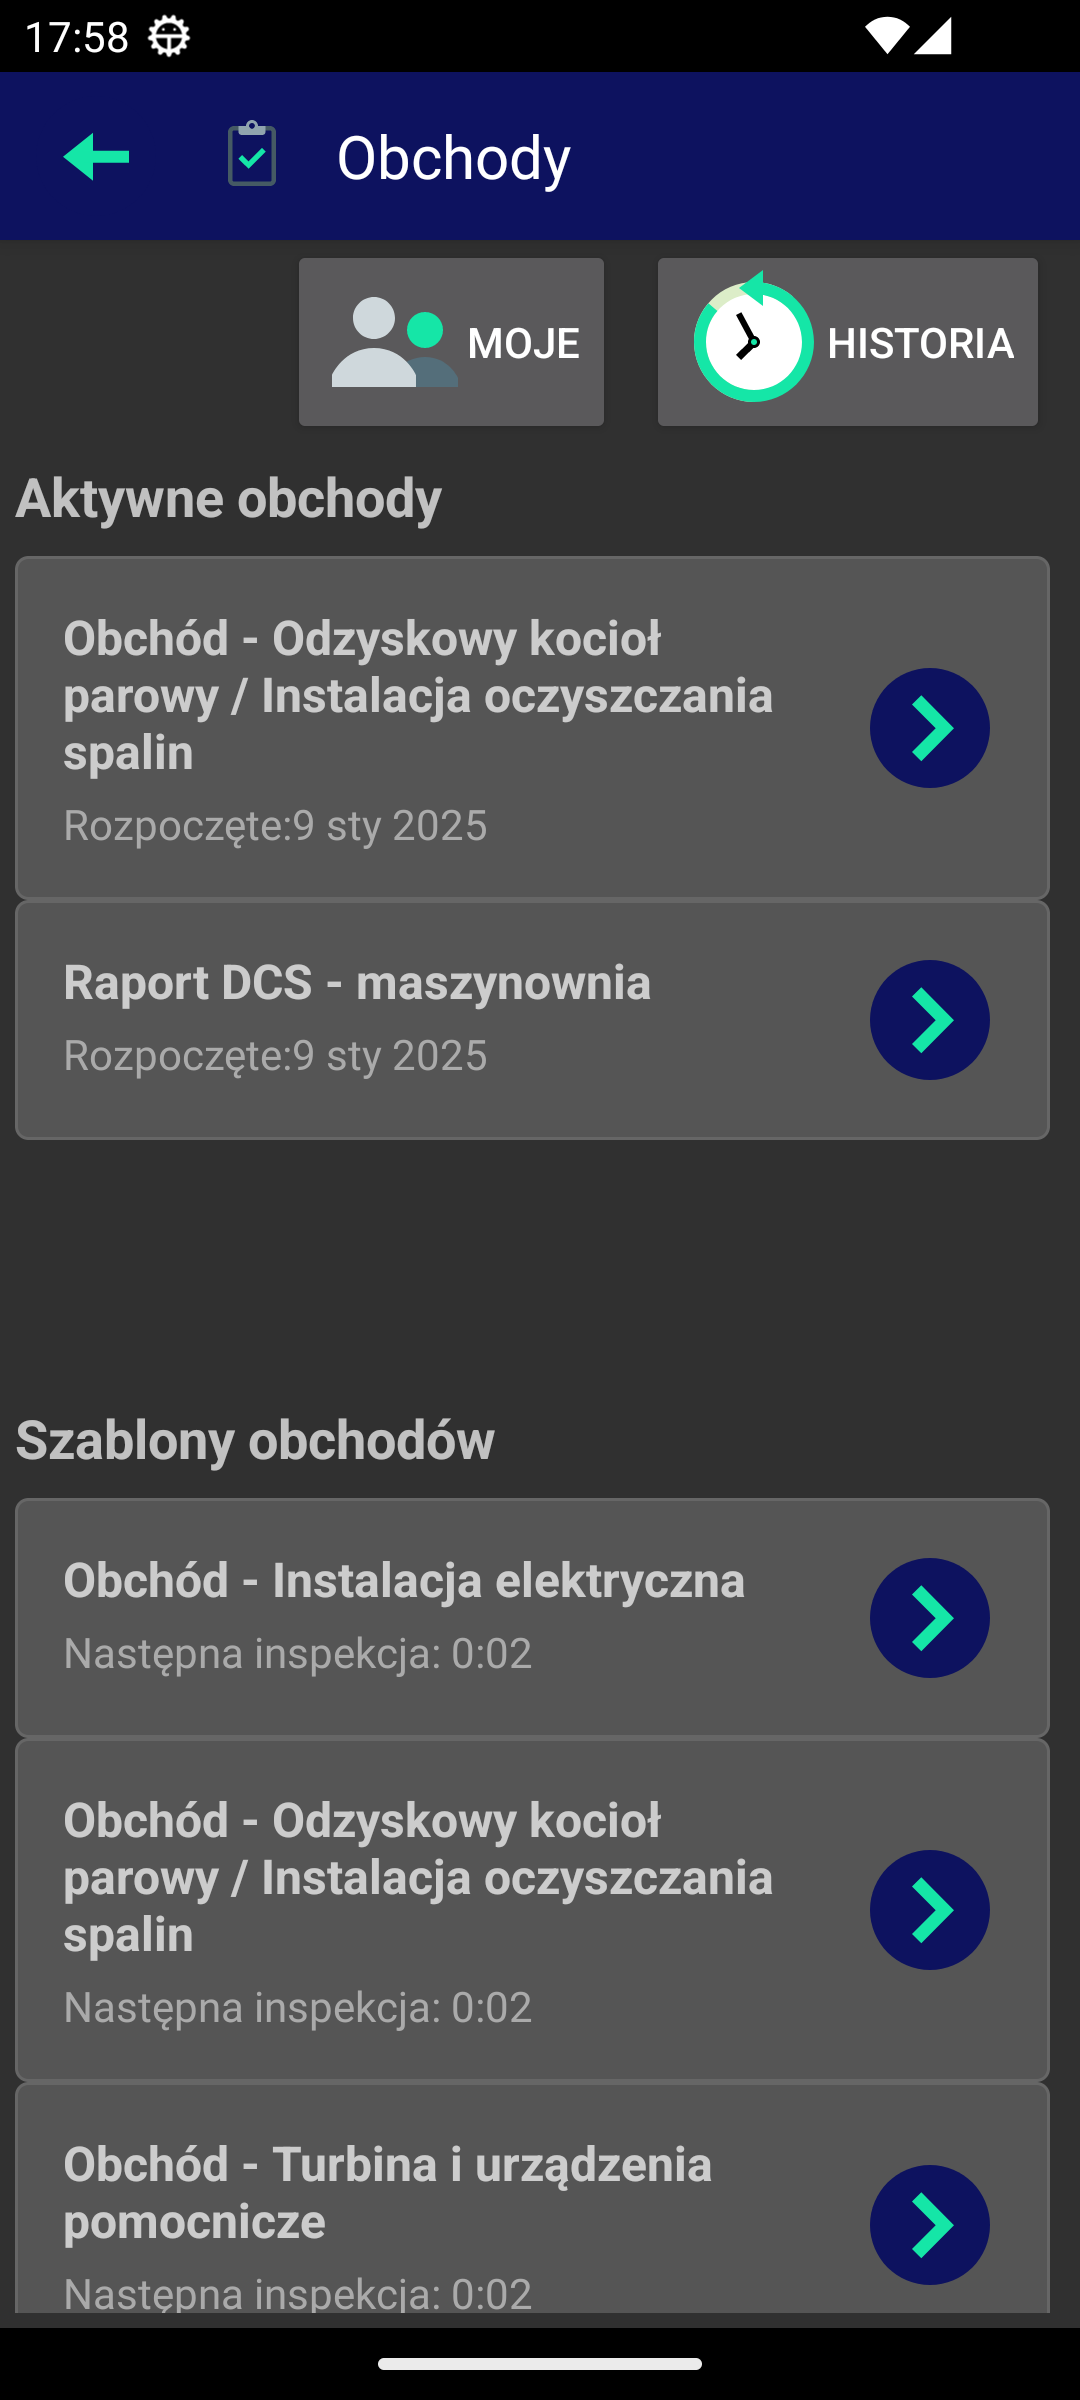
After selecting the inspection round function from the start section, we go to the inspection round list. The window is divided into three parts. The first contains a selector that filters the inspection round currently being performed on this device. Then, a list of active inspection round is displayed, i.e. those that have been started but not yet completed or others according to the selected filter. The lower part of the view contains a list of inspection round templates, i.e. definitions of inspection round that can be performed.
The list of inspection round templates also contains information on when a given inspection round should be performed. This is displayed if a given inspection round has a defined schedule for its execution.
Available view items:
-
Exit to main menu button - exit to the main application start screen
-
Filter Selector - Filters the list of active inspection rounds
-
Active inspection rounds - a list of inspection rounds that have been started but not yet completed or according to the selected filter
-
Inspection round Templates - List of inspection round templates that can be executed
To start a new inspection round, select the Play button in the list of inspection round templates. The system will automatically create a new inspection round and proceed to its execution. If a inspection round has already been started for a given user, an appropriate message will appear, which will force the end of the currently open inspection round, and only then allow the start of a new one.
Continuing a started inspection round involves selecting it from the list of active inspection rounds. After selecting the inspection round, the system will take us to the inspection round execution view.
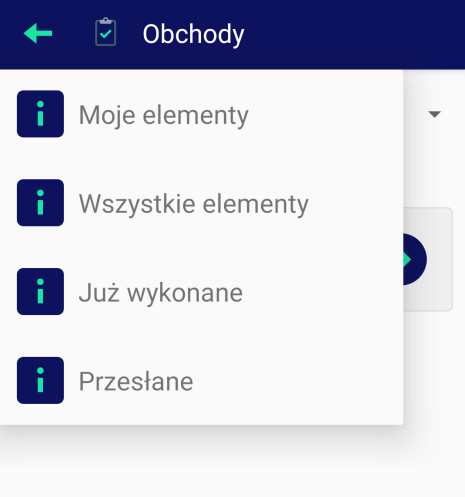
Filters allow you to display active inspection rounds. Selecting a filter allows you to display only those inspection rounds that match the selected criteria. It is possible to filter inspection rounds by specific ranges.
-
My Items - Displays the active inspection rounds of a given user.
-
All Items - Displays all active inspection rounds available on the device
-
Already done - displaying completed inspection rounds
-
Sent - Displays the inspection rounds that have been completed and sent to the central system
| Inspection rounds that have been completed or sent to the central system cannot be edited. After 30 days from sending, the inspection rounds are deleted from the device and can only be viewed in the central system or in the device’s online mode. Inspection rounds before sending can only be deleted, not allowed to be sent to the central system. |
Inspection round execution
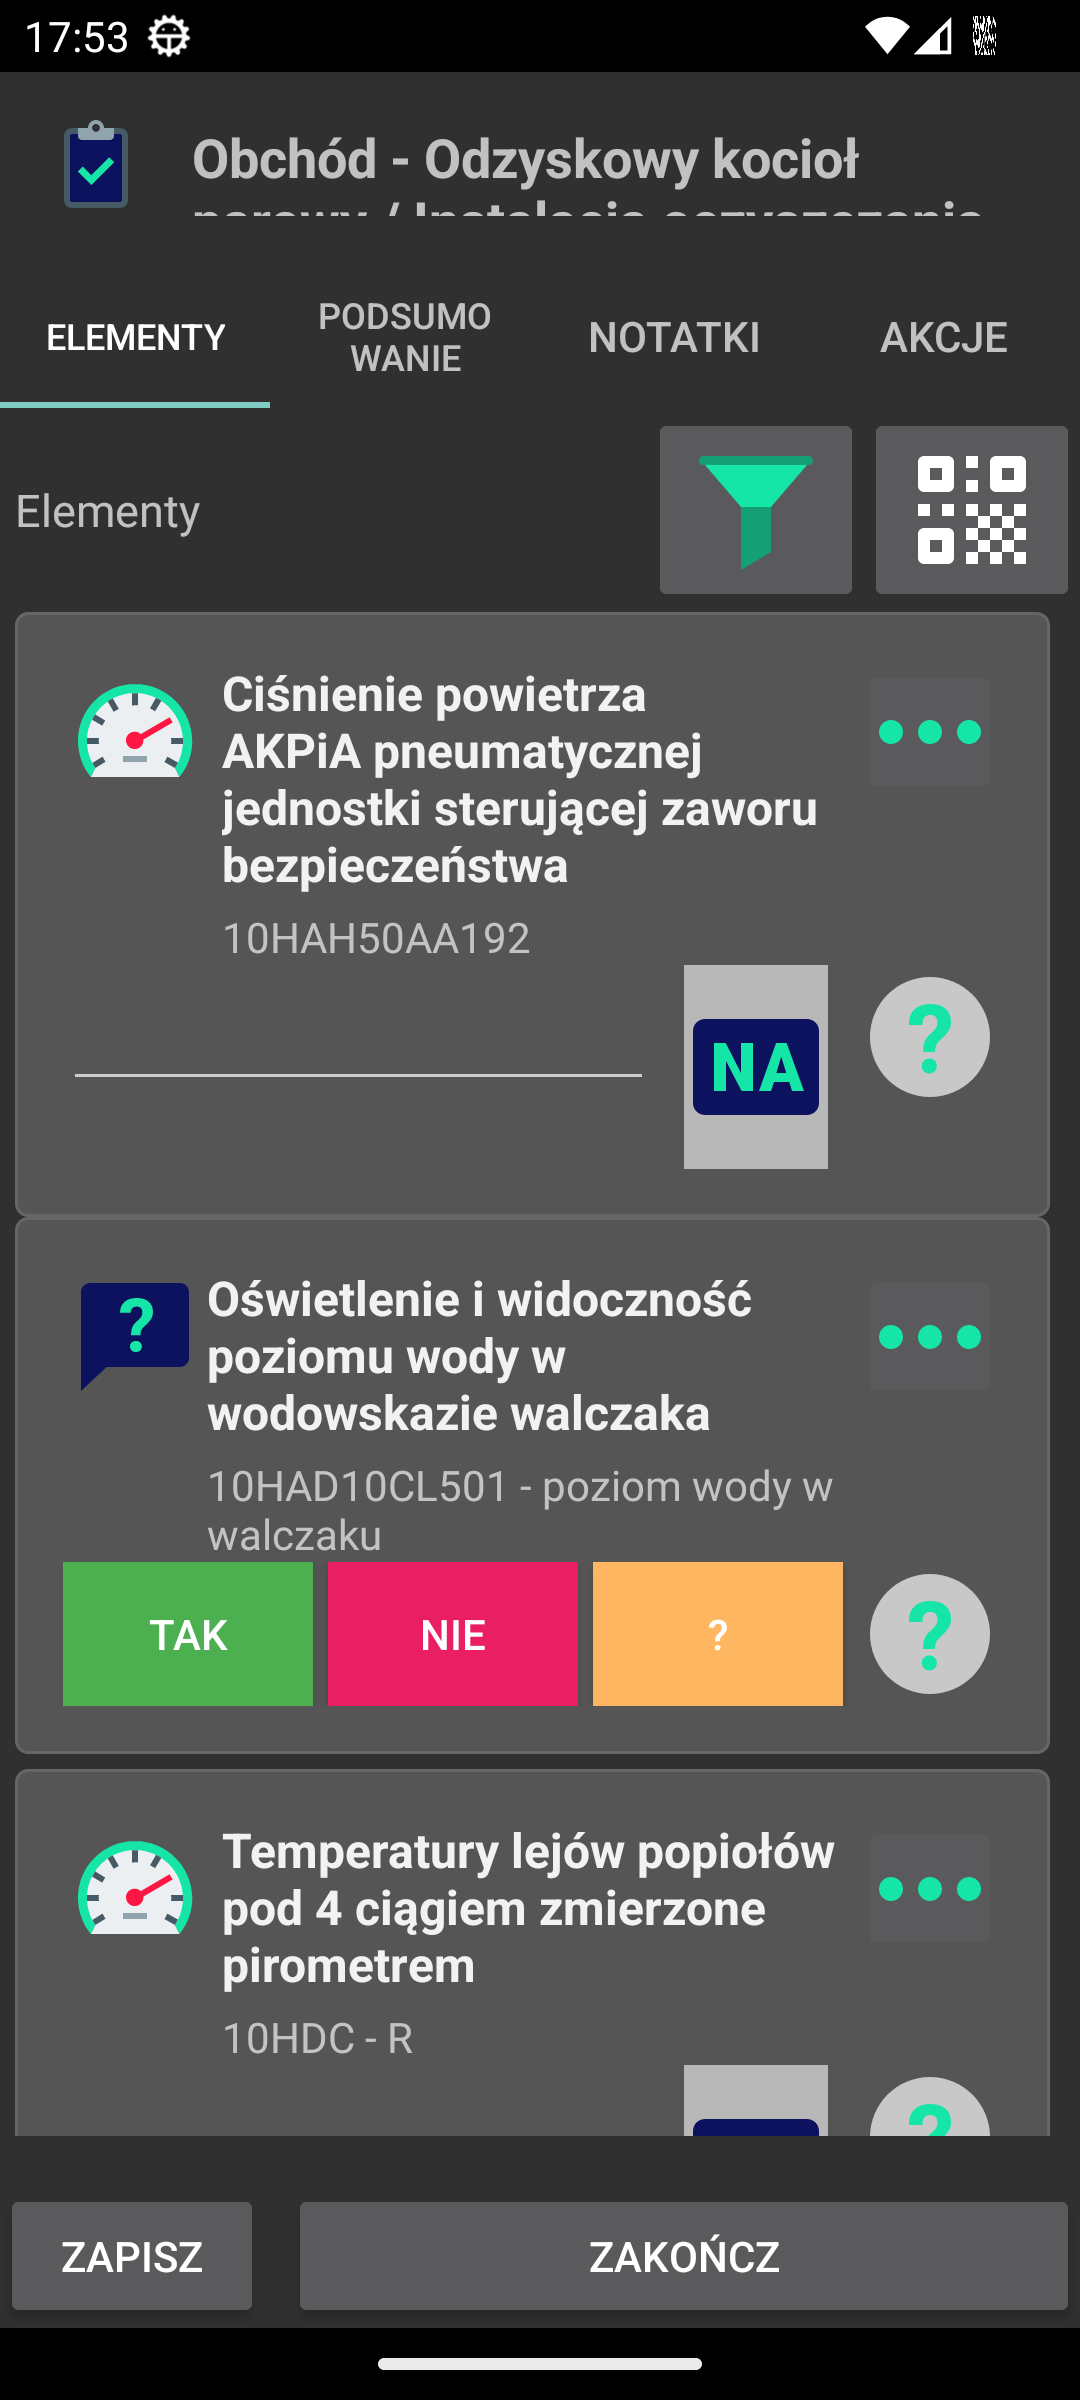
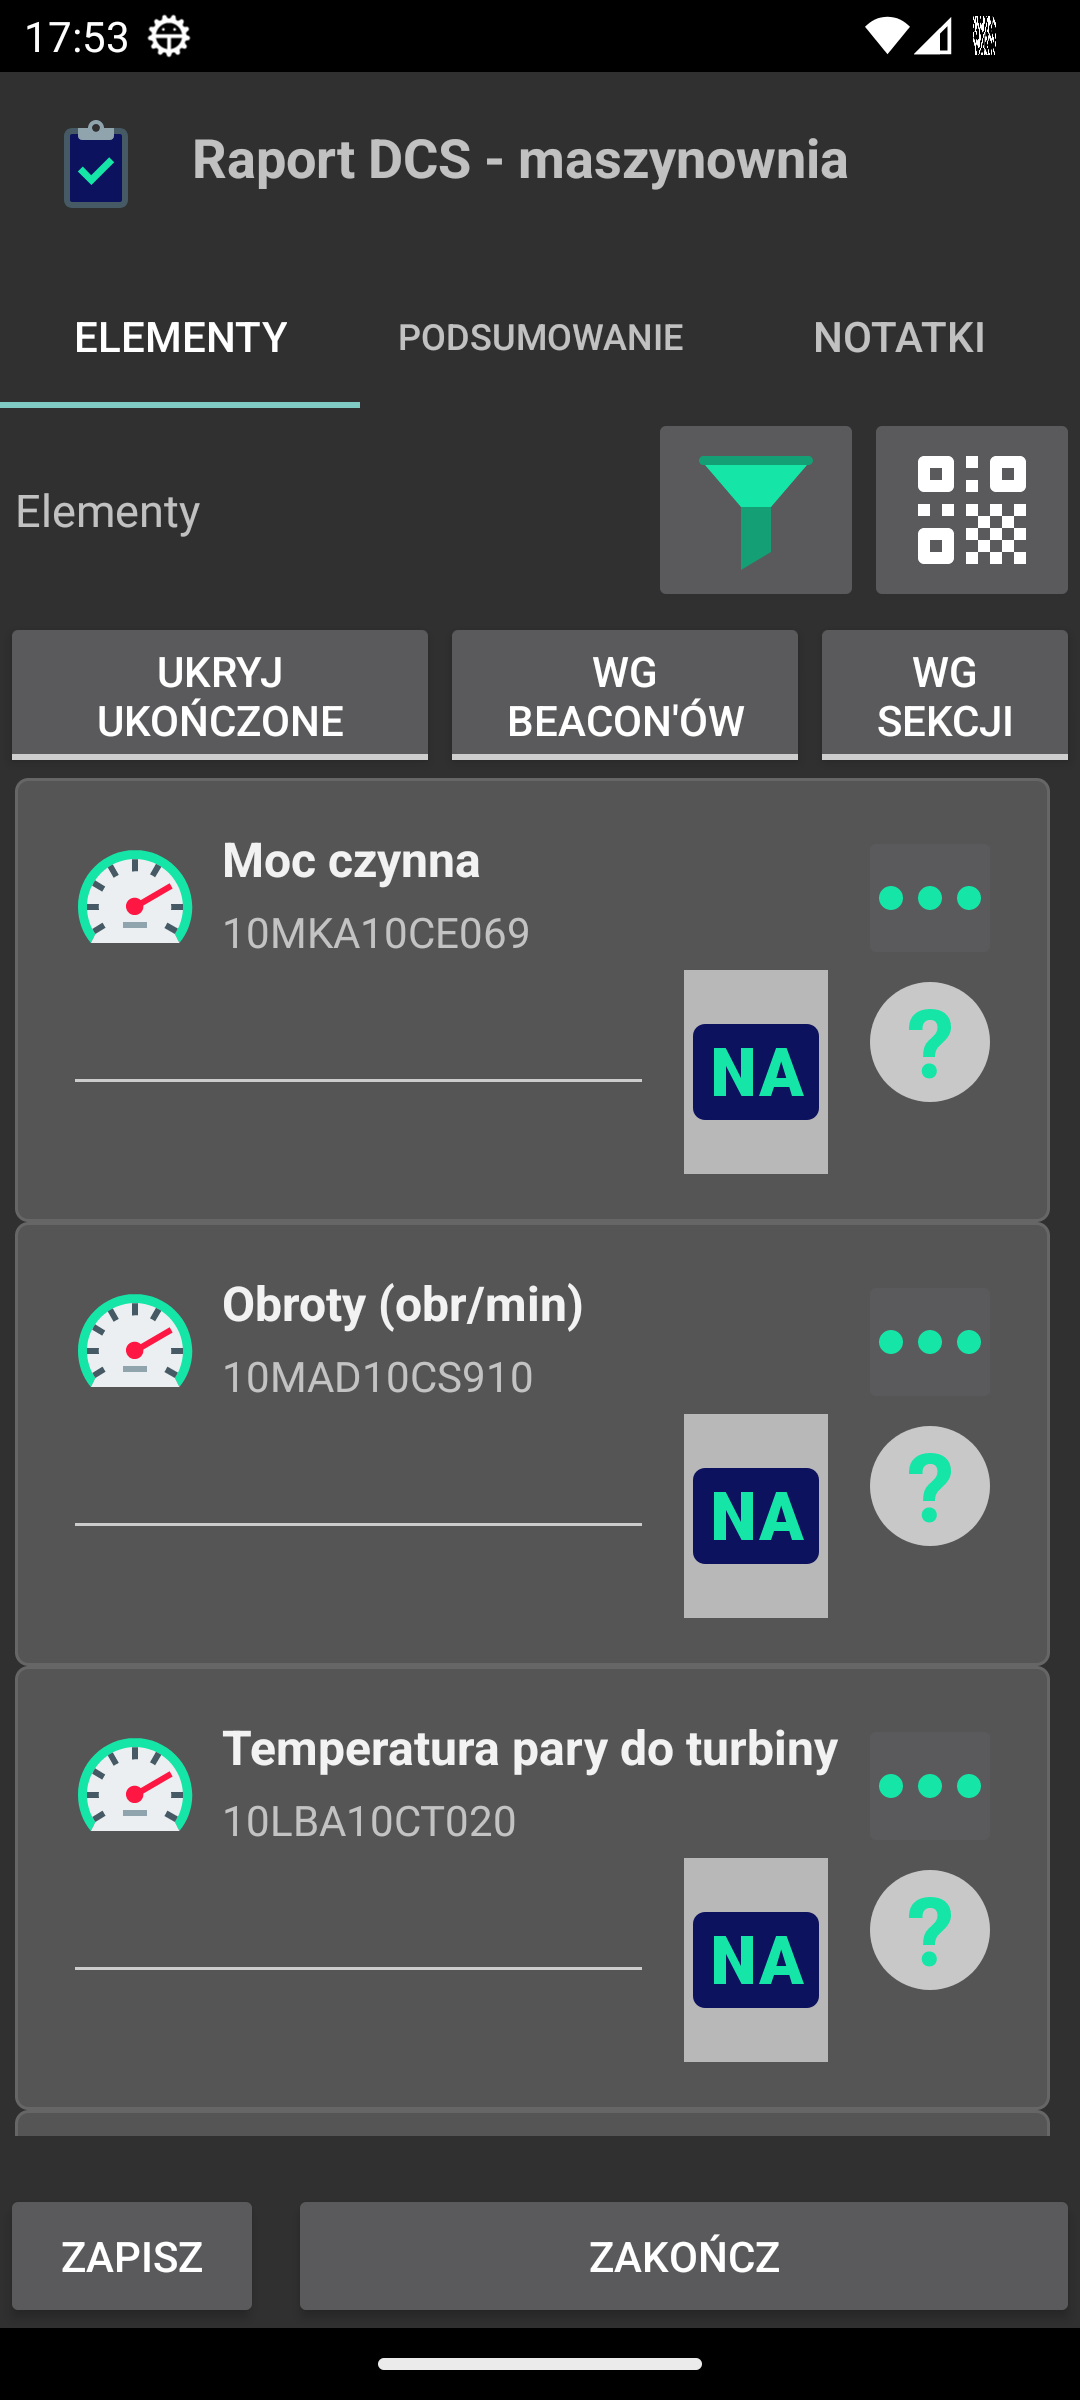
Going to execute an inspection round opens a new window with details of the given inspection round. The window is divided into tabs. The first one contains a list of elements of the inspection round, the second one contains information ending the inspection round, then two allow you to attach additional photos/attachments to the inspection round and select the inspection round actions that were performed during the inspection round.
The view is divided into the following elements:
-
Bookmarks - selection of bookmarks for the inspection round execution view
-
Elements - questions, measurements, tasks - list of elements of the inspection round or other tasks to be performed
-
Save button - a button that saves the execution of the inspection round, but does not formally close it
-
Finish button - a button that checks the completeness of the inspection round, saves it and closes it, formally marking it as completed
| While performing an inspection round, we can save it and return to performing it again later. The system automatically saves the progress of the round every 30 seconds. When the inspection round is finished, the system saves it and formally closes it. |
Additional filters and options in the button bar allow you to:
-
Display additional filters for the inspection round items list
-
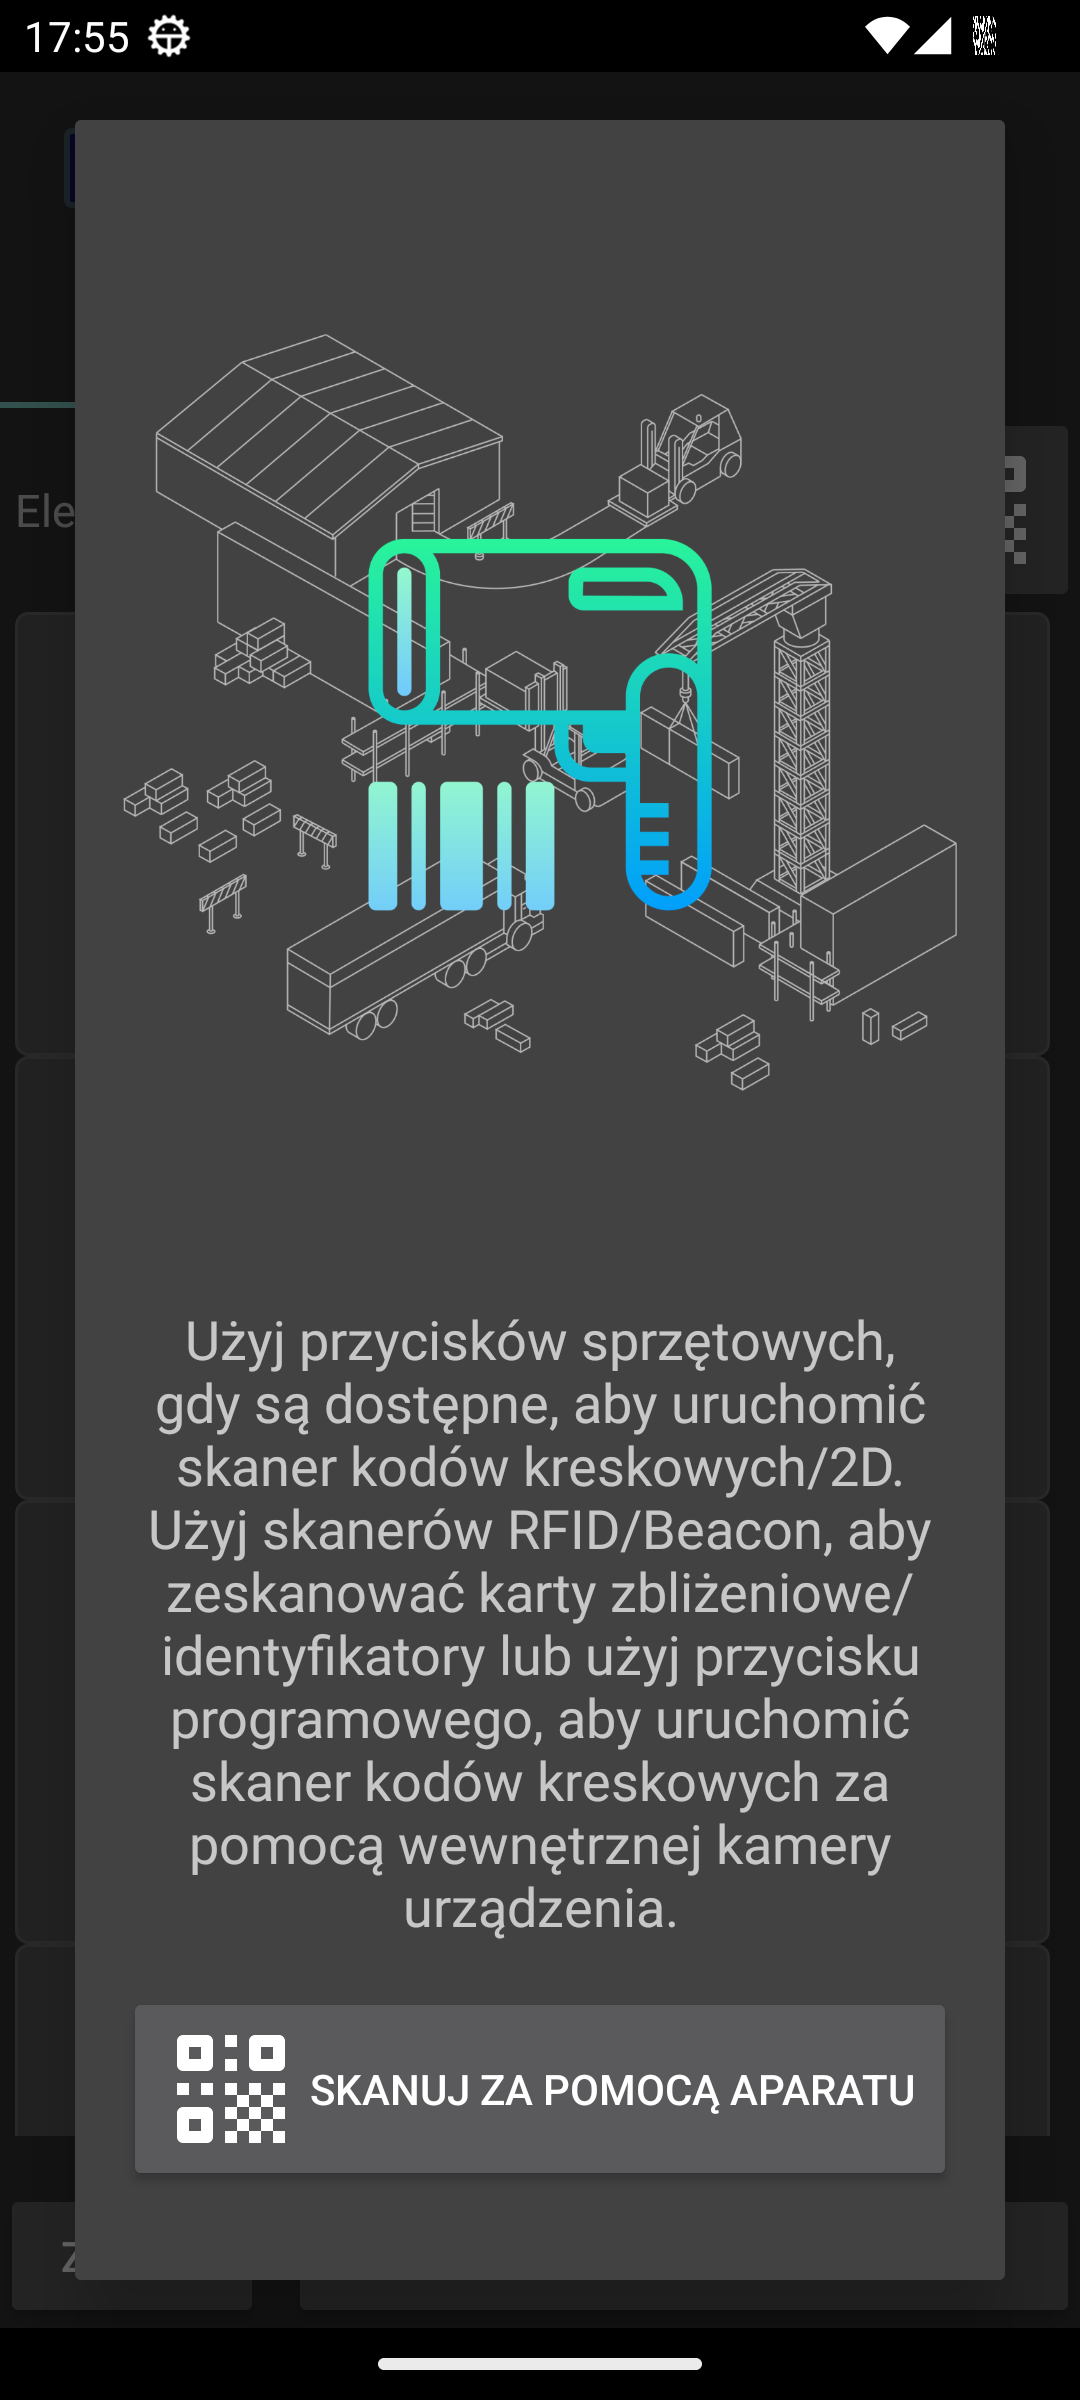
Triggering a barcode/RFID scanner to identify the item.
| When using physical buttons on the device that automatically activate scanning, there is no need to call up the scanning window. Simply scan the barcode/RFID and the system will automatically identify the item on the inspection round. |
Identification after scanning an element allows for automatic transition to a given element of the inspection round associated with a given identifier. If the element is a task to be performed, e.g. confirmation of presence by scanning a code, then this task will be automatically marked as completed.
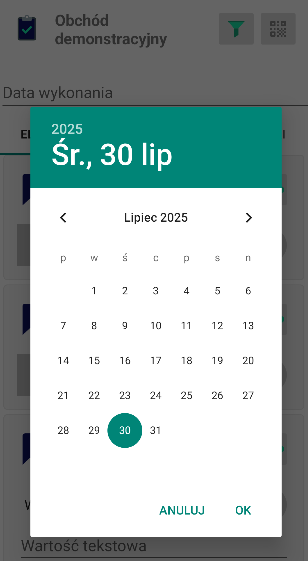
W przypadku, gdy w szablonie obchodu włączona jest opcja Pozwalaj na zmianę daty wykonania, to pojawia się dodatkowy pole, który pozwala na zmianę daty wykonania obchodu. Po jego wybraniu pojawia się okno dialogowe, w którym można zmienić datę wykonania obchodu i z tą datą zostanie zapisane wykonanie.
| W takim przypadku czas wykonania obchodu będzie liczony jako jedna godzina. |
The filter button displays an additional line of filters that allow you to display only those items that match the selected criteria. It is possible to filter the inspection round items by specific ranges.
Available functions:
-
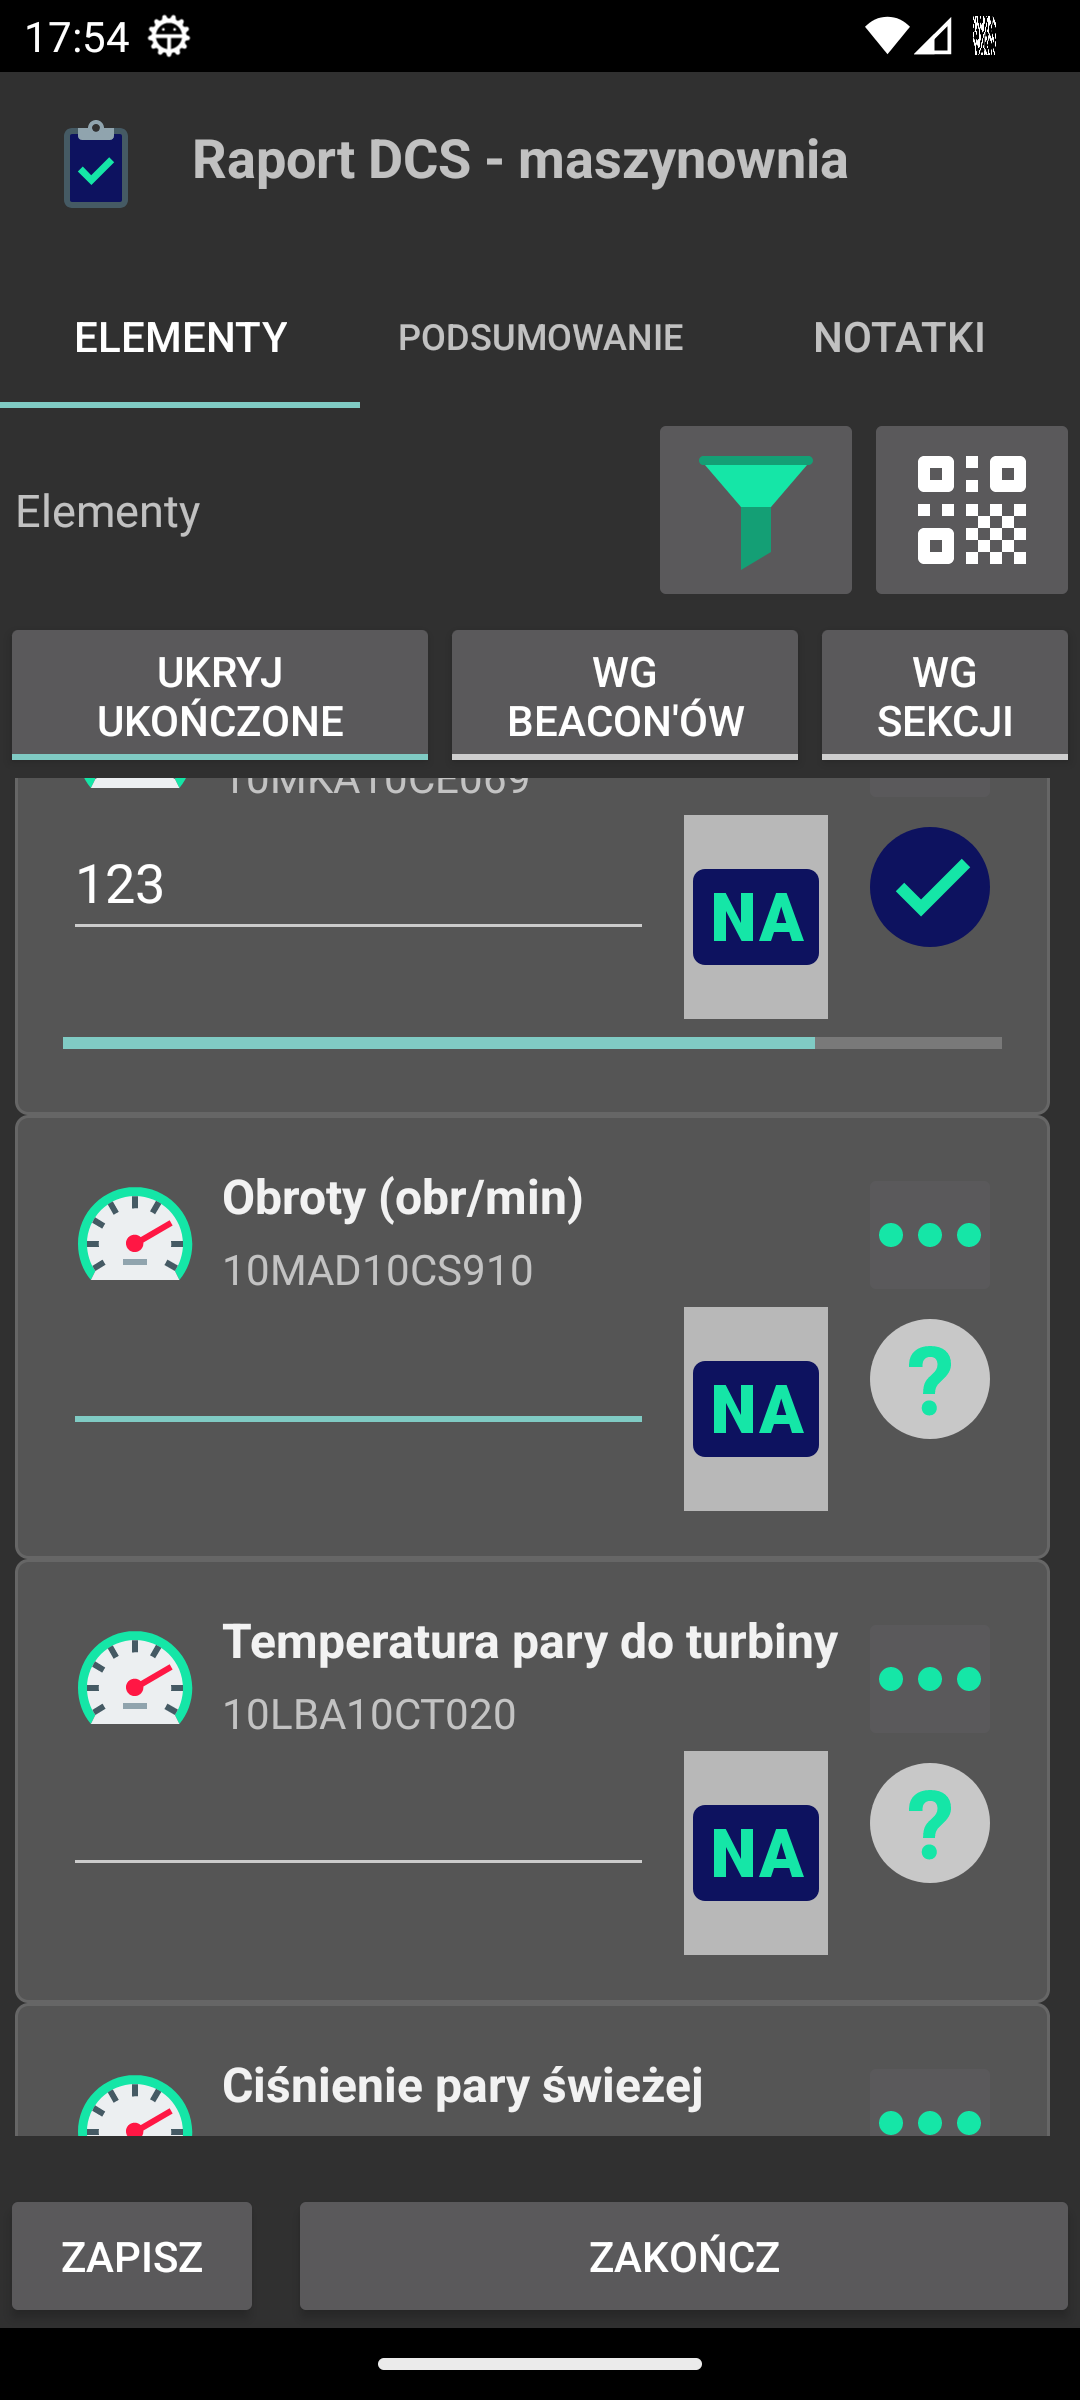
Hide Completed - automatically hides items that have been completed. A completed item is displayed for a moment after completion. This is visible via a progress bar in a given item. After this time, the item disappears from the list.
-
By beacons - automatic filtering of elements is used, which are related to the sections to which the bluetooth beacon is assigned. Details of this functionality are described in the AMAGE Academy in a separate chapter.
-
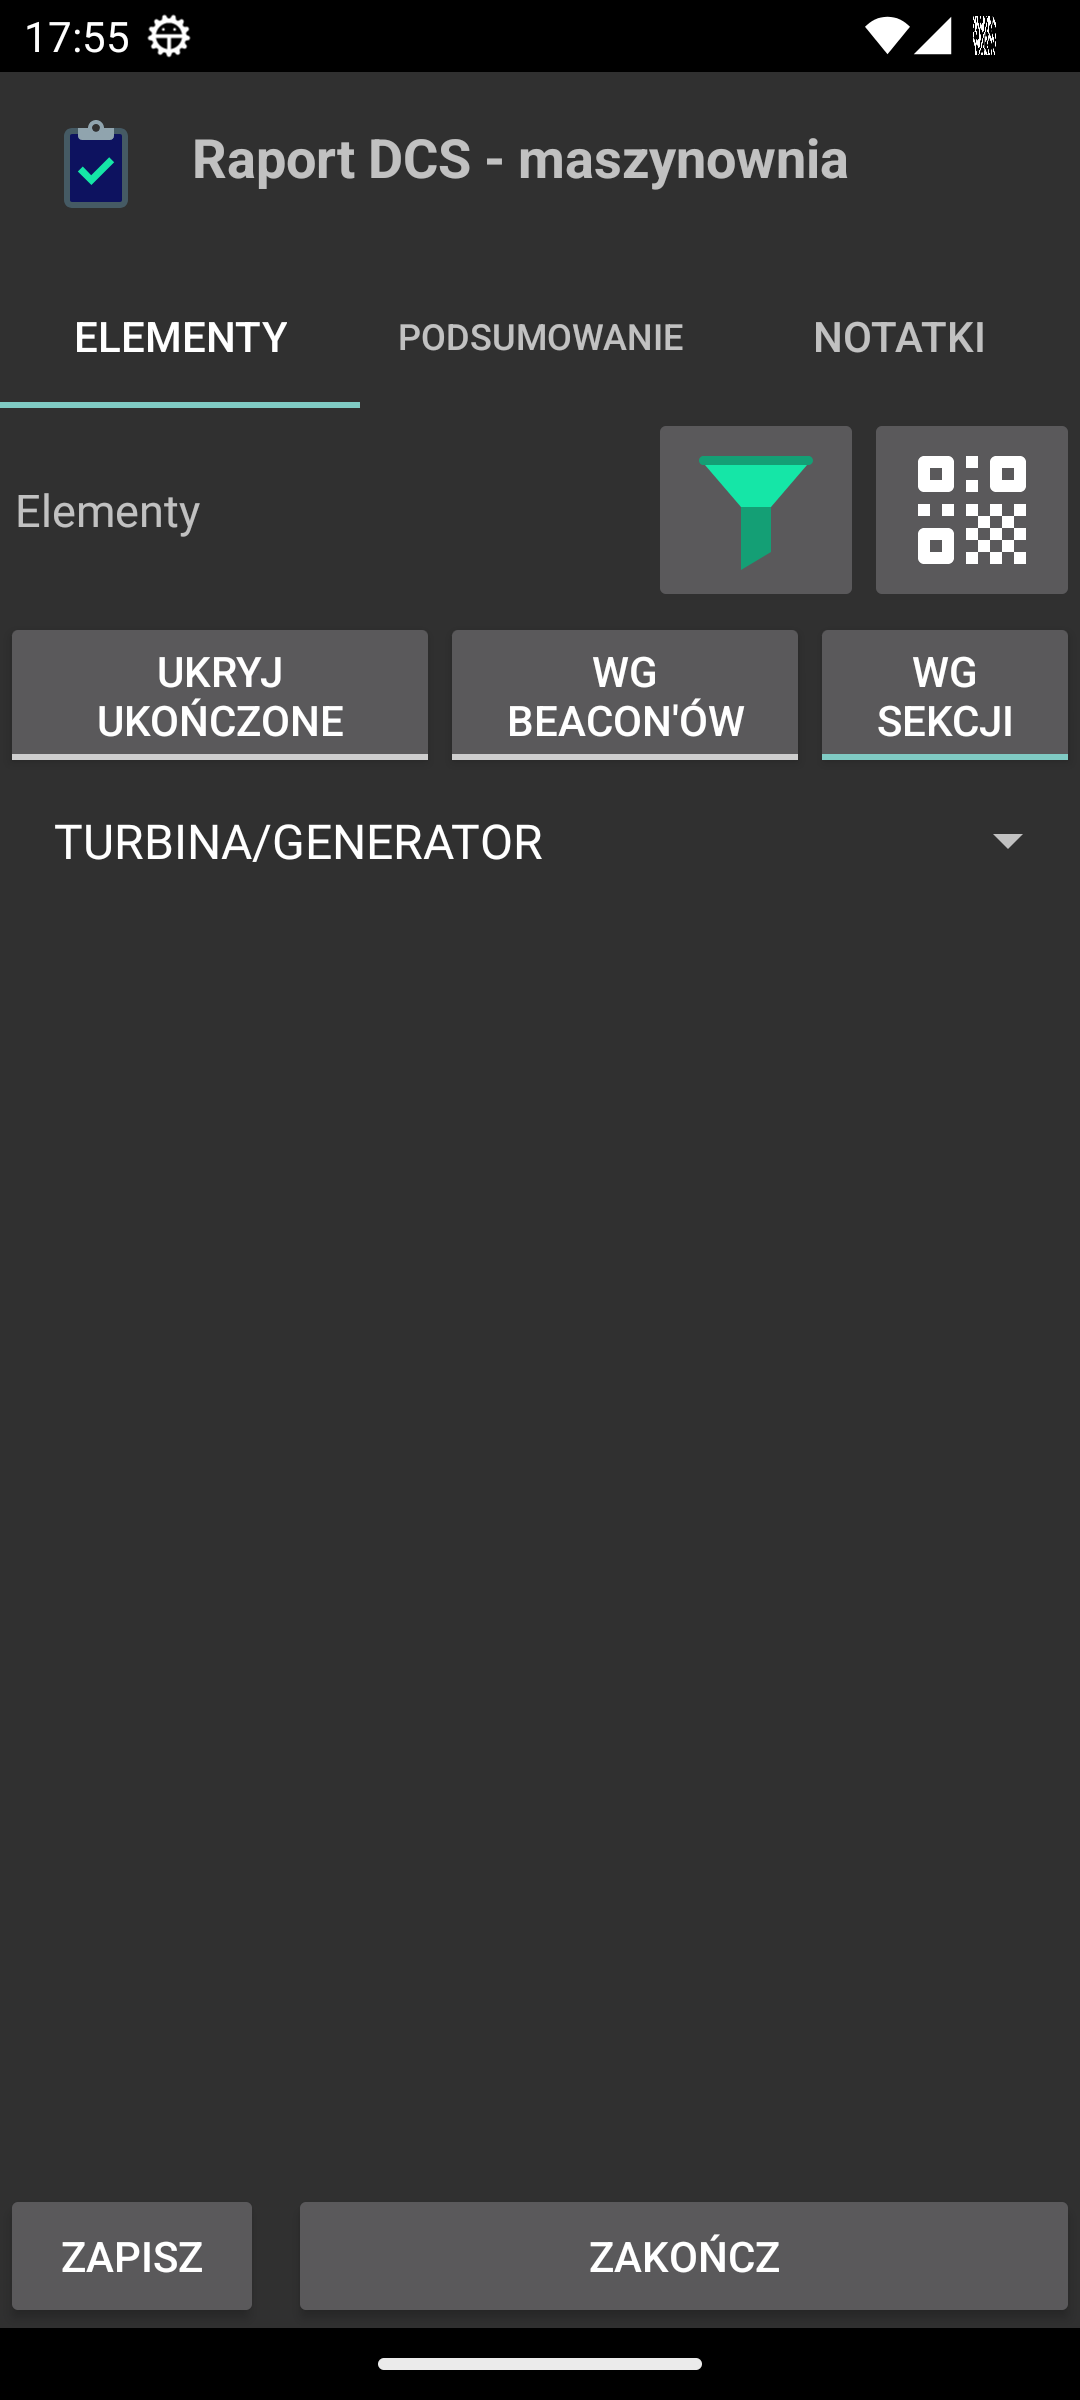
By section - if a given inspection round has separate question/measurement sections, a button appears that allows you to select elements of a given section based on the checkbox that appears after selecting this option.
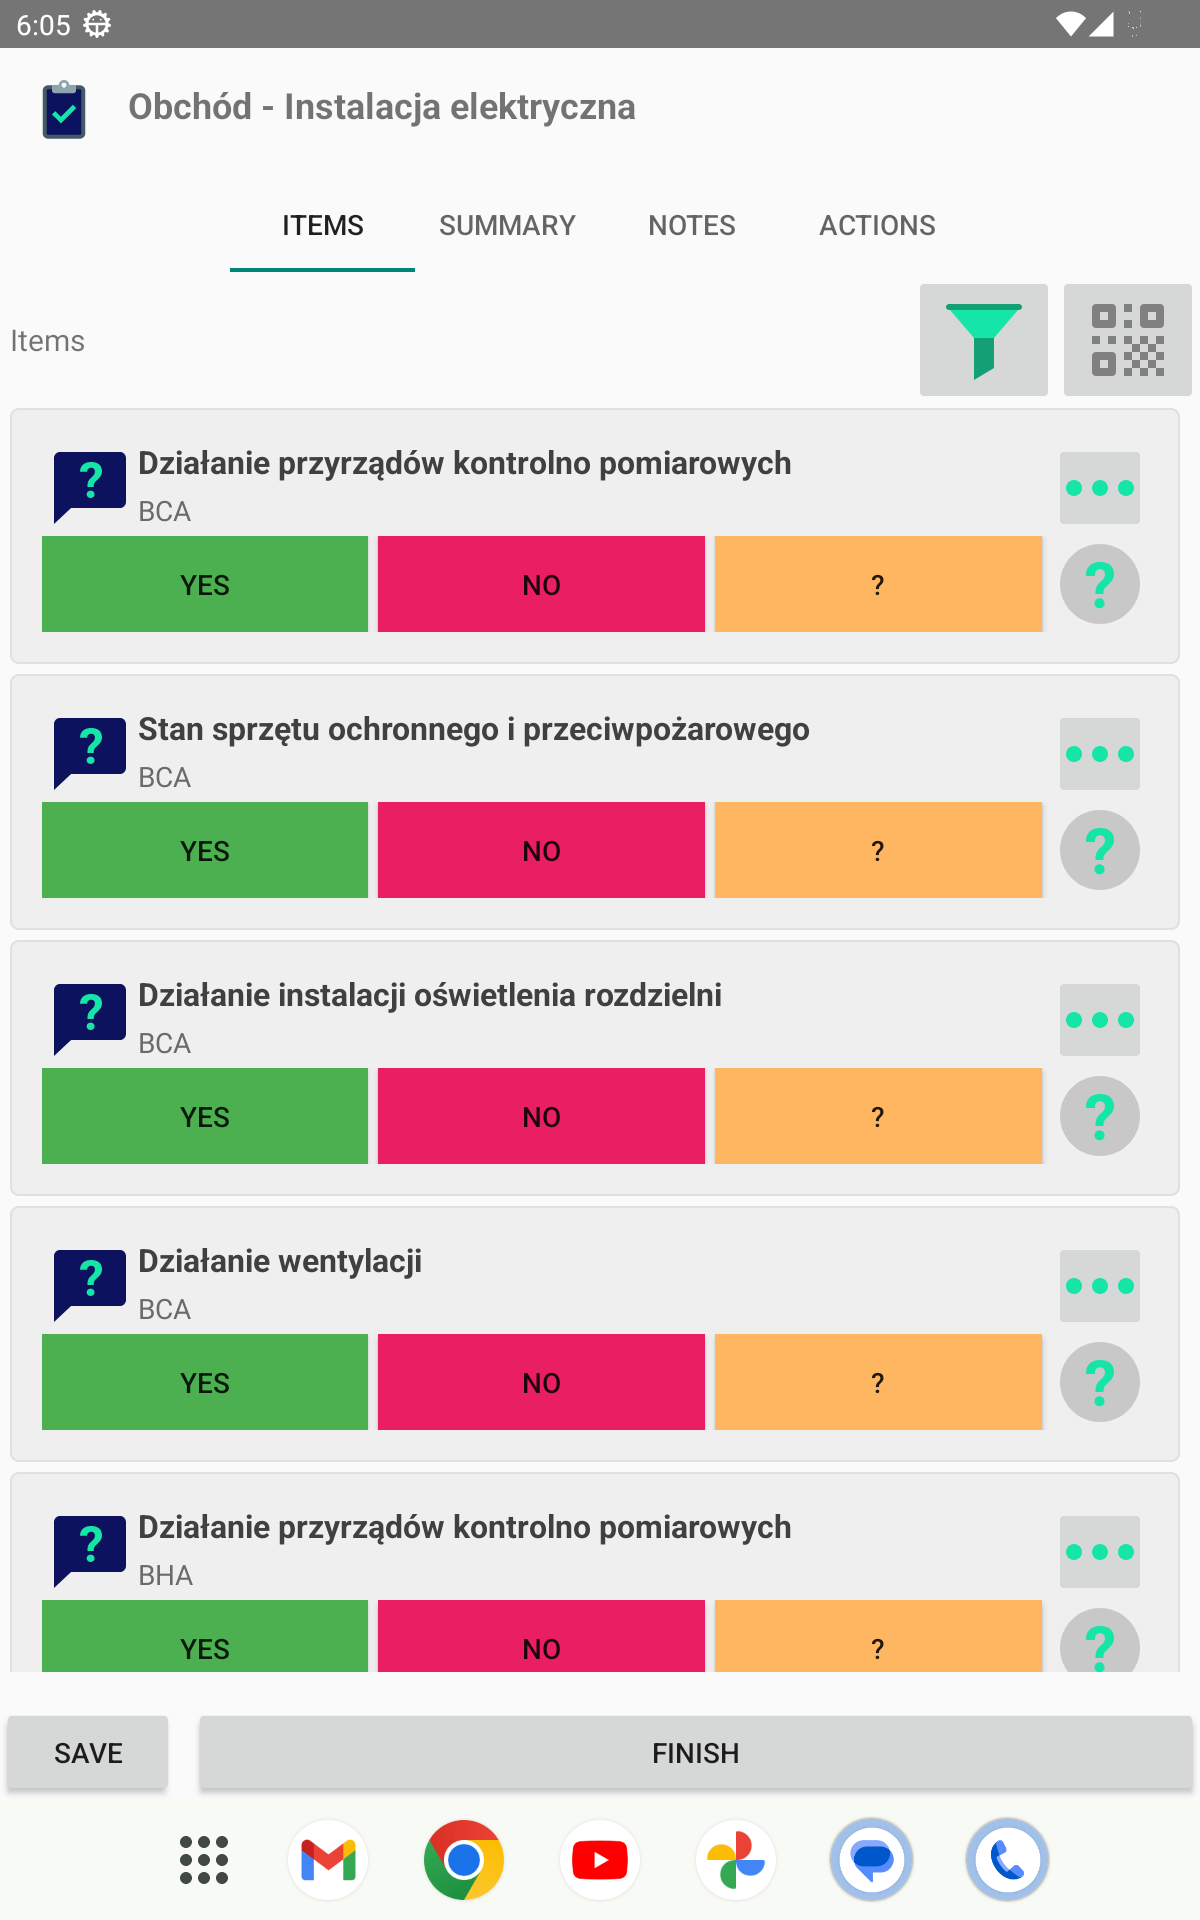
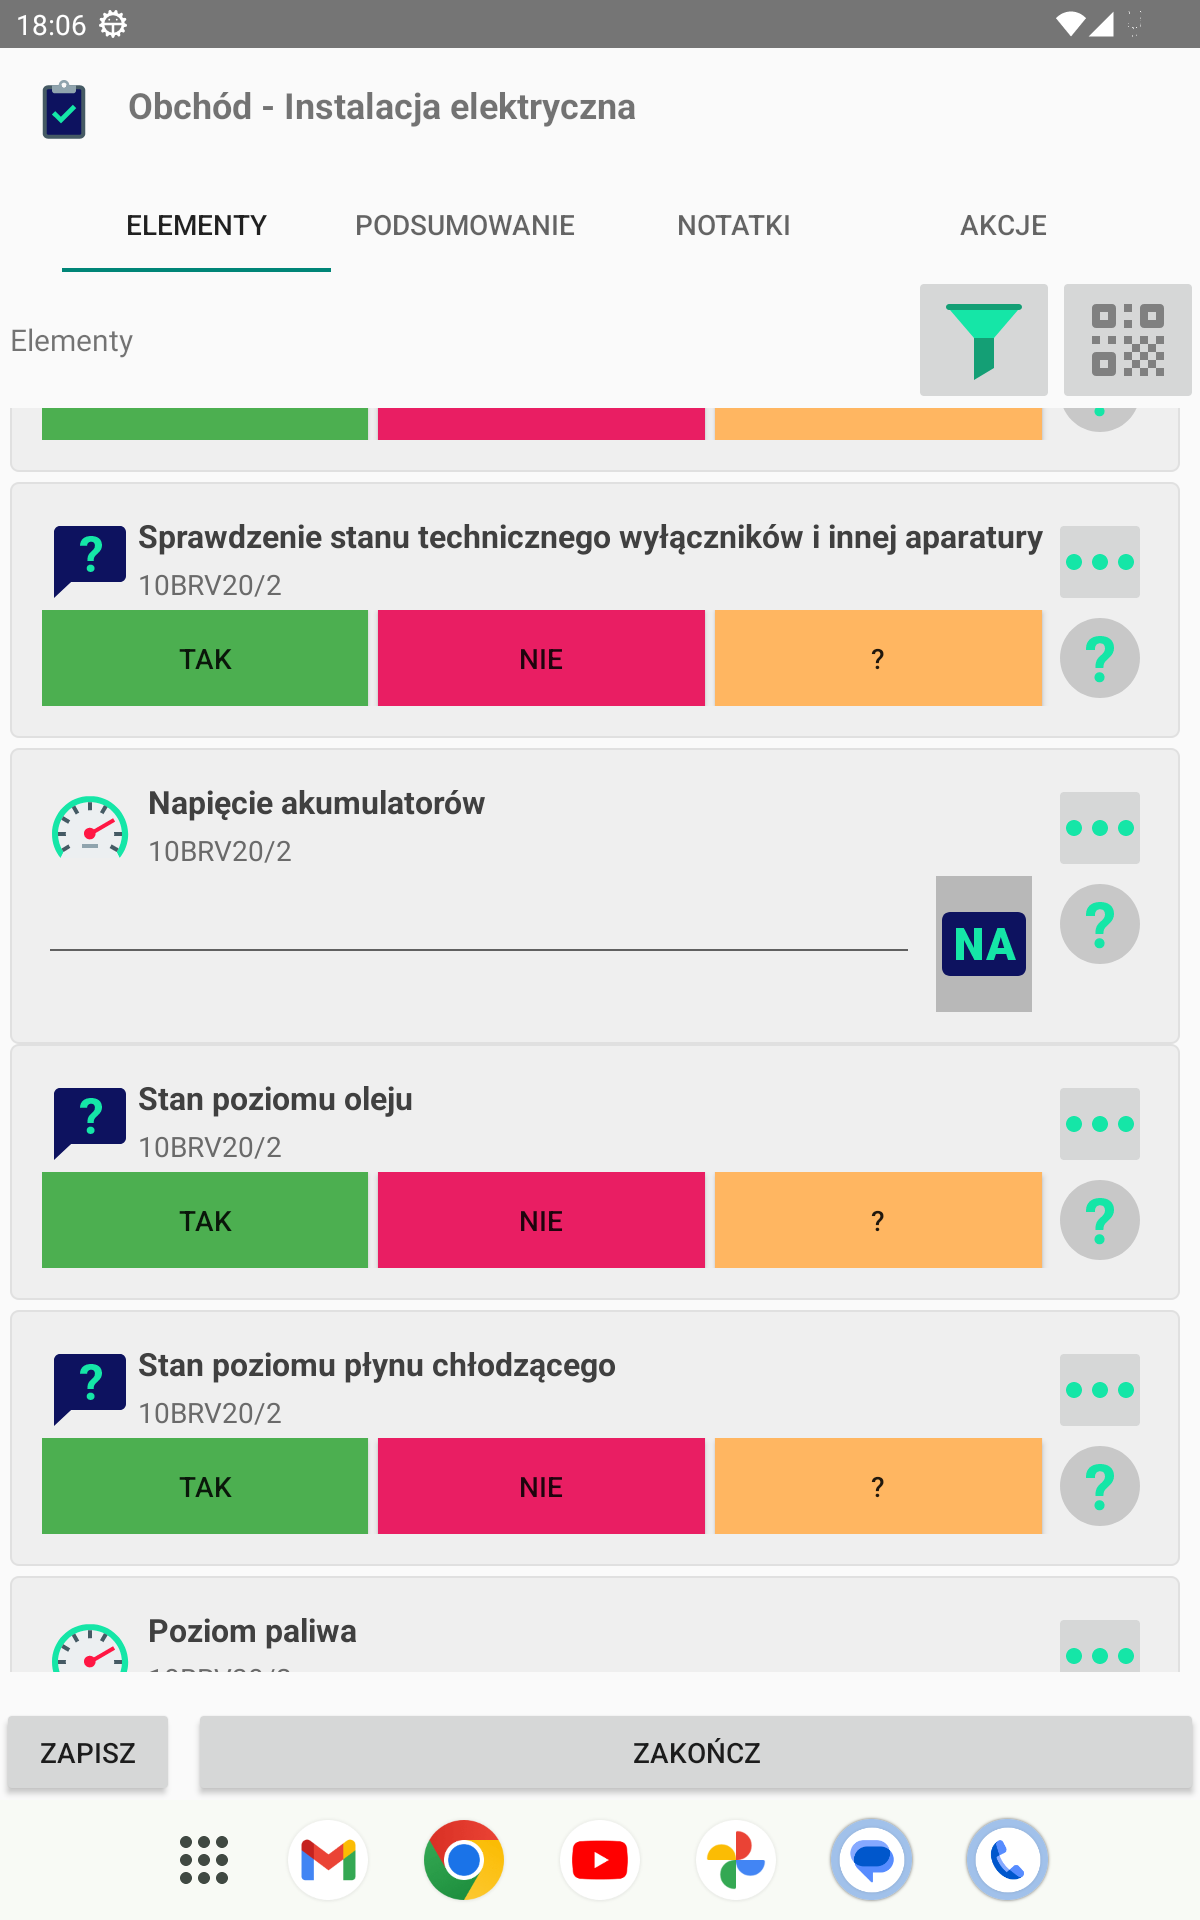
The list of the inspection round execution contains individual inspection round elements arranged according to the inspection round path setting. Each element has its type - question/measurement/task and depending on these options, appropriate controls are displayed allowing you to enter data for a given inspection round item type.
A picklist question allows you to select an answer to a question from a predefined list.
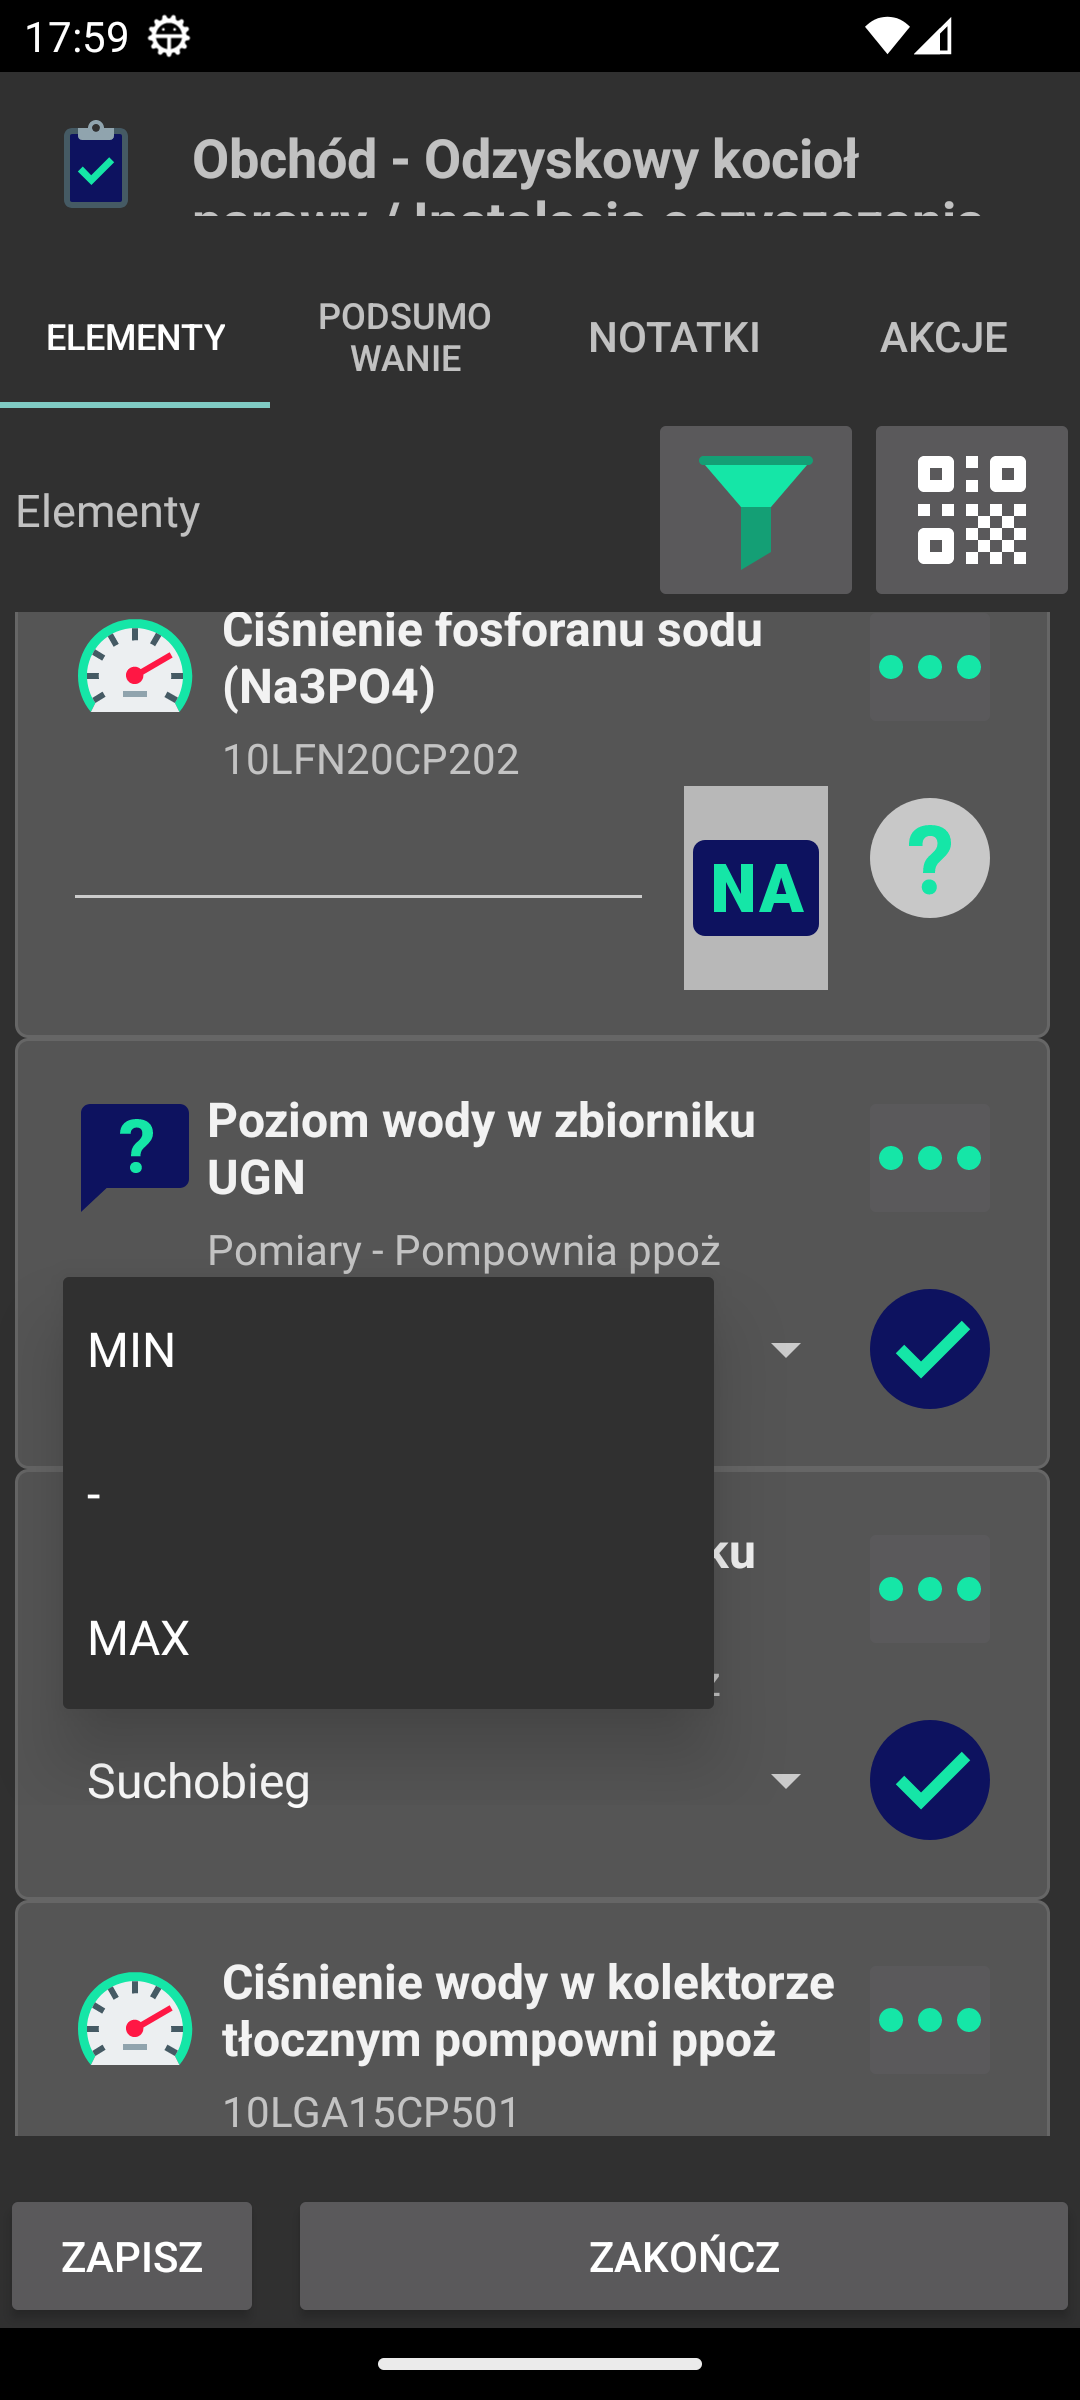
A YES/NO question displays buttons that allow you to select an answer. The selected button is marked with the appropriate color.
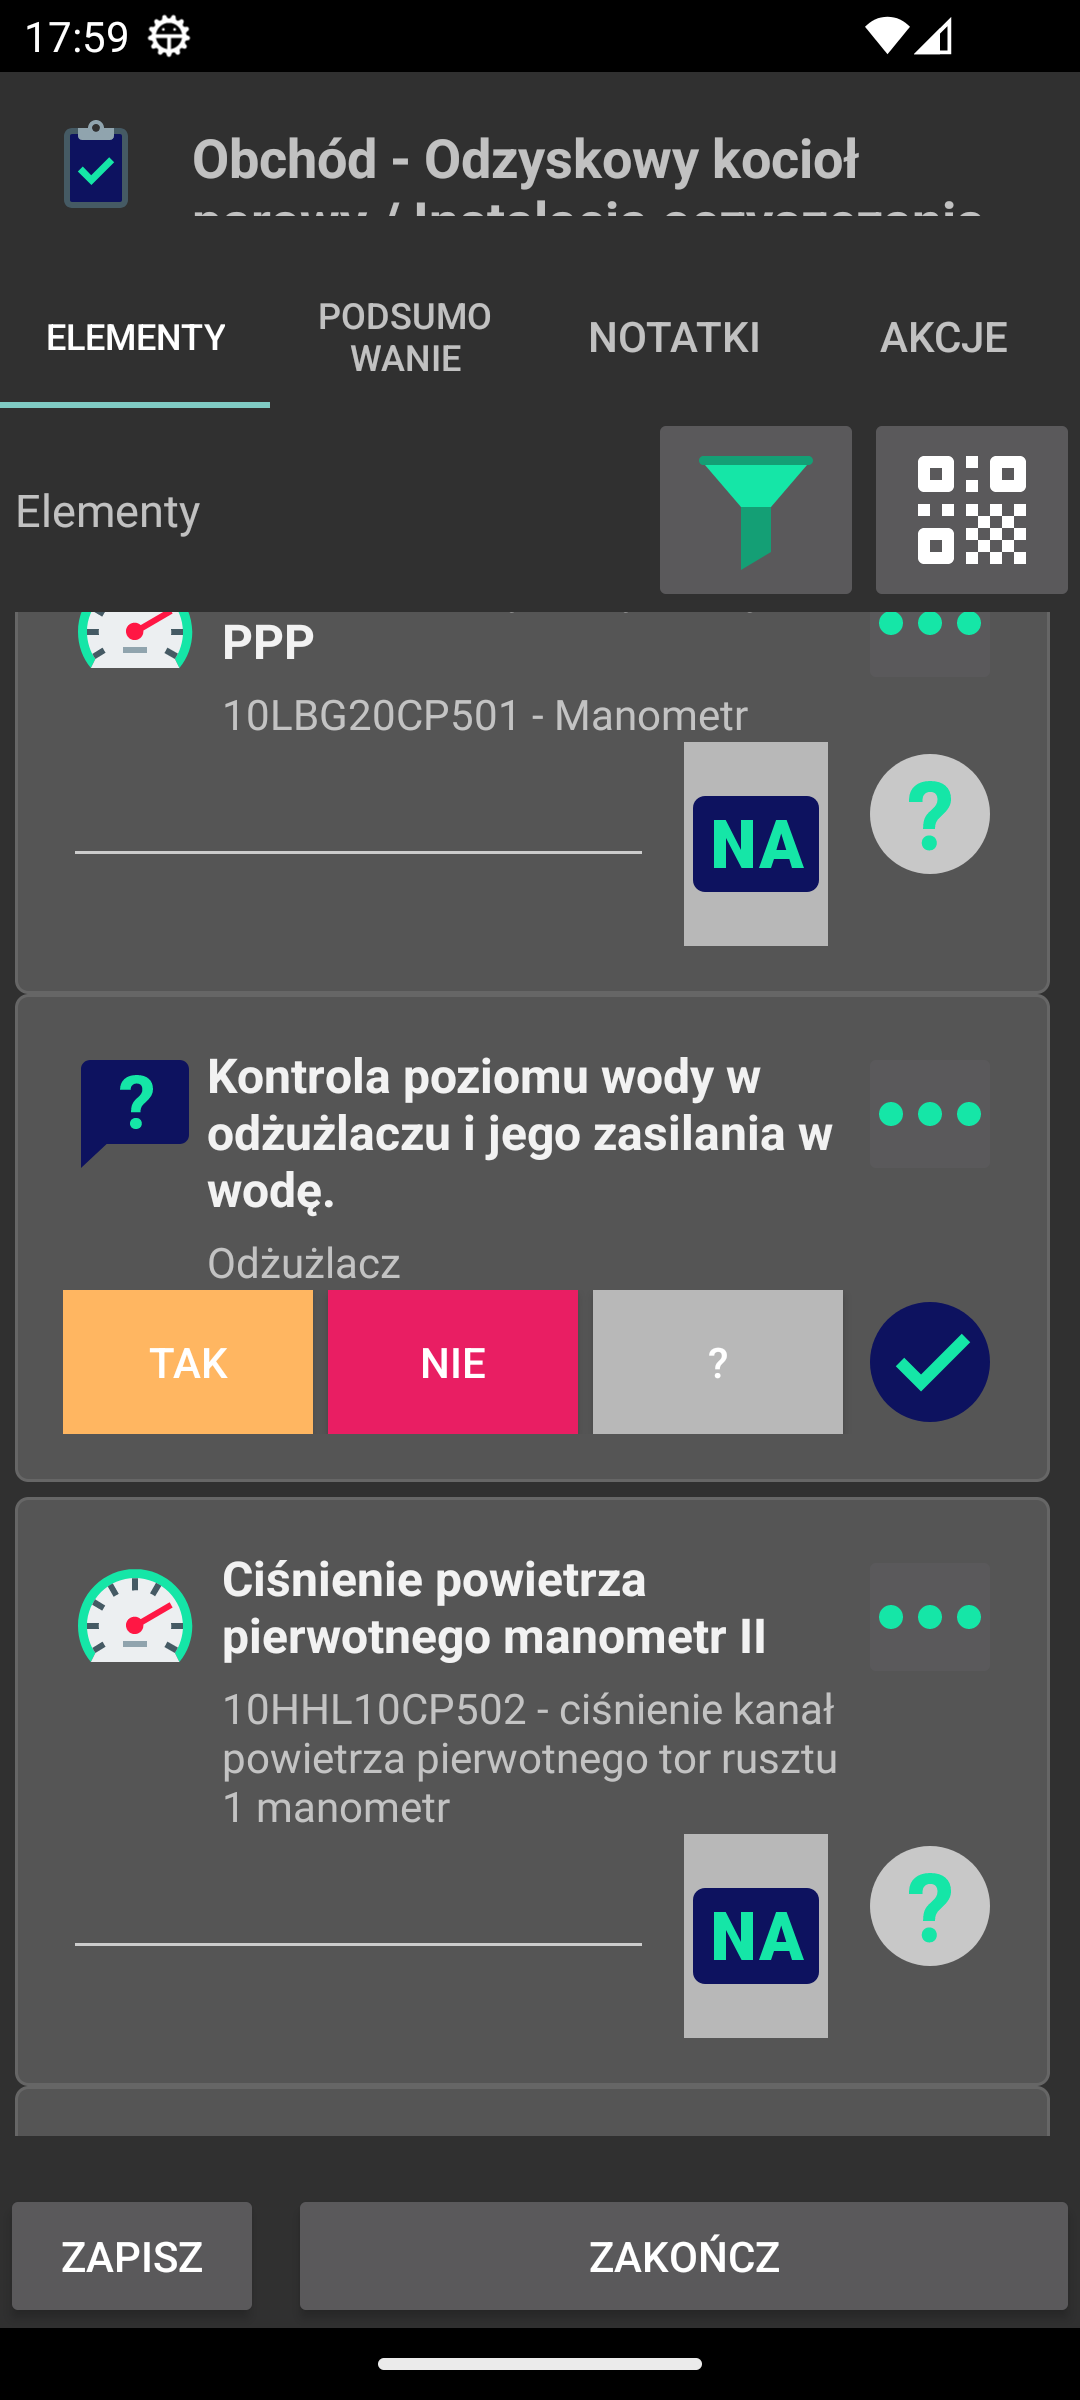
Measurements allow you to enter measurement values. Depending on the measurement type, appropriate controls are displayed.
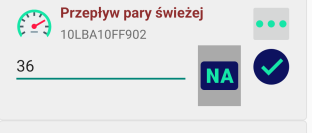
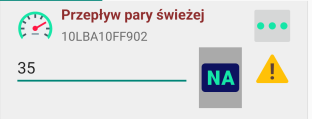
Each element contains permanent elements. An icon indicating the correctness of the element’s execution, i.e. whether a question has been answered, a measurement has been written or a task has been performed, and a button (three dots) that allows you to display additional options for a given element. After selecting it, an additional context menu appears in the form of buttons that allows you to perform an action for a given element of the inspection round.
| If the option to suggest recent measurements is enabled, this data will come from the most recently performed inspection rounds available in the local data storage |

Available options:
-
Additional information to be performed - displaying additional descriptive information for a given element of the inspection round
-
Note for item - ability to save an additional note for the inspection round
-
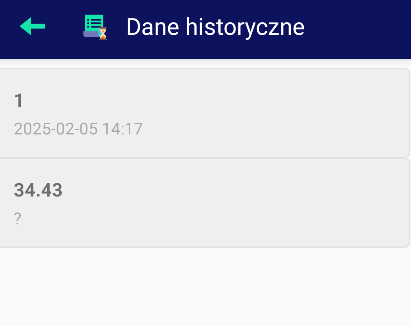
Measurement chart - for measurements, it can display a chart of the last values of a given inspection round element from the local data store
-
History - history of measurements/questions/tasks in tabular view
After selecting a note for an attachment, the user is taken to a separate dialog box where you can enter a note and attach attachments (photos) related to the given point.
Charts and history allow you to view historical data. NOTE. Data comes from already completed inspection rounds, which are available in the local data store.

| Depending on the available functionality, the number of buttons may vary. If there is no available function, the button is not displayed. |
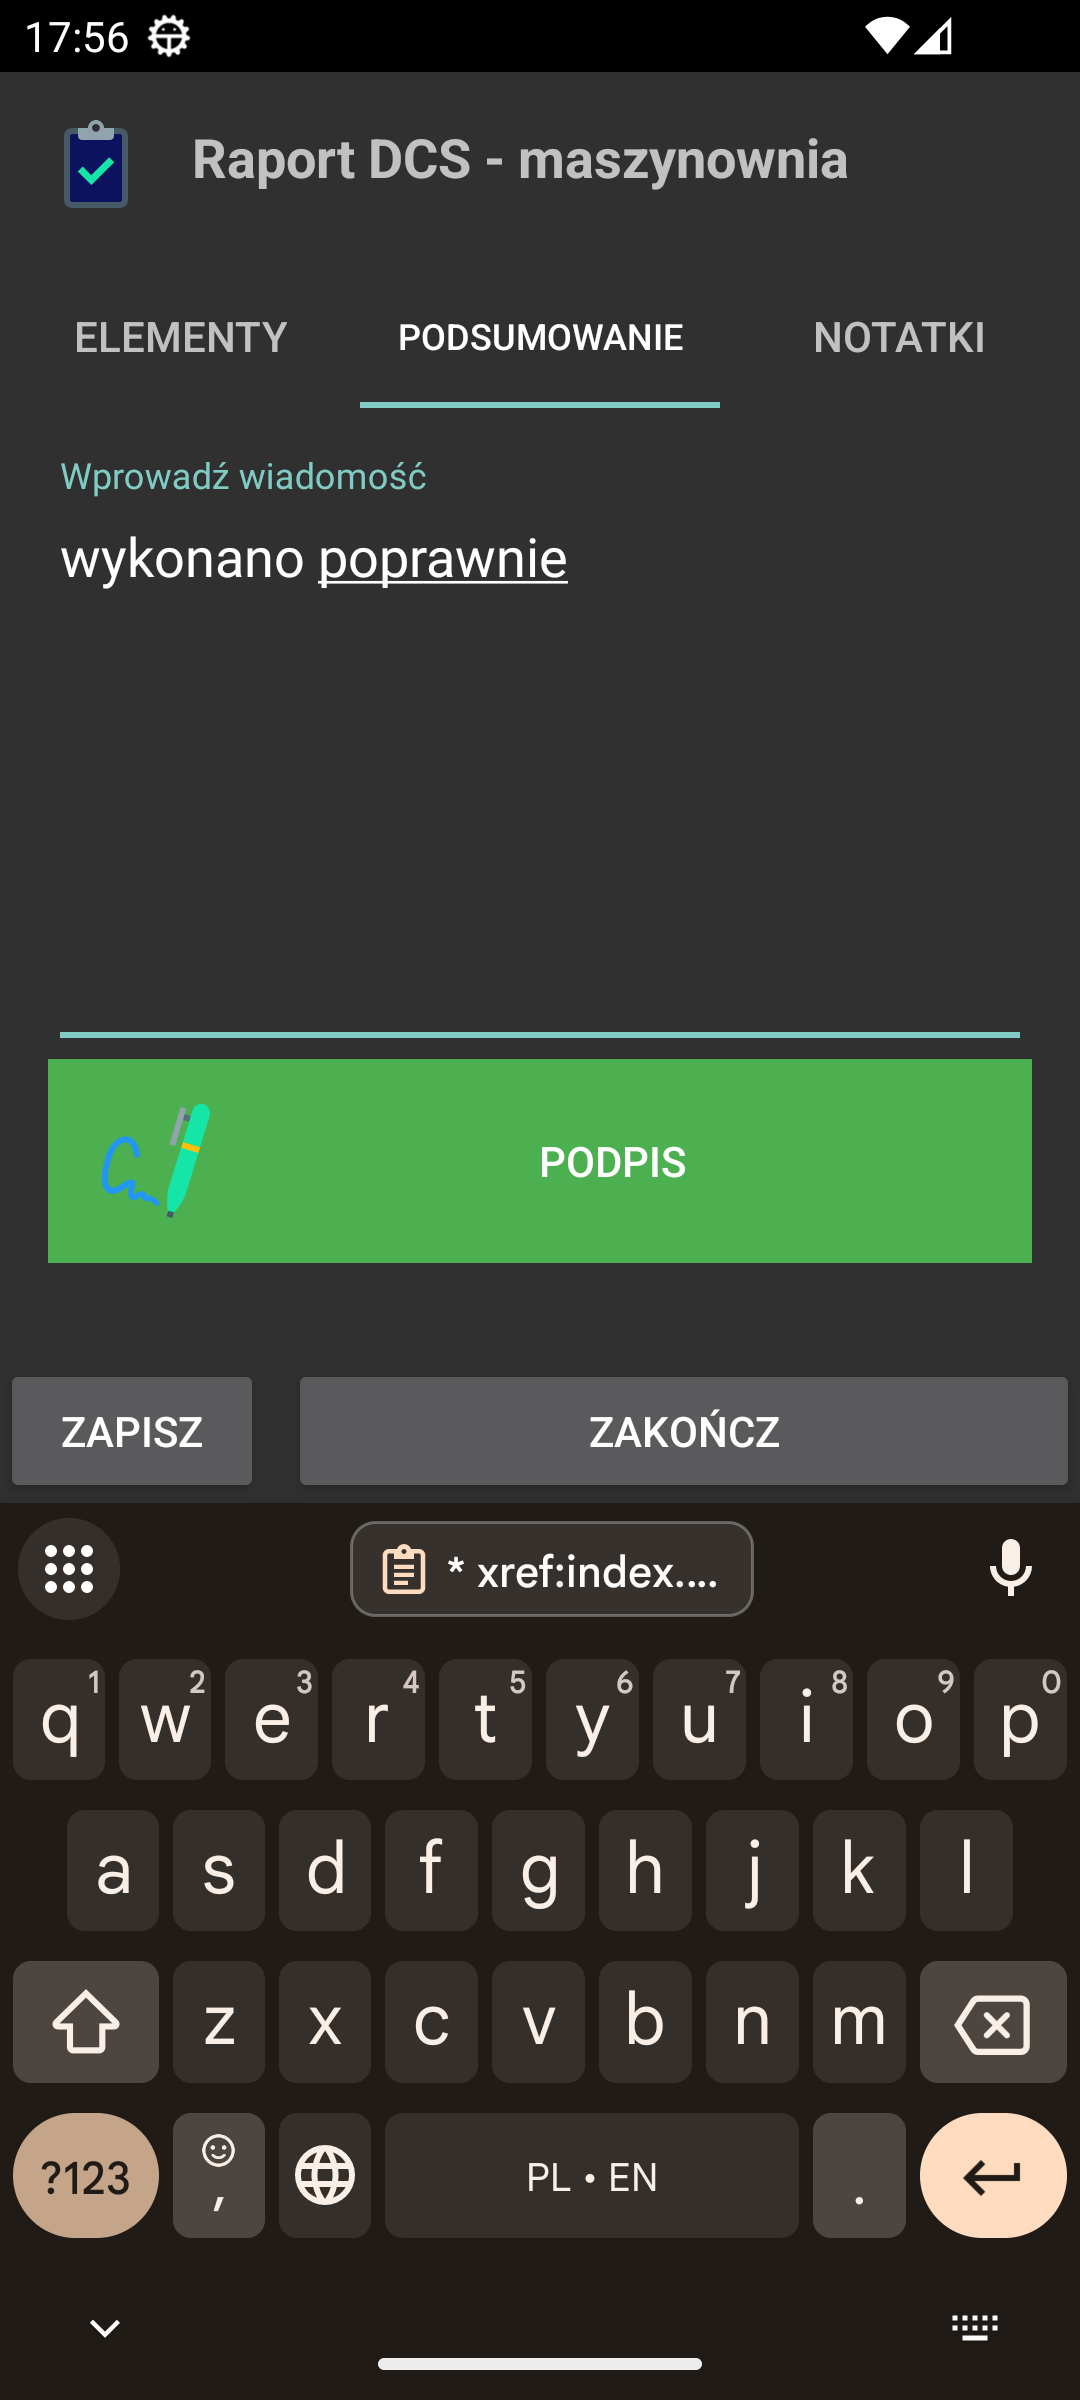
The comment tab allows you to add a comment to the execution of the inspection round. The comment is saved along with the execution of the inspection round and is visible in the central system.
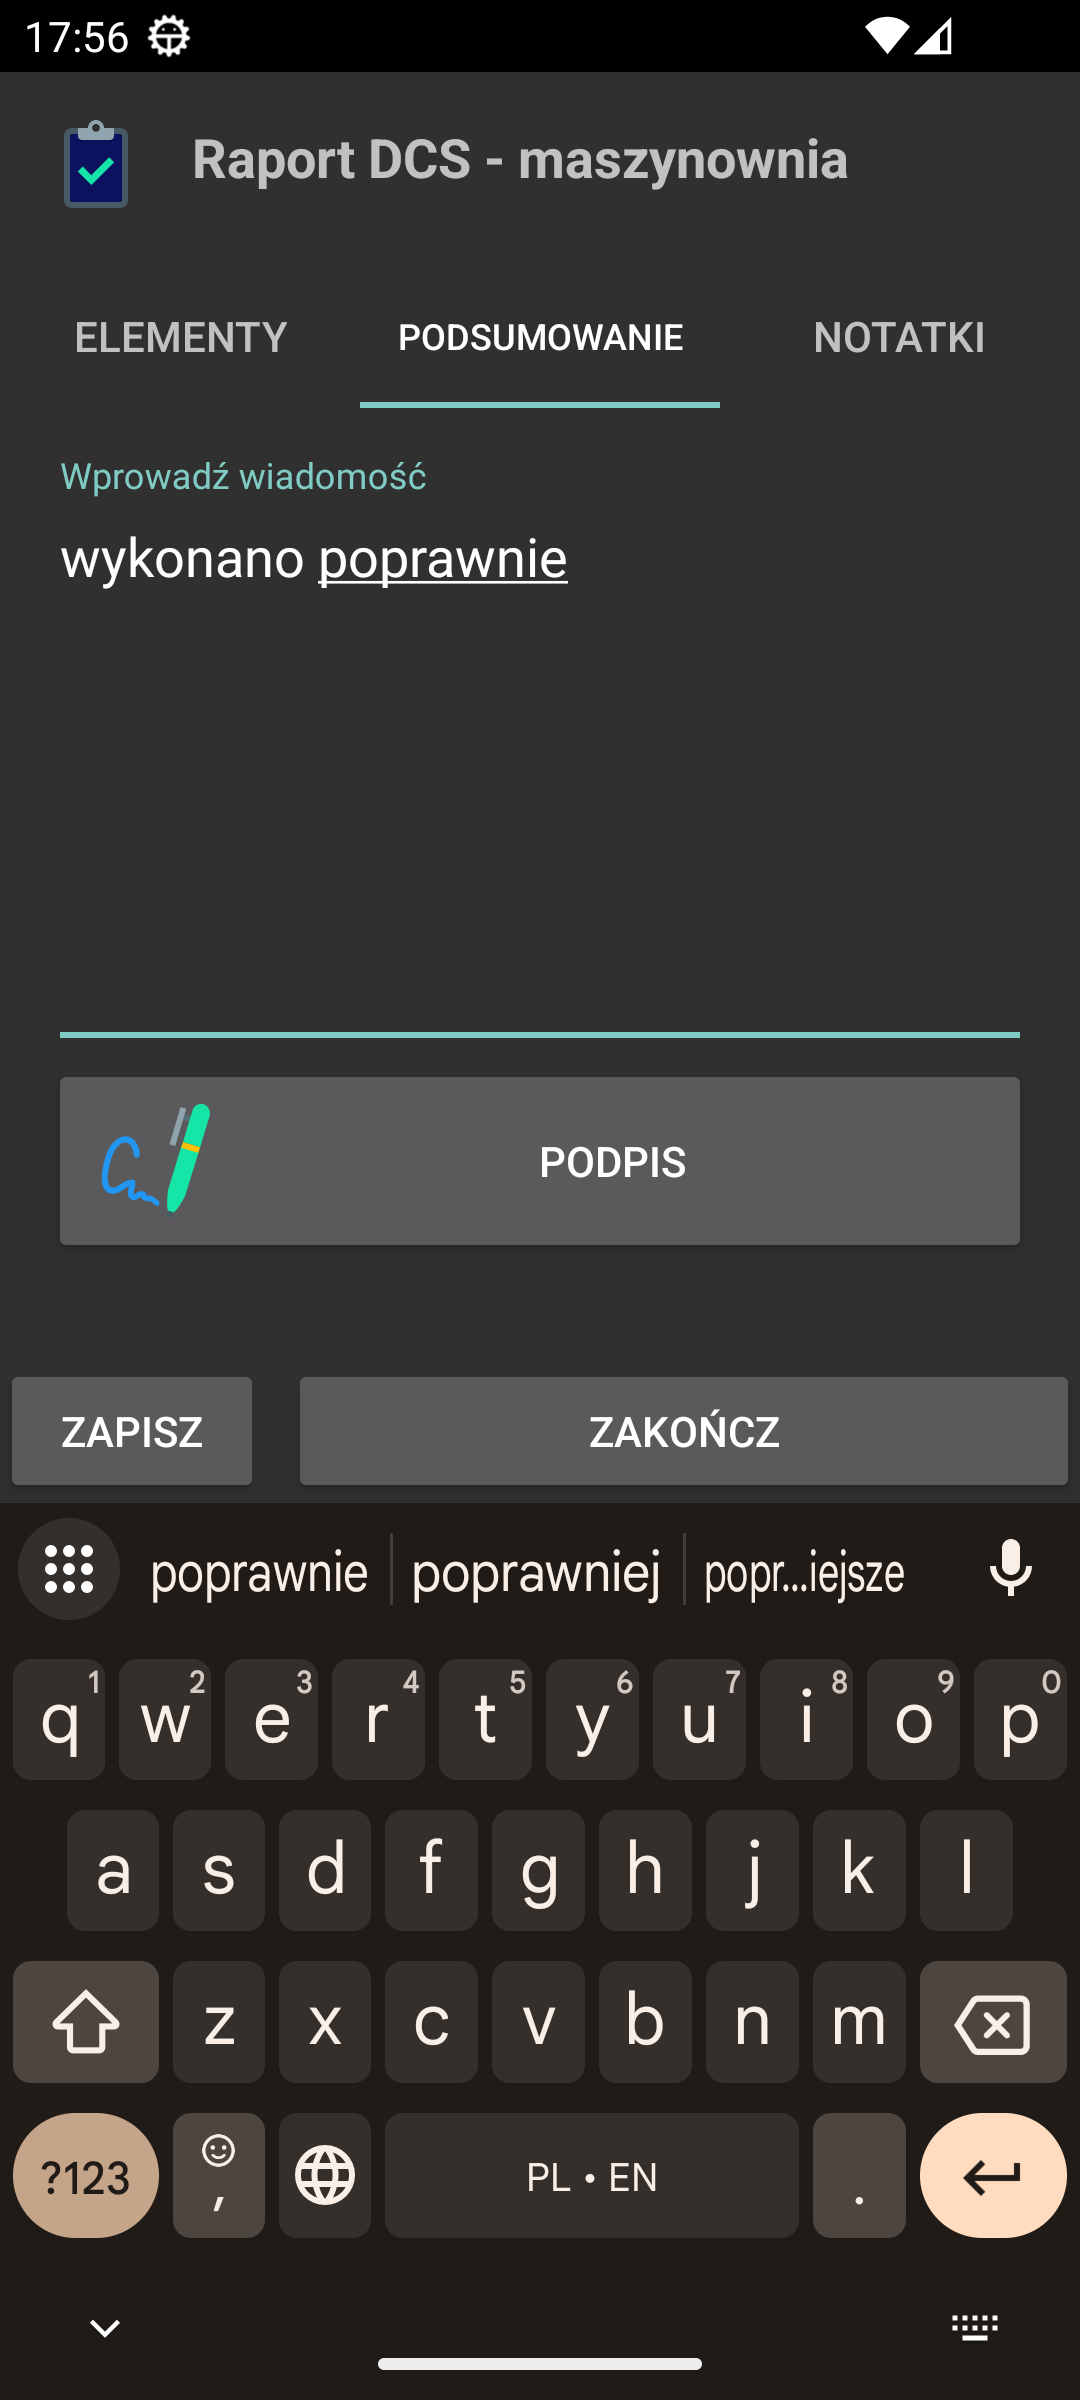
In this window we also have the option to sign under the performed inspection round. This is available via the 'Signature' button available in this tab.
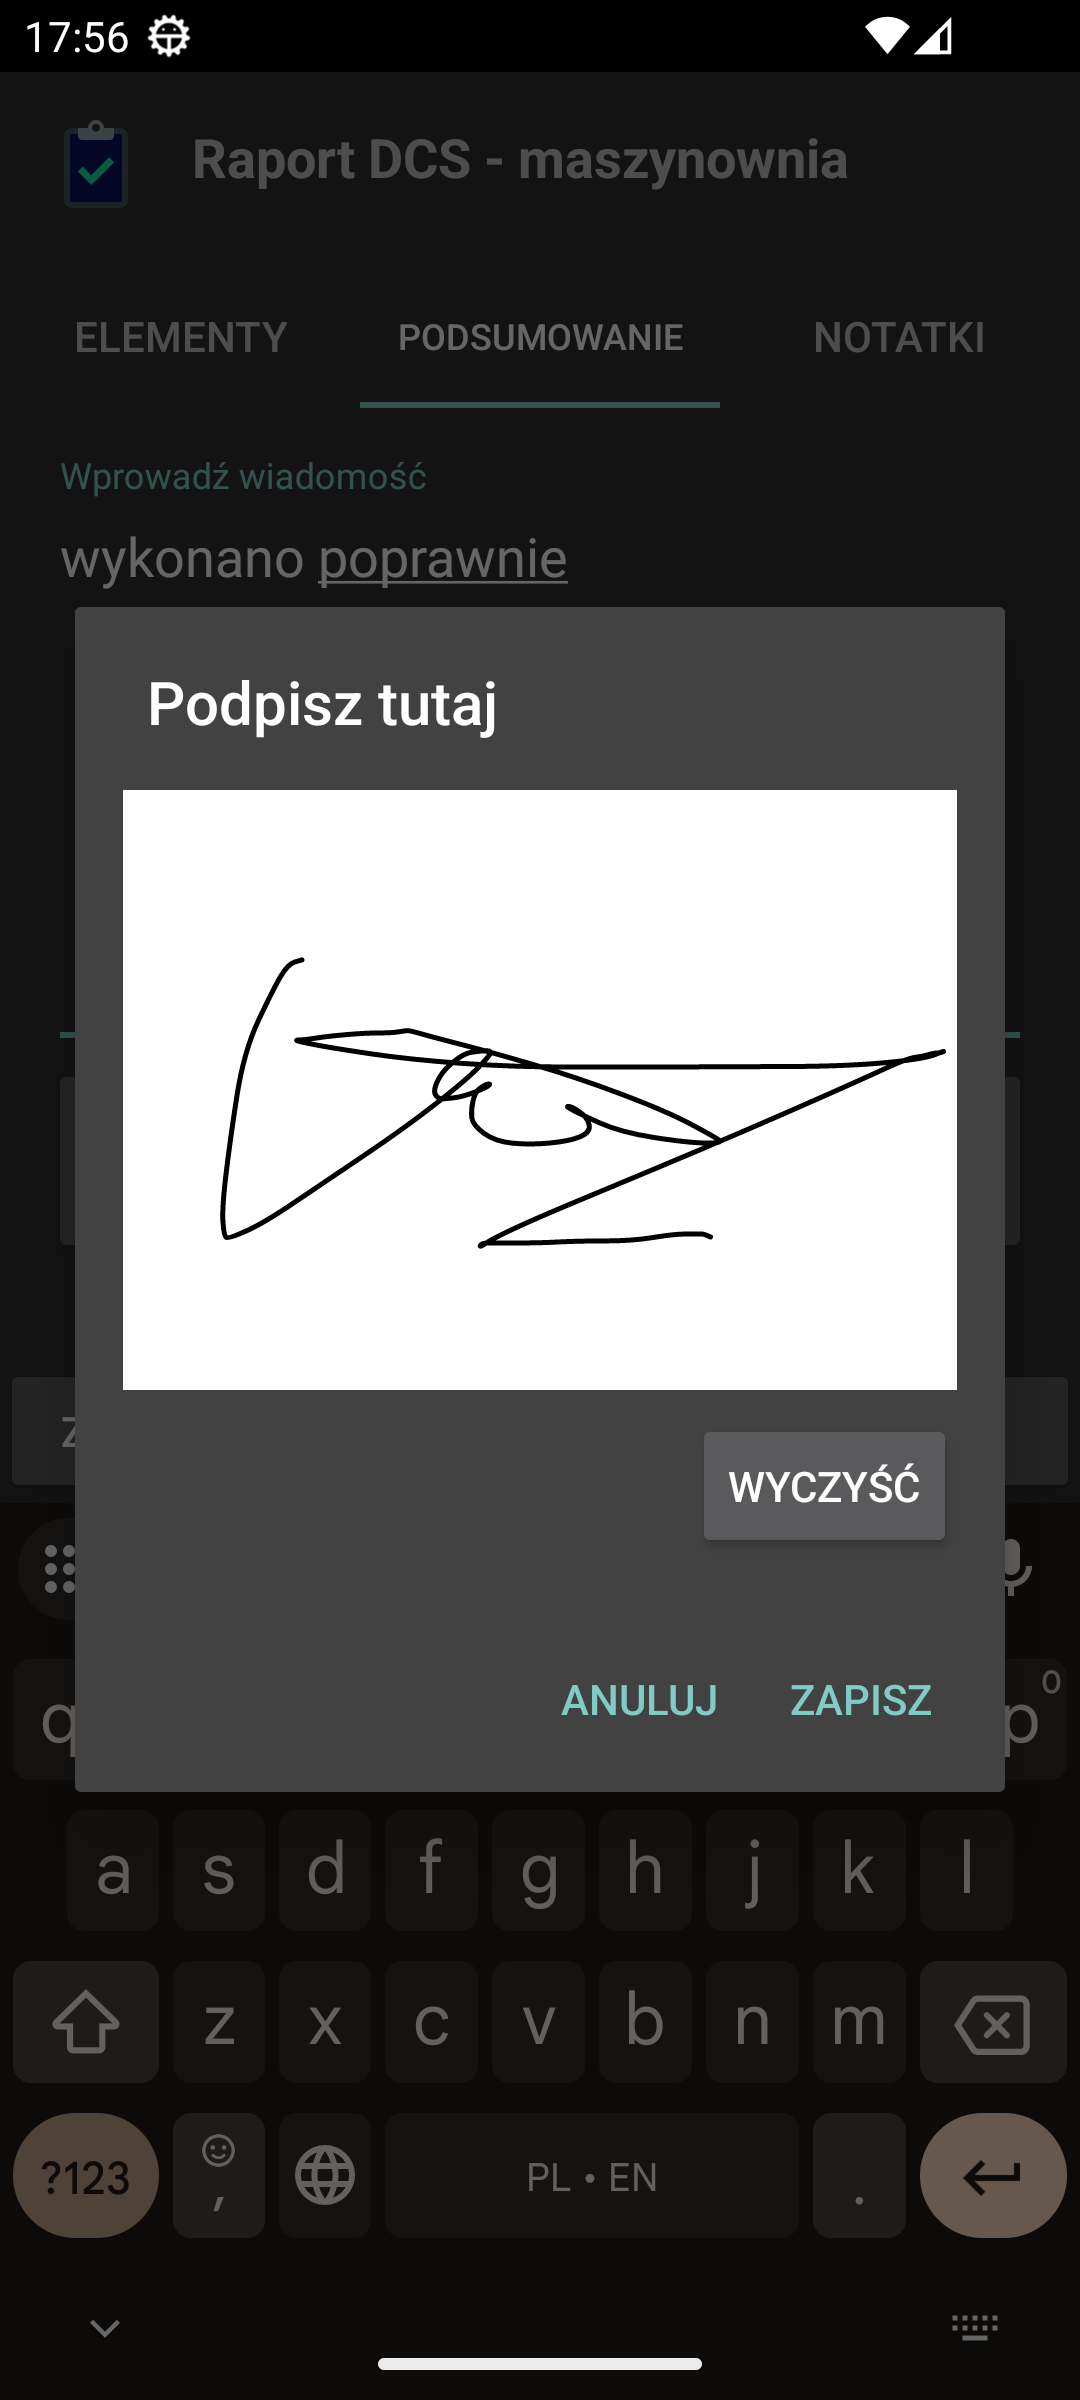
Once the signature is saved, the button turns green.
If you choose to end the inspection round, the system verifies that all the elements required for completion in a given inspection round have been completed. If not, an additional message appears, which signals that not all the elements have been completed and does not allow you to end the inspection round.
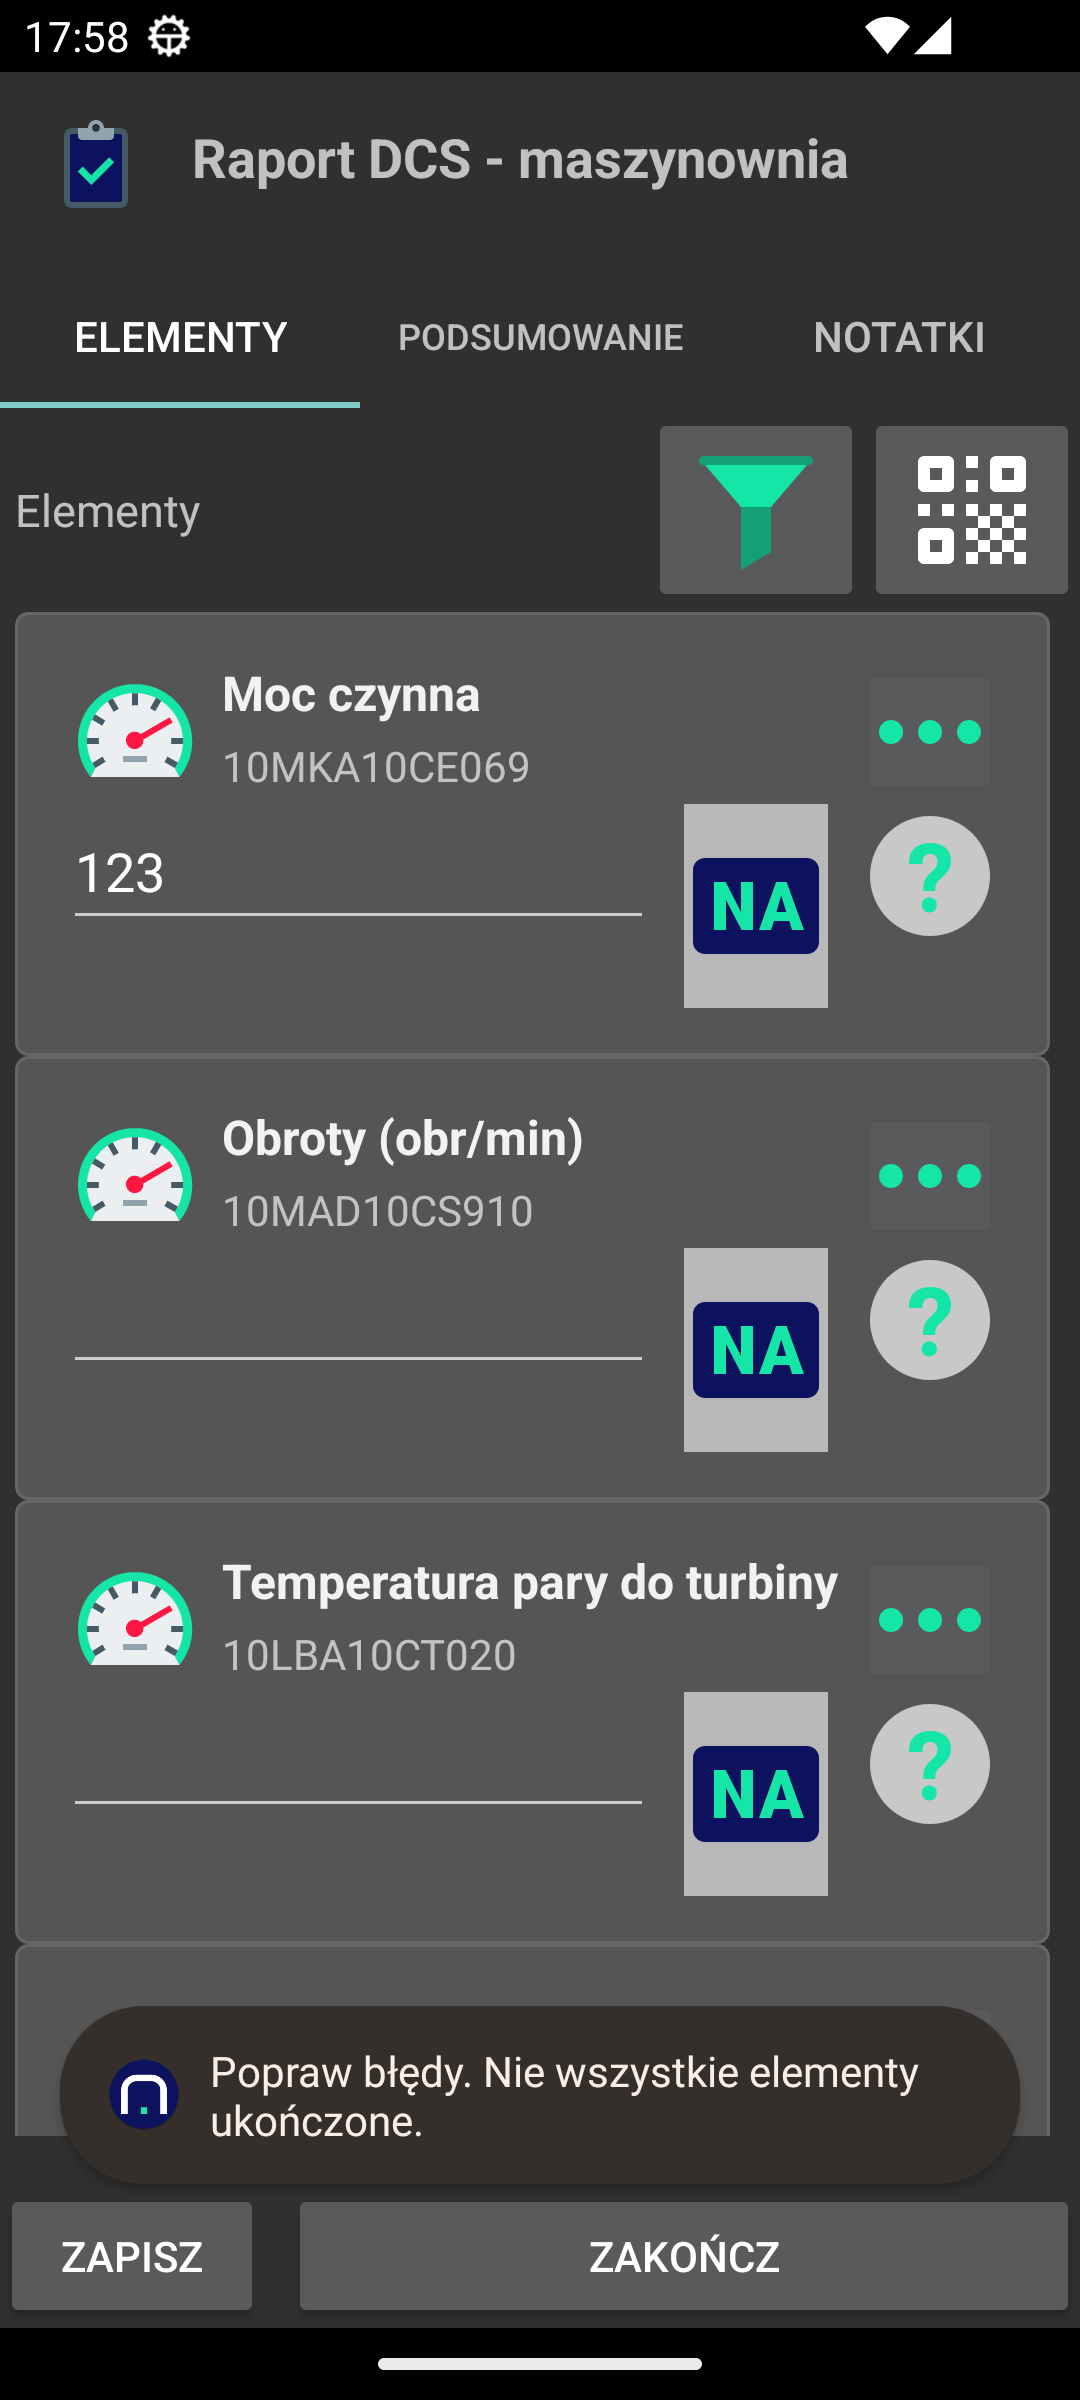
| Required inspection round items have a different color text description. |
Once we close an active inspection round, it remains visible in the list of active inspection rounds.
Completed inspection round is visible by selecting the appropriate filters. After inspection round is sent to the central system, it is deleted from the device after 30 days.
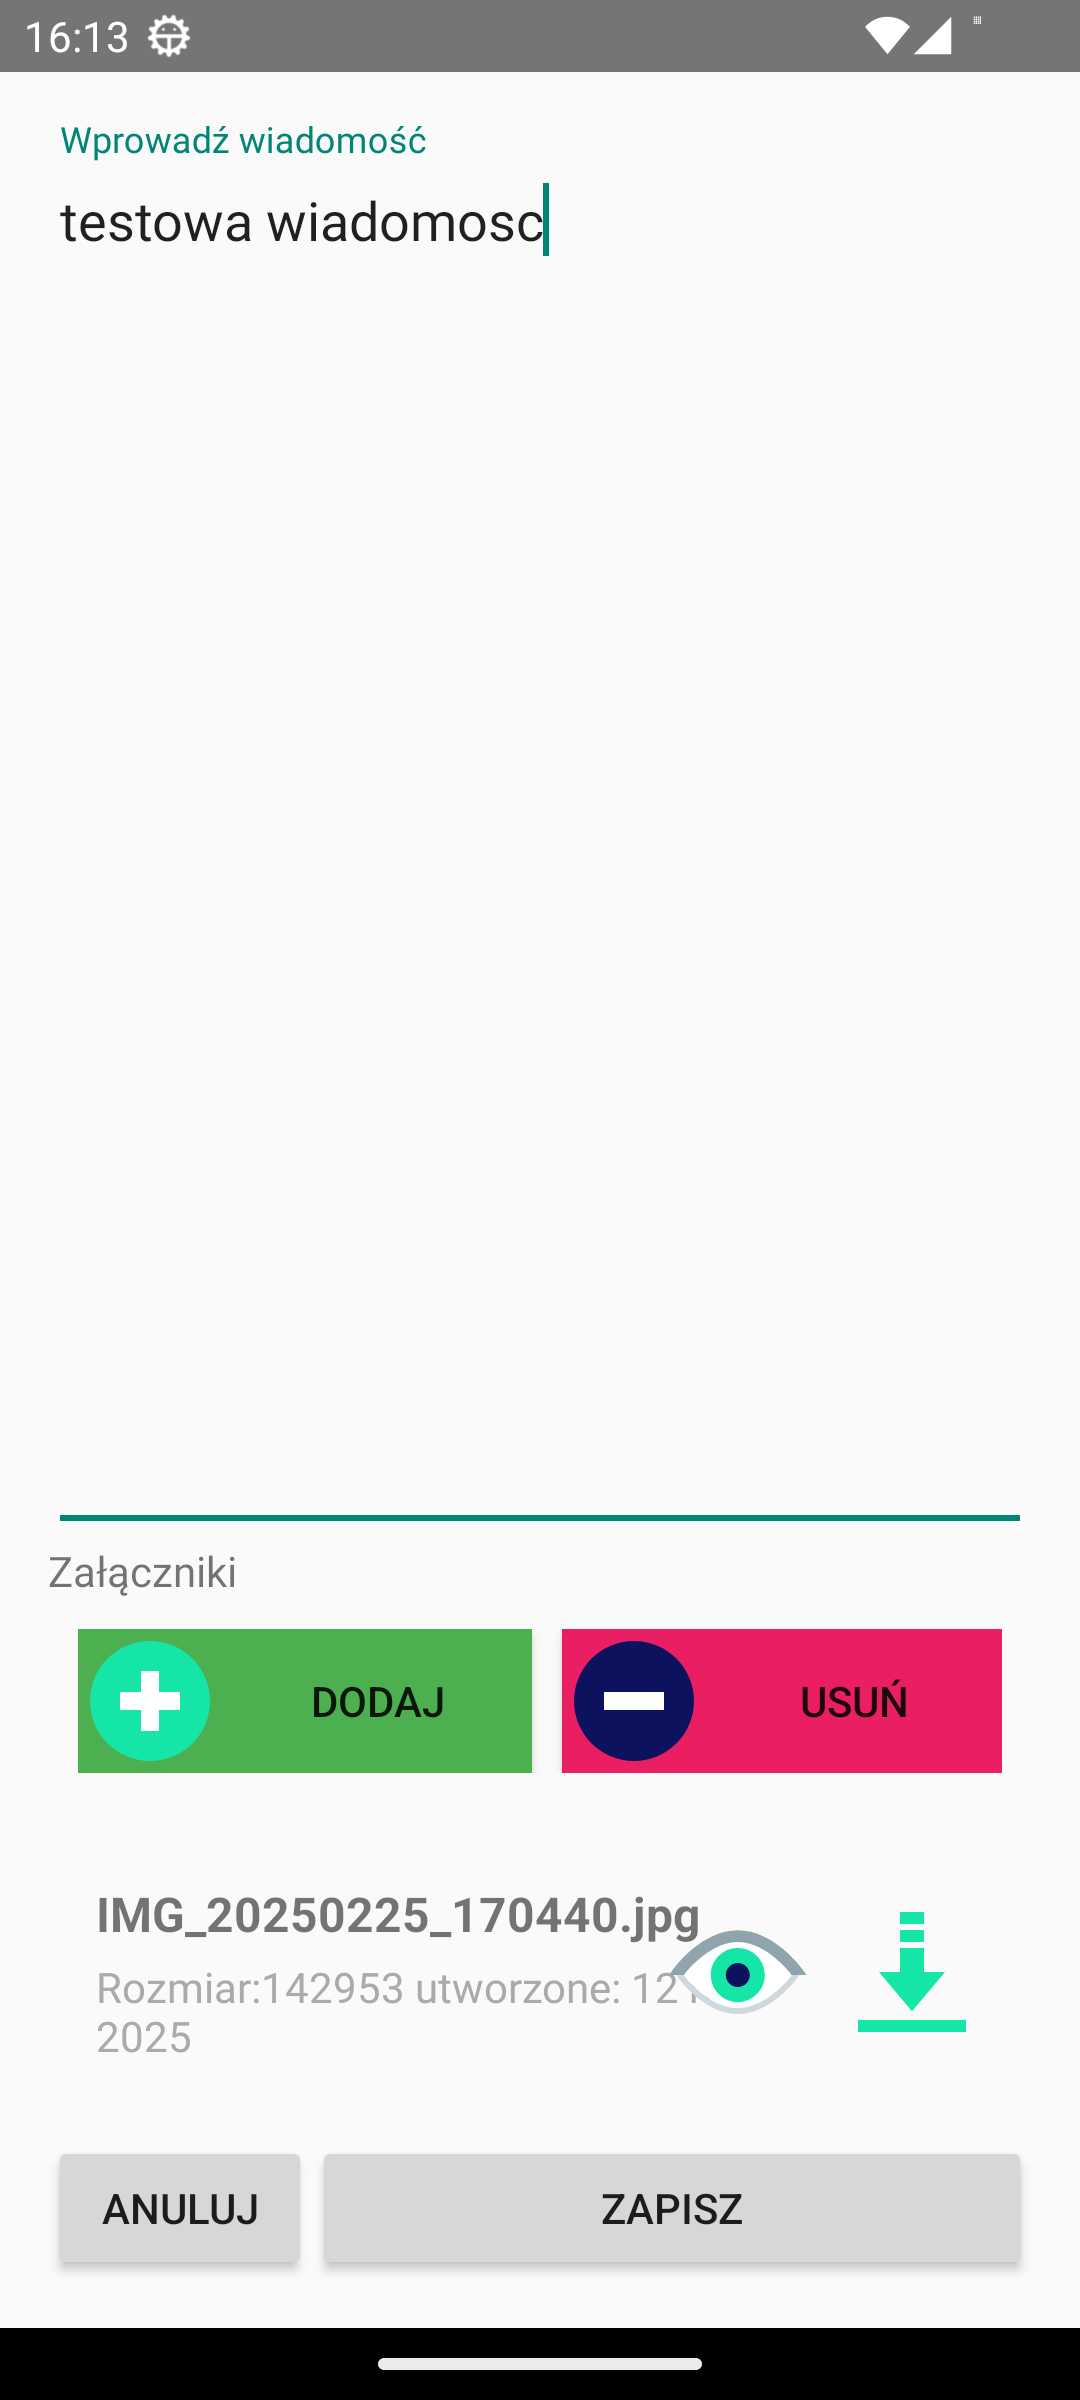
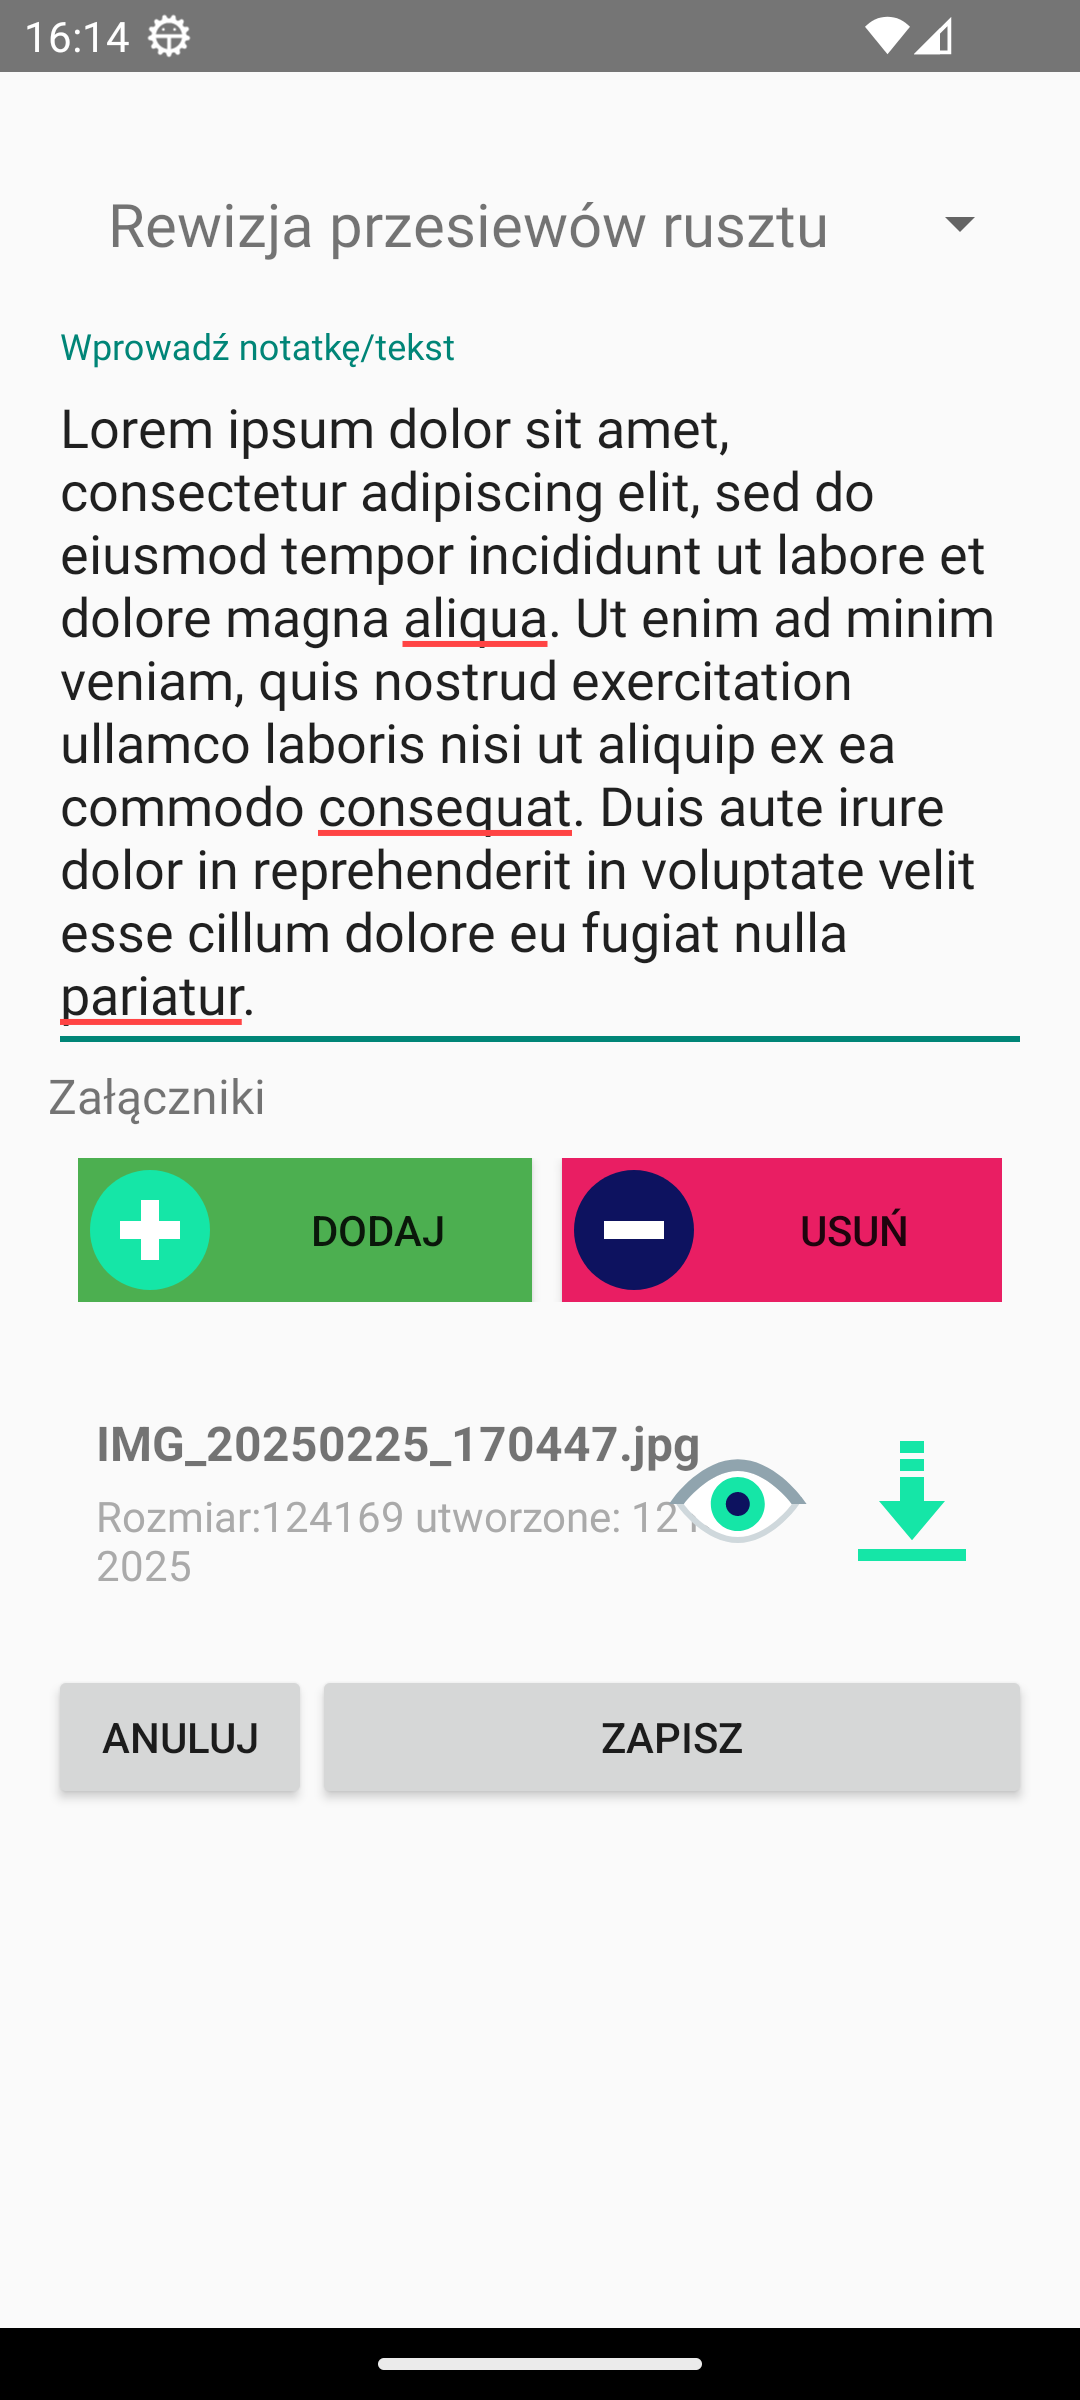
Inspection round notes
The inspection round notes tab allows you to add additional attachments (photos, files, evidence) to the inspection round being executed. The 'Add' button allows you to add new items. The 'Remove' button removes selected items.
| To select an item, select it by long pressing on its item in the list. |
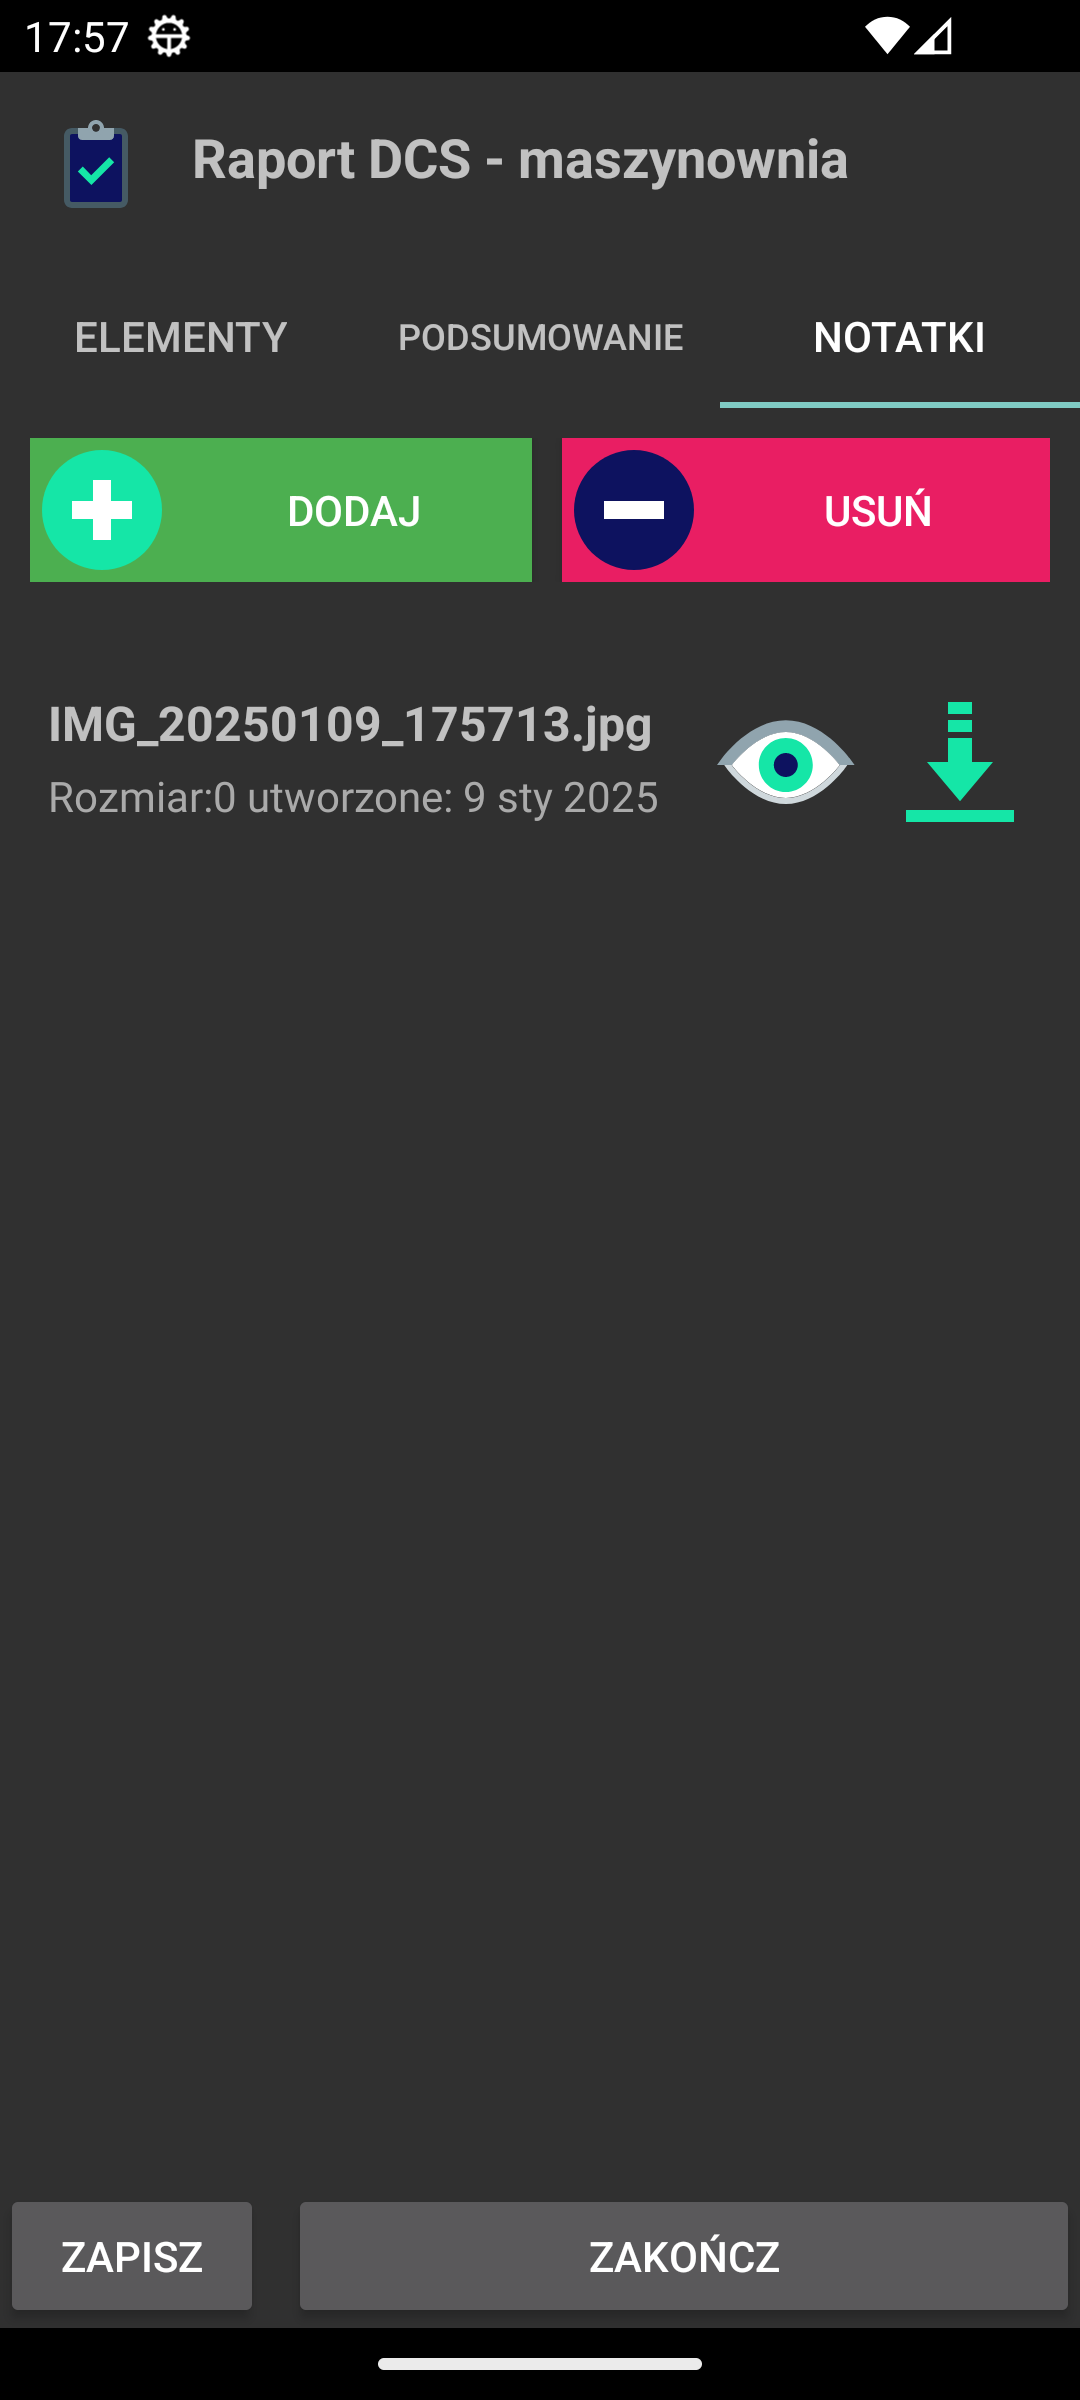
Each element has additional buttons that allow you to:
-
Preview button - preview a given file using the device’s system browsers
-
Download button - downloads a given file to the device to the
Downloaddirectory
Additional inspection round actions
Additional actions allow you to add actions that were performed during the inspection round. Actions are defined in the central system. These are additional actions that are not related to the question/measurement/task, but are additional actions that must be performed during the inspection round execution. The interface is identical to the notes list.
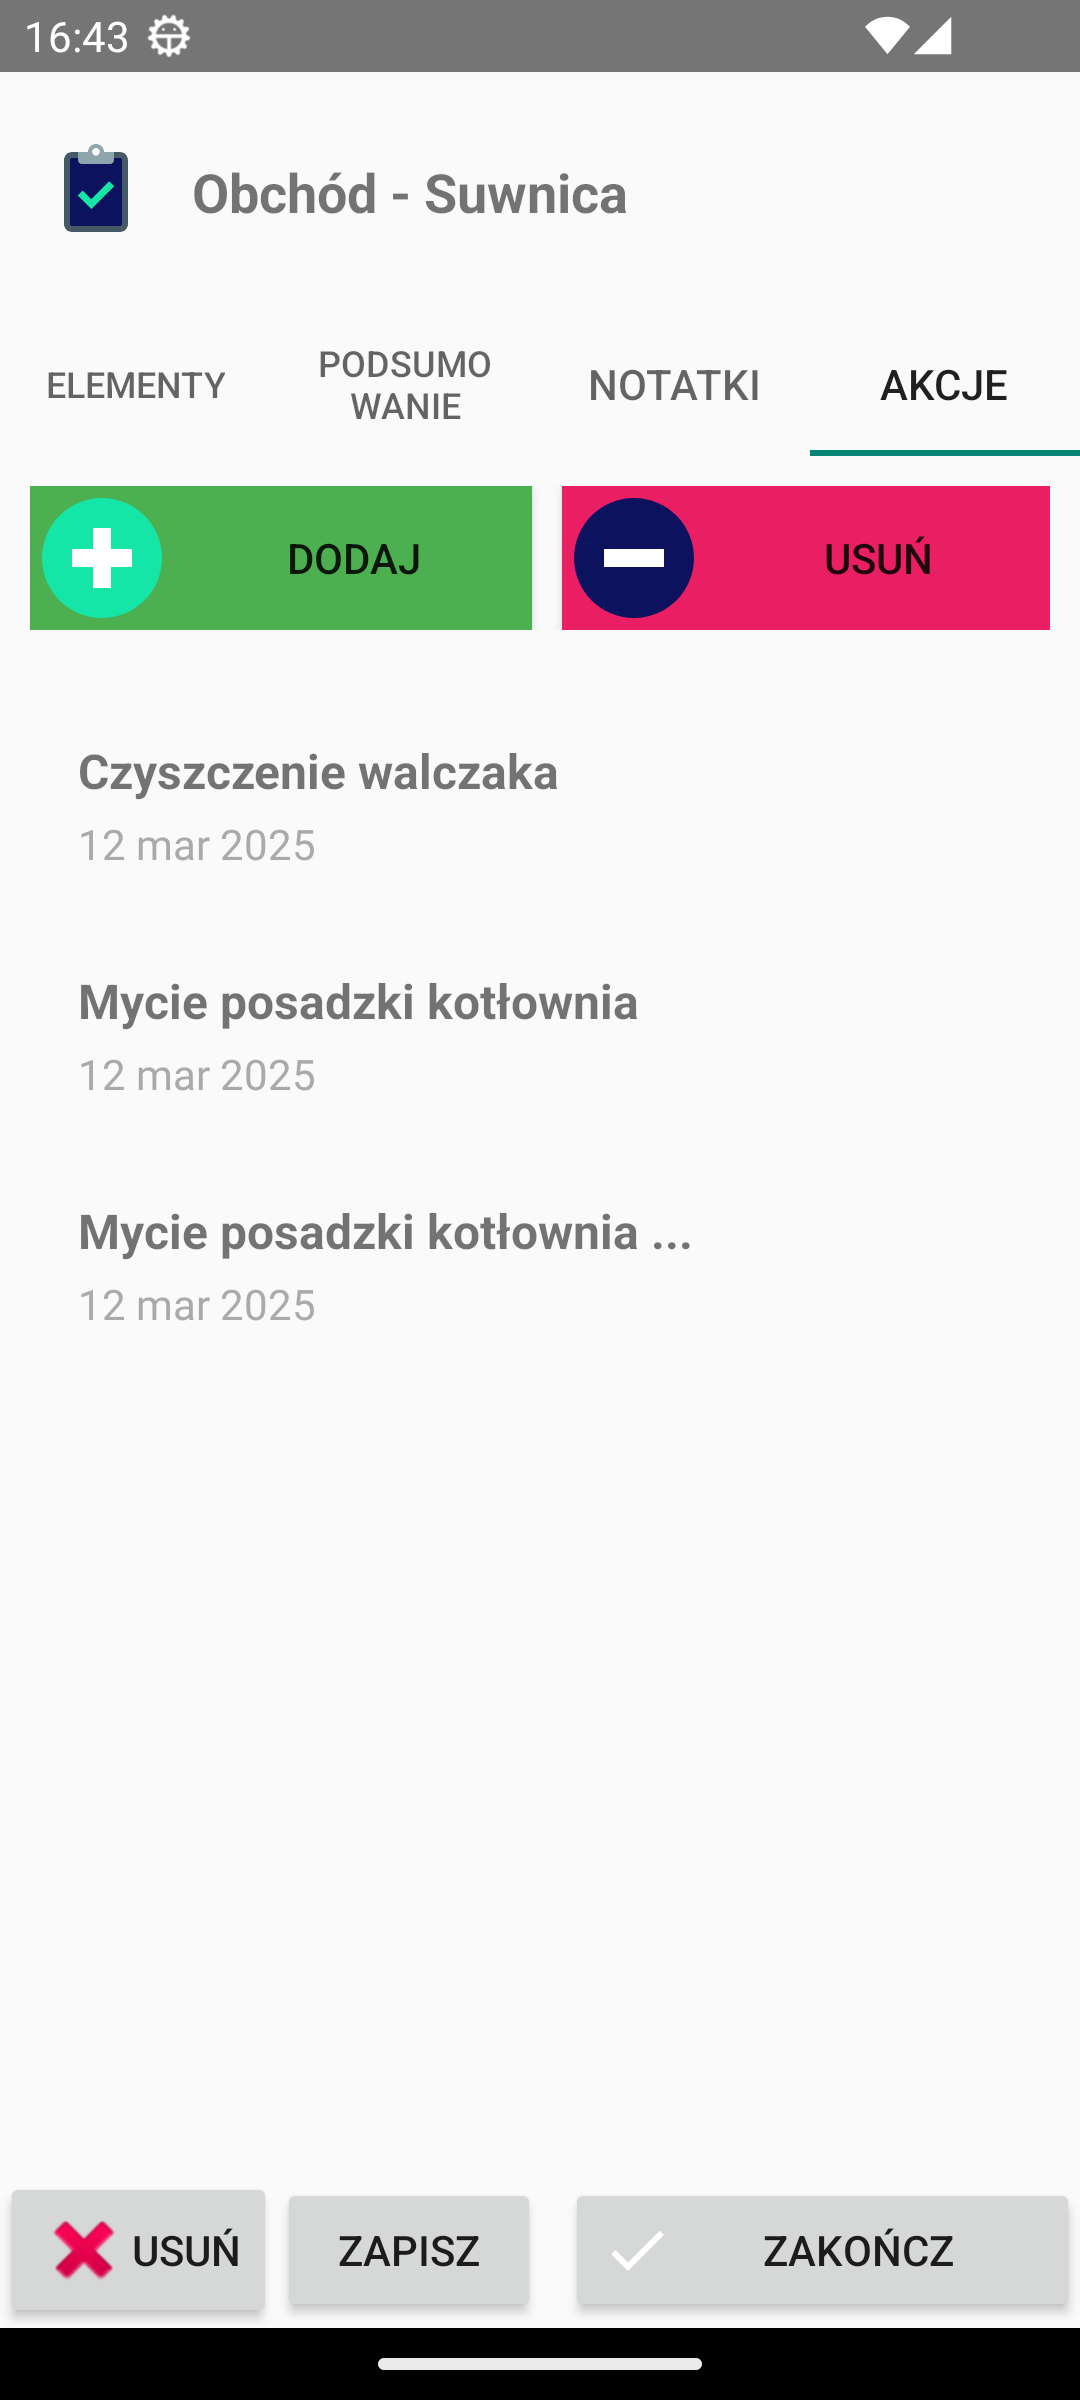
Using the add and remove buttons, we can enter or remove new actions. Actions are defined in the main system along with a description and additional photos documenting the action. After selecting the add action, a window is displayed with the possibility of selecting the type of action, entering a comment and adding a photo.
Saved actions are sent to the associated inspection round during synchronization.
Light/Dark Mode and Screen Formats
The inspection round module supports different screen formats and light/dark modes. Depending on the device settings, the appropriate interface language is displayed.
More
For more information about the inspection round system, please refer to other chapters and user manuals of the AMAGE system:
| Please also refer to the AMAGE Academy and its use cases, which indicate possible operating modes and configuration of the inspection round module for different functions and customer expectations. |