Configuration - general data
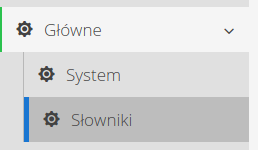
General configuration data necessary for proper operation of systems. Determination of basic parameters and settings is realized through this view. It is accessed through the main menu 'Main' → 'System'.
The settings view is divided into two sections 'Common' and 'Counters'. The common section contains the main system settings affecting the application.
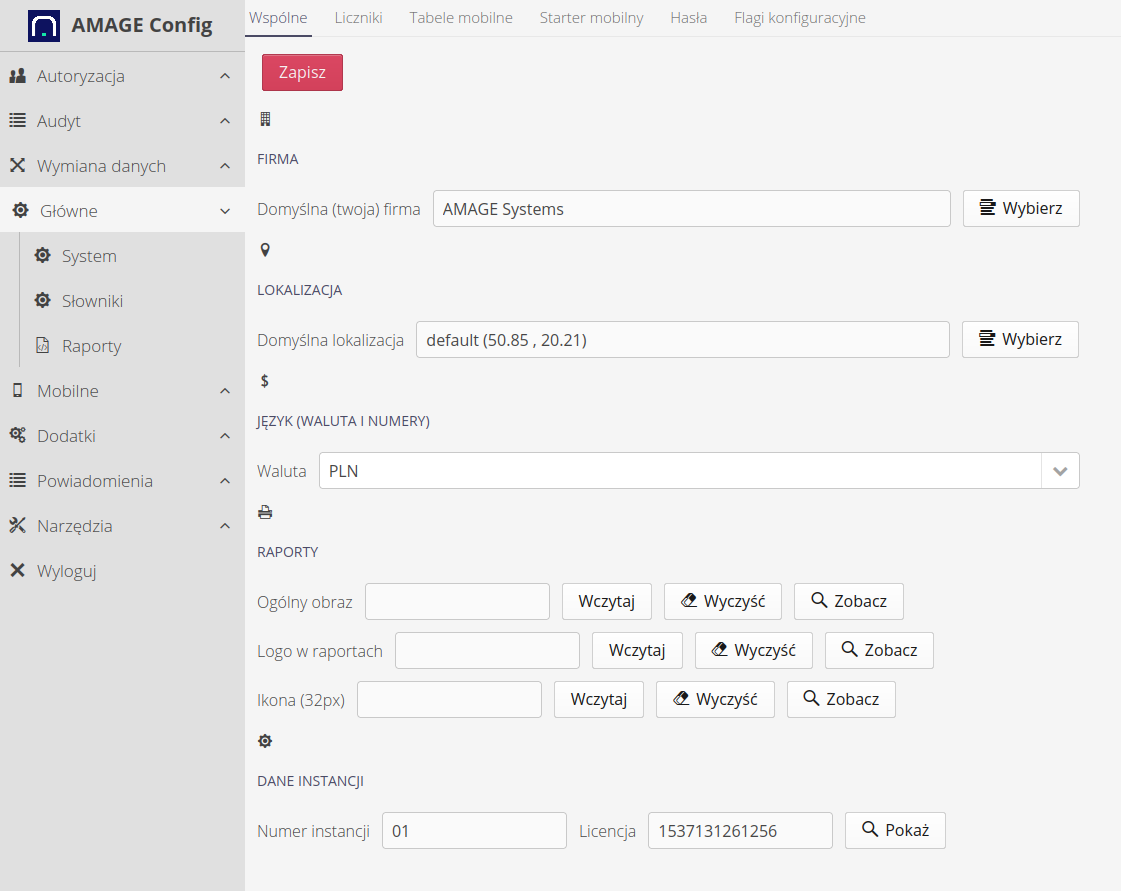
Available configuration options:
-
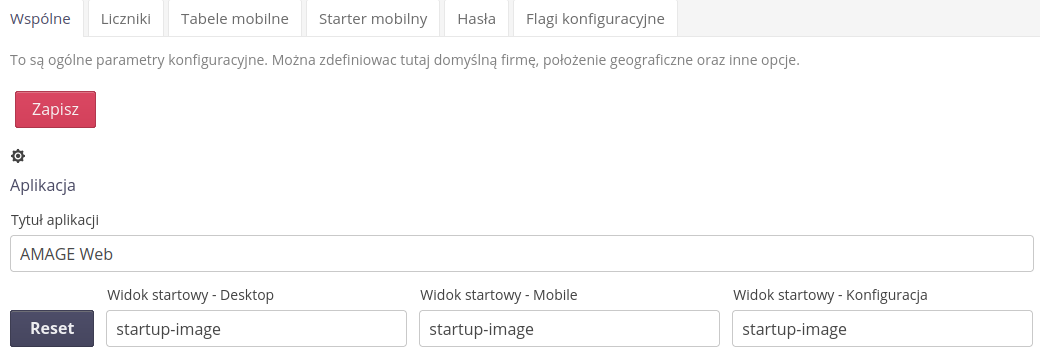
Application title - the title of the application displayed in the title bar
-
Default start views - in which view we start the session in each area
-
Default location - select the default location. This location will be shown as the initial location in all windows where geographic location/plans are required. It is usually set on the view of the workplace, plant, construction site. This allows you to quickly specify additional locations without having to constantly search. NOTES. The default location is set to (0,0) in the Atlantic Ocean.
-
Currency - select the currency displayed in the application in those places where price information is stored. NOTE: This setting is used only for data formatting. No currency converters are used.
-
Images - the ability to upload images/logos used in login/information windows and separately an image used as a company logo in reports.
-
Instance data - instance data resulting from the license and deployment settings. The license applies to data set during deployment by AMAGE Systems. The instance number is assigned by system administrators.
Using the default start addresses, we can specify the address at which we start the session for the mobile, desktop and configuration views. To change it to any other, use the end of the address and enter it in the given field. For example, to start the configuration view from the system data configuration, we will enter config-desktop-system because the address of this area is: config#!config-desktop-system
| The system number (derived from the license) and the instance number are used during the generation of unique 2D/Dash codes in some modules. It is very important that the instance number is unique among all instances running for one customer. The customer has the option to determine this number independently. |
Counter data
Counter data is used to indicate to the system which counter definitions to use when generating unique numbers for documents created in the system. In this area you define which counters the system should use when generating documents from the order/supply area, which ones for warehouse operations and other systems (service events, etc.).
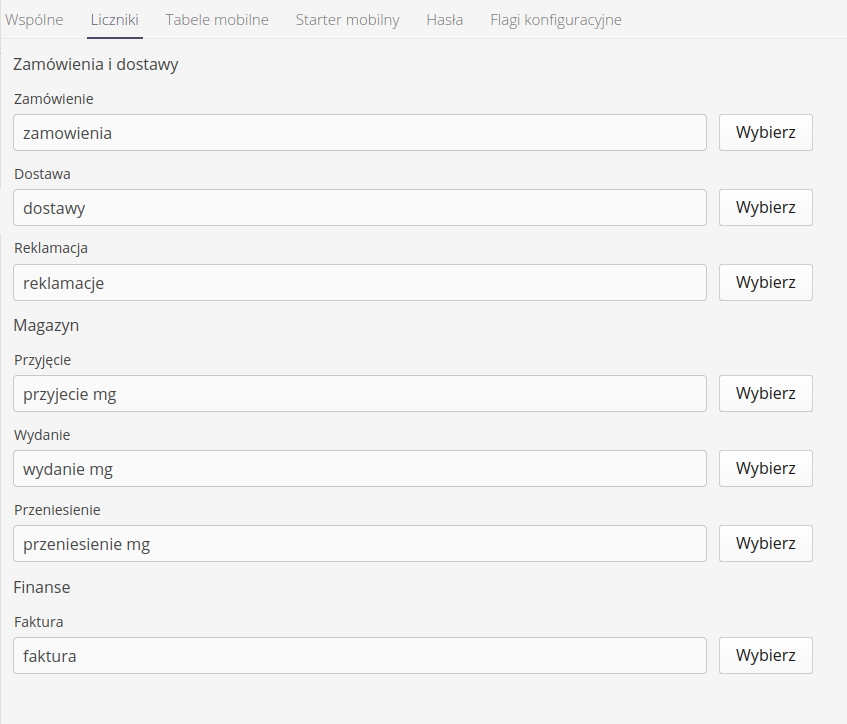
| The counter settings are used for document generation, where the user chooses to automatically assign consecutive document numbers. |
Mobile tables
The configuration of mobile tables can be adjusted in each instance separately. Due to the small amount of space in the mobile interface (especially on phone-type devices), it is not possible to present all the data in the lists available in this interface. Each instance of the system may also have different needs for showing data. For example, one instance may use type order numbers and another may not. In the former case, it is important to show this number in the interface (in the list) and in the latter it is not necessarily so.
By default, the system, if it does not have a mobile table view configured, presents the following items in such a table.
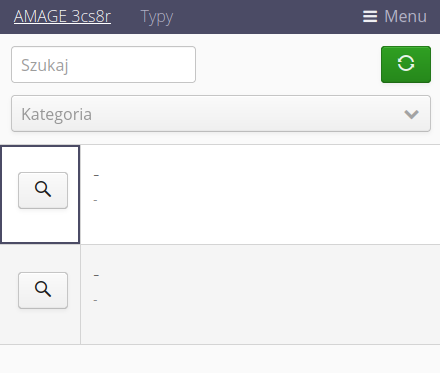
In the system configuration section, there is a Mobile Tables tab and there you can configure the views for the various lists available in the mobile interface.
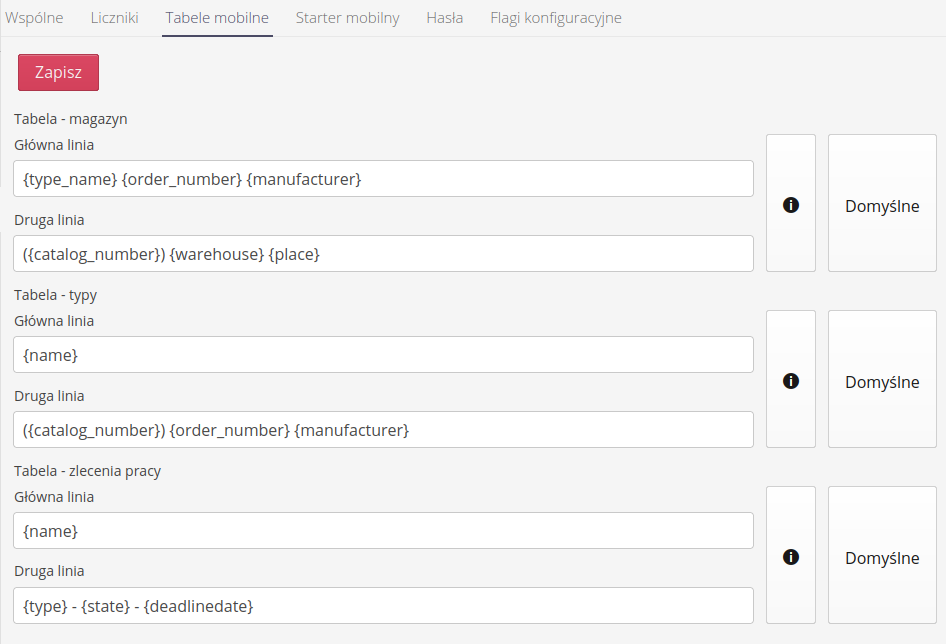
Each list has two lines - a main line and a secondary line. Each of them can be separately configured using fields for entering your own words and keywords (eng. placeholder) in which the system will enter the relevant parameters of the object. In this way we can freely configure the visibility of information.
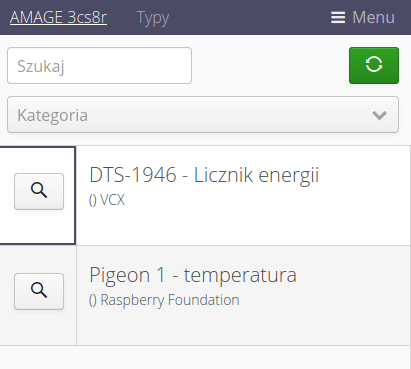
An example view of the types already after the default configuration:
Mobile starter
The mobile application has the ability to enable the start panel when launching this application. The system allows you to freely configure the available buttons and actions provided there. Using this view and tab, we can configure any view.
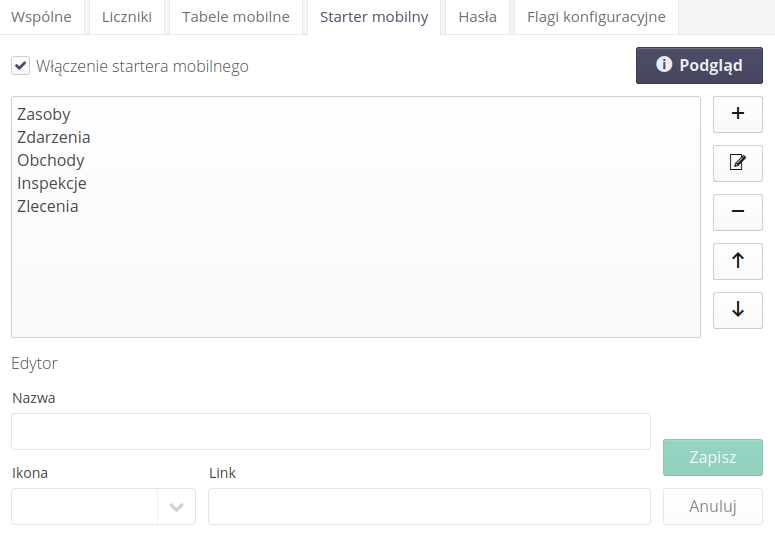
When the Enable Mobile Starter action is enabled, it will be used as the starting point for the application. Once you enter and select the application name in the top corner of the mobile view, the system will go to this view and allow you to quickly navigate to the selected actions.
To define any action, you need to add a new item, enter the text you want to display, select an icon and specify the address to which the system will be redirected when you select this action.
This approach allows any view configuration taking into account even additional filters and settings i.e. we don’t have to go to the general view of work orders but we can immediately use such a button to go to work orders that are in Scheduled state. To do this in a web browser we go to the mobile view (see the general initial instructions on how to force a mobile view), then go to the view we want to pin to the button, set all the filters and copy the final part of the address as in the example below.

Using the Preview button, we can display the configured starter buttons as they will be presented in the mobile application.
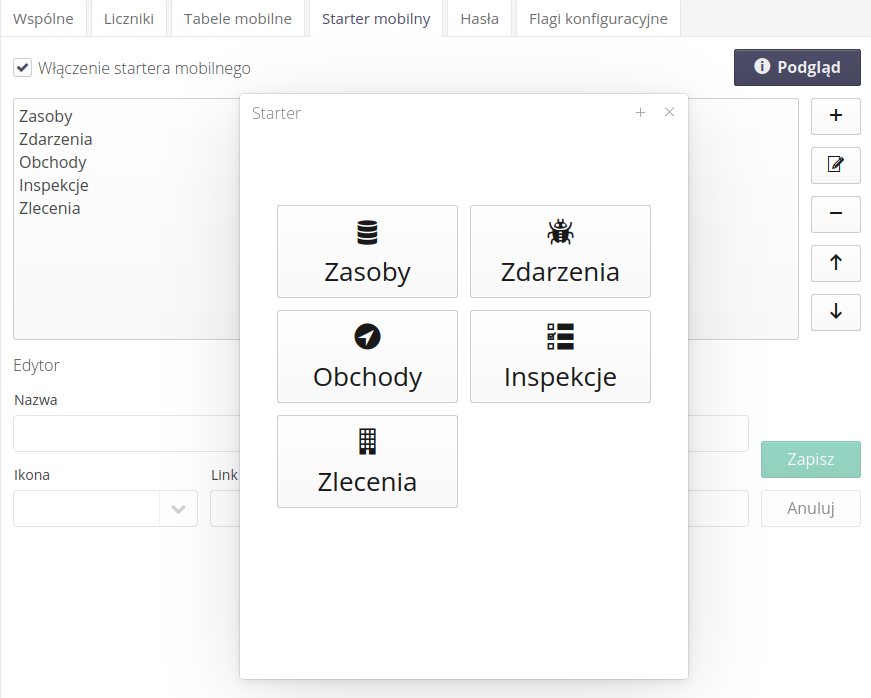
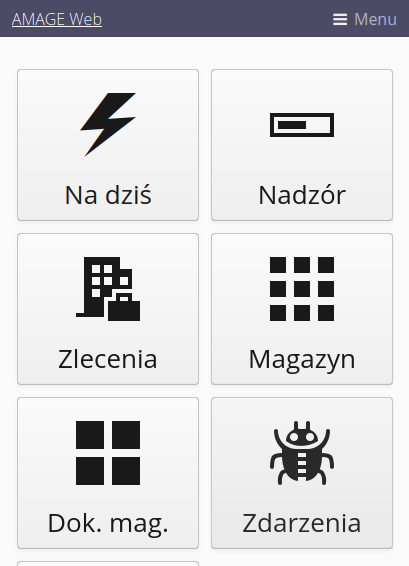
After activating such options, the starter may present itself as follows:
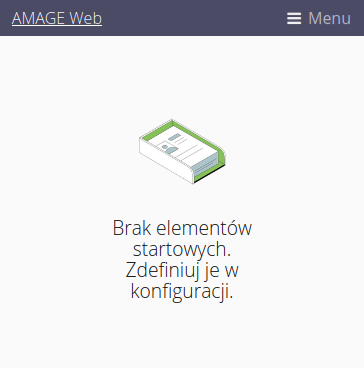
If we enable the starter but do not define any tile, the default view will appear with information about the lack of startup elements.
Security
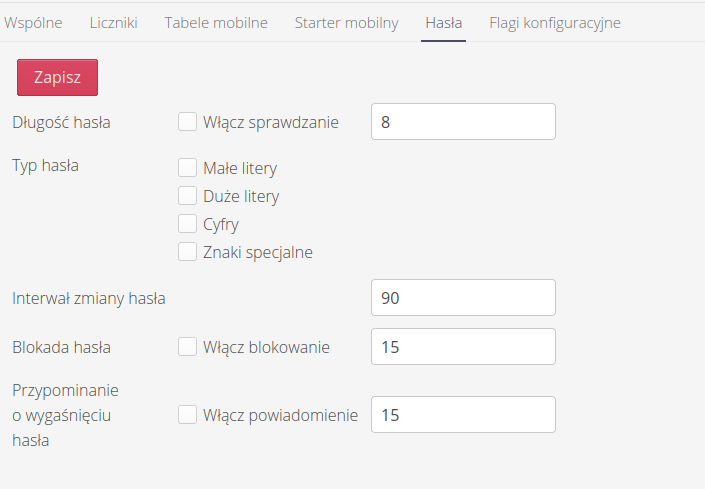
The system allows you to define a password policy for local users. After going to the configuration view and selecting the Passwords tab, we can set the password security policy. By default, the policy is disabled which allows the user to set any password.
Available options:
-
Password length - minimum password length
-
Password type - types of characters that must occur in the password (upper/lower case, etc.).
-
Password change interval - every how many days the password must be changed
-
Password lockout - after how many days after the password change interval, the account will be locked if you do not change your password
-
Password expiration reminder - how many days before the password change interval expires, a reminder should be sent to the user to change the password.
| A locked account can be unlocked by an administrative user, who will set a new password and login settings in the configuration interface. |
| The password policy applies only to local users who authorize using passwords stored locally in the AMAGE database. It does not apply to corporate users who authorize themselves in external systems such as Active Directory/LDAP. |
In the case of systems that have the ability to log in using corporate accounts enabled, e.g. via Azure Entra ID, we can define additional behavior in the section regarding corporate login.
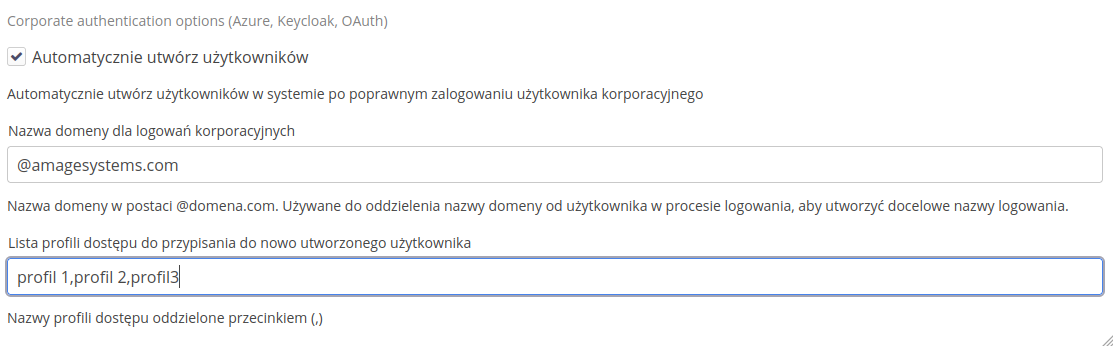
Available options:
-
automatically create users - only for corporate accounts. After successful logging in, a default user is created in the remote system without any other permissions except the ability to log in to the system. This makes it easier to configure users later.
-
domain name for corporate logins - when provided, the username in the AMAGE system will be the name sent by the authorization system, omitting the provided domain. If the user logs in as admin.test@domain.com, then if the domain is configured as @domain.com, the user will be entered in the system with the login
admin.test. -
list of access profiles. List of access profiles separated by a comma. These profiles will be assigned to the newly created user.
Configuration flags
Configuration flags allow you to set specific system behavior for individual modules. Usually these settings are enabled during the initial implementation of the system and determine how functions behave in the system, e.g. whether electronic signatures are required during delivery checks. Using this view, we can also determine the visibility of certain sections in the system (hide if they are not used in a particular case, for example).
| The settings should be treated as a significant change in the behavior of the application, and it is advisable to approach changes to these settings with appropriate caution, as they can change both the behavior of the application and also increase/decrease the visibility of data on the system for certain users. |
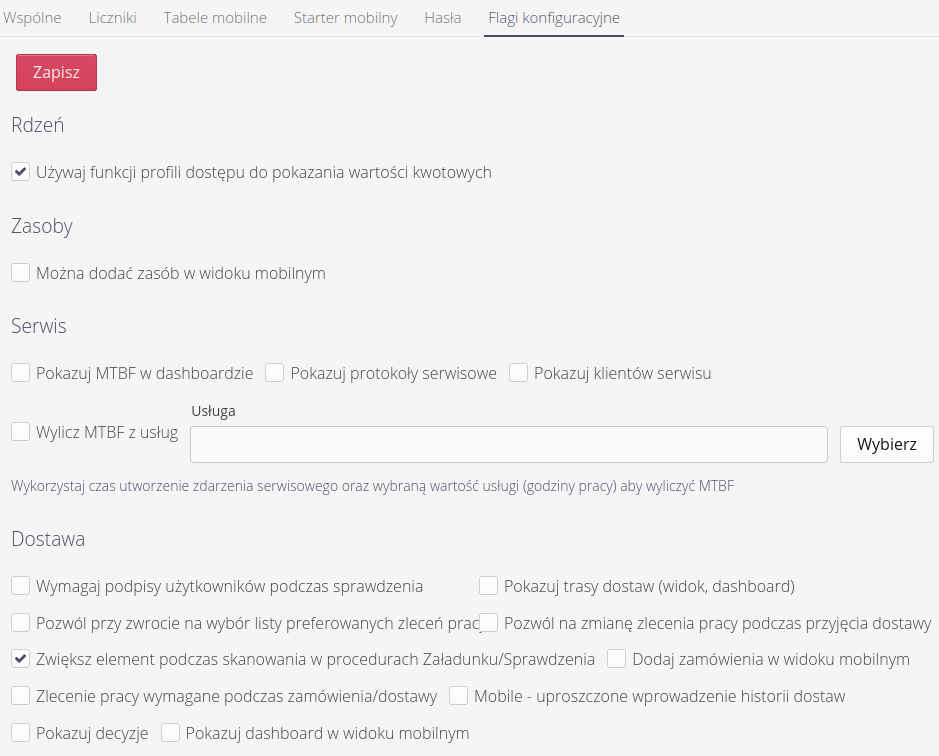
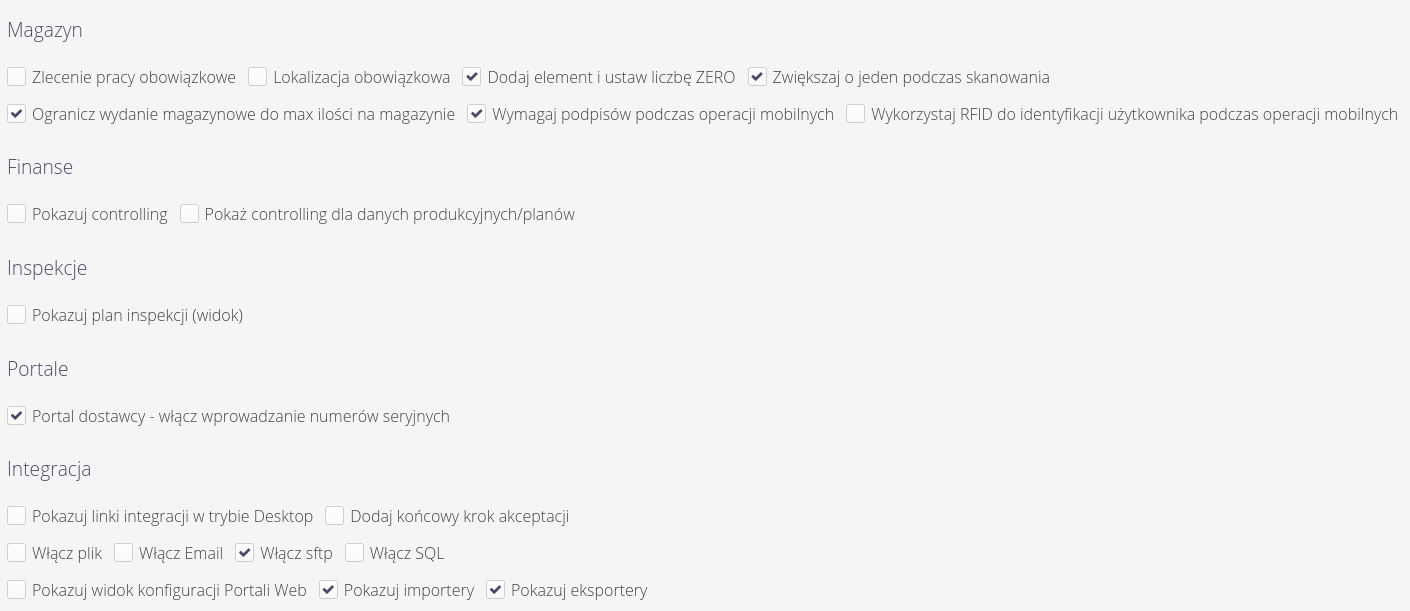
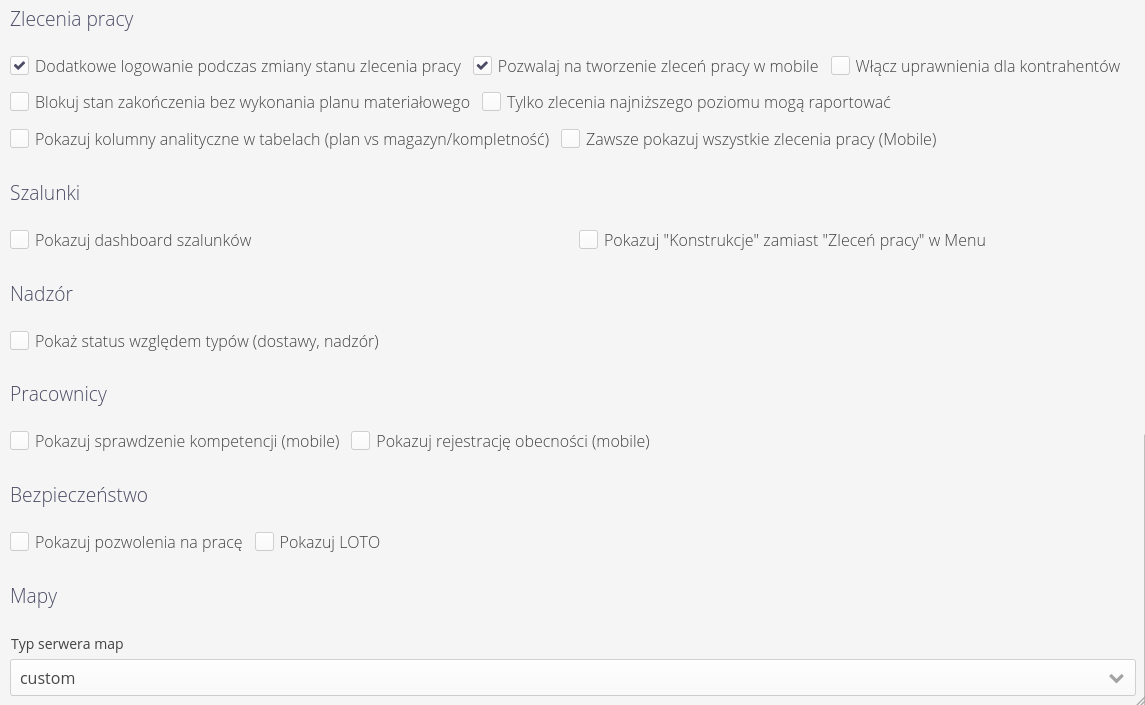
Konfiguracja menu
Zakładka Konfiguracja menu pozwala administratorowi określić, które pozycje menu są widoczne dla użytkowników oraz w jakiej kolejności są wyświetlane. Konfiguracja dotyczy dwóch interfejsów i podzielona jest na dwie sekcje:
-
Wpisy menu desktop - pozycje menu głównego interfejsu desktop,
-
Wpisy menu mobilnego - pozycje menu interfejsu mobilnego (aplikacja AMAGE Shell / widok mobilny).
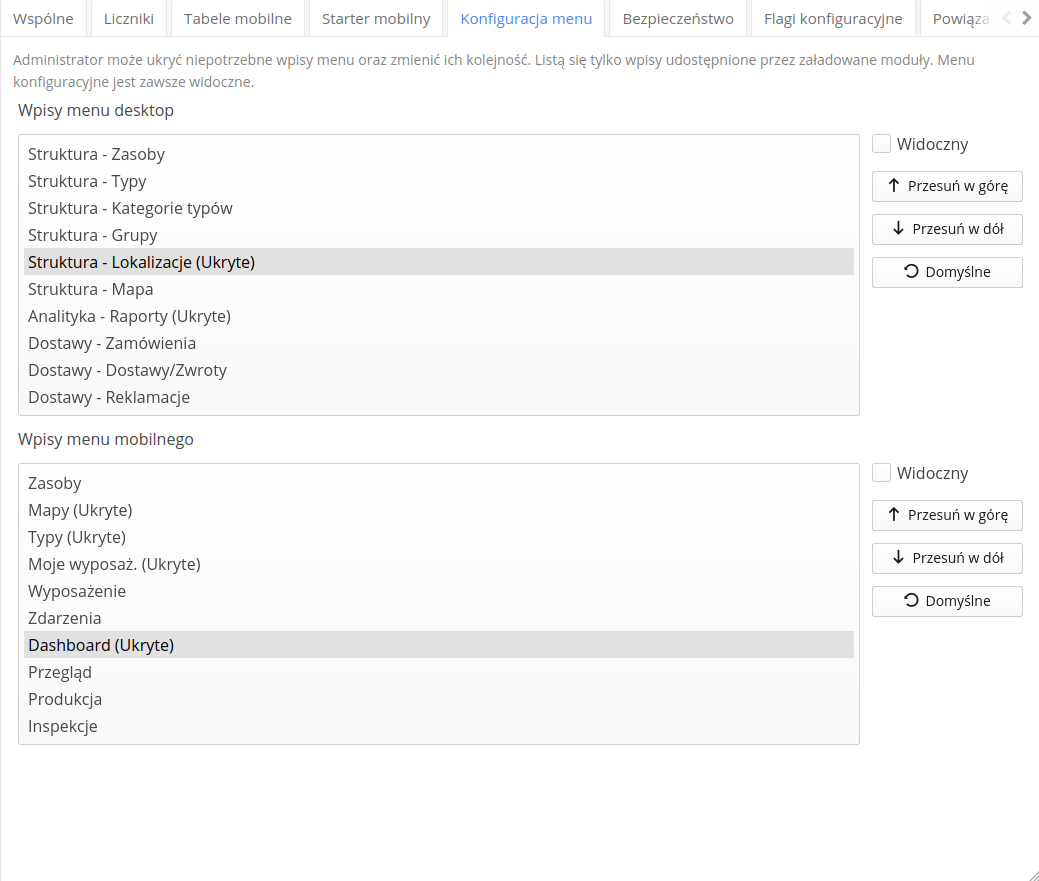
Na liście każdej sekcji prezentowane są wyłącznie pozycje udostępniane przez załadowane moduły danej instancji. Pozycje ukryte oznaczone są dopiskiem (Ukryte). Po wybraniu pozycji z listy dostępny jest panel sterowania:
-
Widoczny - checkbox włączający/wyłączający widoczność wybranej pozycji menu,
-
Przesuń w górę / Przesuń w dół - zmiana kolejności wyświetlania pozycji,
-
Domyślne - przywrócenie domyślnej widoczności i kolejności (skasowanie nadpisań) dla całej sekcji.
Ustawienia zapisywane są w konfiguracji systemu per instancja, więc każda instancja może mieć inny układ menu. Dotyczą one odpowiednio menu desktop (widok MainViewDesktop) i menu mobilnego (widok MainViewMobile).
| Listą są tylko pozycje, które dany moduł faktycznie udostępnia. Jeśli moduł przestanie być dostępny, nadpisanie takiej pozycji jest odrzucane przy zapisie. |
| Pozycje administracyjne oraz samo menu konfiguracyjne nigdy nie są ukrywane - nawet przy błędnej konfiguracji administrator zawsze zachowa dostęp do konfiguracji systemu. |
File extensions
In the File extensions tab we have the possibility of defining additional extensions for supported data formats. We can use this interface to add new, self-defined extensions to the already supported types of extensions. For example, adding the extension "abc" to the type "Text files" will allow you to upload a file with such an extension and categorize it as a text file. This will allow you to use the internal file browser to display such a file.
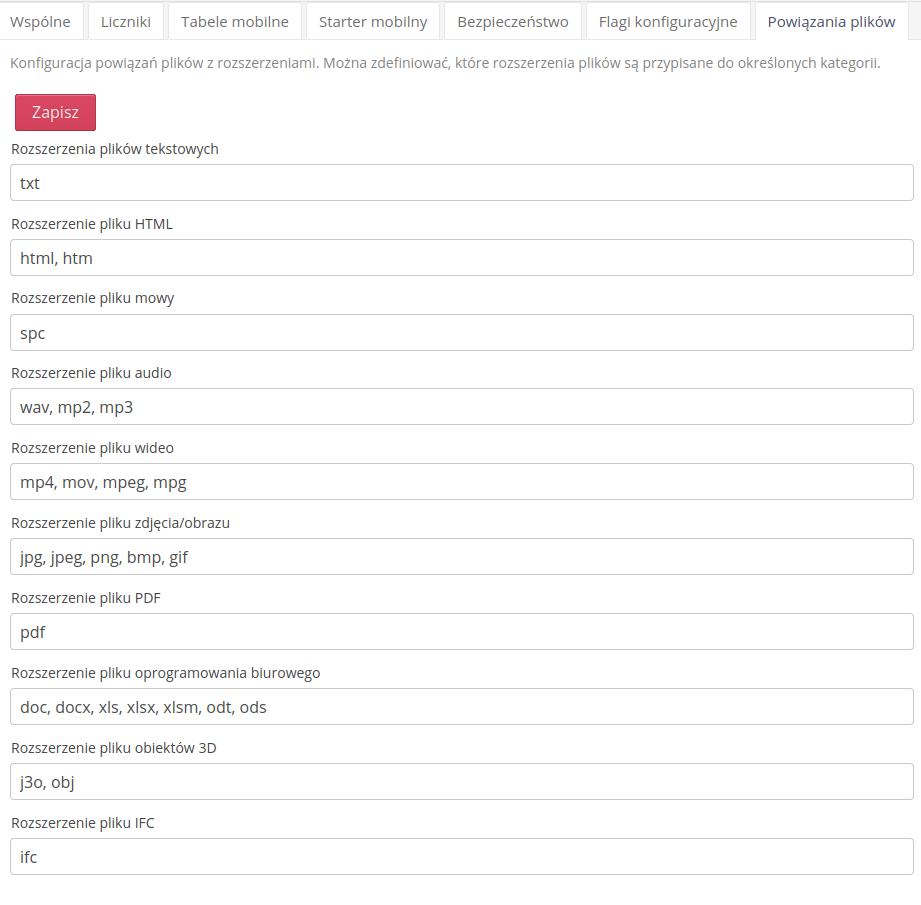
Extensions defined here are treated as additional extensions for a given file type. Existing, built-in extensions are still supported by the system, e.g. a text file is always a file with the extension .txt.
|
Uprawnienia dla rekordów - edycja grup użytkowników
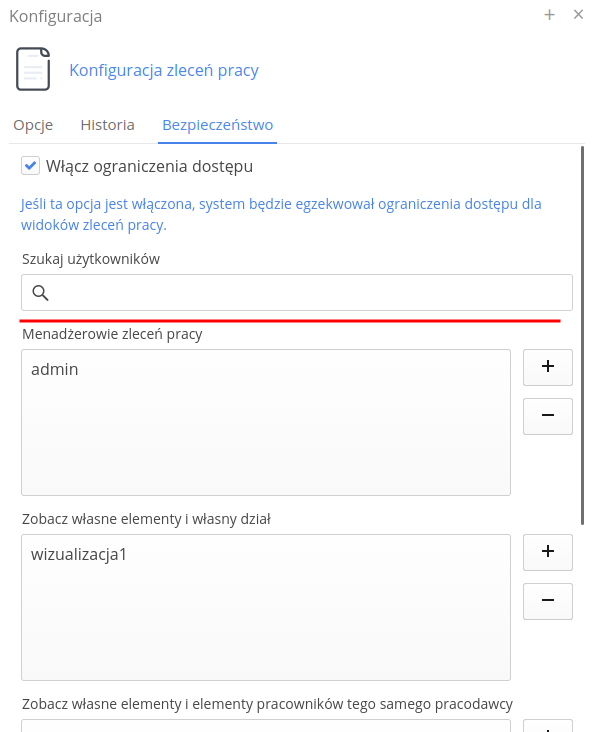
W miejscach, w których system pozwala ograniczyć dostęp do pojedynczych rekordów (np. Bezpieczeństwo w konfiguracji zleceń pracy, konfiguracji zdarzeń serwisowych, konfiguracji klientów czy najemów), definiujemy grupy użytkowników decydujące o zakresie dostępu. Edycja tych grup została znacząco usprawniona:
-
użytkownicy na listach poszczególnych grup sortowani są domyślnie po nazwisku (rosnąco),
-
na górze dialogu dostępne jest jedno wspólne pole
Szukaj użytkowników- wpisanie tekstu filtruje wszystkie listy grup jednocześnie (po nazwisku, imieniu, loginie i pełnej nazwie), -
użytkownika można przenosić pomiędzy grupami metodą przeciągnij i upuść (drag & drop),
-
ten sam użytkownik może należeć tylko do jednej grupy - dodanie go do jednej grupy (również przyciskiem
+w panelu grupy) automatycznie usuwa go z pozostałych grup. Eliminuje to sytuacje, w których ta sama osoba miała sprzeczne zakresy uprawnień.
Grupie odpowiadają typy dostępu takie jak np. menedżerowie danego obszaru, podgląd własnych elementów i własnego działu czy podgląd elementów pracowników tego samego pracodawcy (szczegóły zależą od modułu).
Odświeżenie uprawnień po zapisie konfiguracji
Zmiany konfiguracji systemu (w tym ustawień, profili i flag konfiguracyjnych) są automatycznie odświeżane w sesjach aktywnych użytkowników. Po zapisaniu zmian w sekcji konfiguracyjnej uprawnienia i parametry są ponownie ładowane dla zalogowanych użytkowników, co oznacza, że zmiany stają się widoczne bez konieczności ponownego logowania.